Ibrahim Dogan - Advanced PIC Microcontroller Projects in C
Здесь есть возможность читать онлайн «Ibrahim Dogan - Advanced PIC Microcontroller Projects in C» весь текст электронной книги совершенно бесплатно (целиком полную версию без сокращений). В некоторых случаях можно слушать аудио, скачать через торрент в формате fb2 и присутствует краткое содержание. Город: Burlington, Год выпуска: 2008, ISBN: 2008, Издательство: Elsevier Ltd, Жанр: Программирование, Компьютерное железо, на английском языке. Описание произведения, (предисловие) а так же отзывы посетителей доступны на портале библиотеки ЛибКат.
- Название:Advanced PIC Microcontroller Projects in C
- Автор:
- Издательство:Elsevier Ltd
- Жанр:
- Год:2008
- Город:Burlington
- ISBN:978-0-7506-8611-2
- Рейтинг книги:5 / 5. Голосов: 1
-
Избранное:Добавить в избранное
- Отзывы:
-
Ваша оценка:
Advanced PIC Microcontroller Projects in C: краткое содержание, описание и аннотация
Предлагаем к чтению аннотацию, описание, краткое содержание или предисловие (зависит от того, что написал сам автор книги «Advanced PIC Microcontroller Projects in C»). Если вы не нашли необходимую информацию о книге — напишите в комментариях, мы постараемся отыскать её.
• Features 20 complete, tried and test projects
• Includes a CD-ROM of all the programs, hex listings, diagrams, and data sheets
Advanced PIC Microcontroller Projects in C — читать онлайн бесплатно полную книгу (весь текст) целиком
Ниже представлен текст книги, разбитый по страницам. Система сохранения места последней прочитанной страницы, позволяет с удобством читать онлайн бесплатно книгу «Advanced PIC Microcontroller Projects in C», без необходимости каждый раз заново искать на чём Вы остановились. Поставьте закладку, и сможете в любой момент перейти на страницу, на которой закончили чтение.
Интервал:
Закладка:
LVP_OFF_4L
ICPRT_OFF_4L
XINST_OFF_4L
DEBUG_OFF_4L
Testing the Project
Testing the project is relatively easy. The steps are:
• Construct the hardware
• Load the program (Figure 8.22) into the PIC18F4550 microcontroller
• Copy or run the PC-based Visual Basic program
When the microcontroller is connected to one of the USB ports of the PC, a message should be visible at the bottom right-hand corner of the screen similar to the one in Figure 8.25. This message shows that the new USB HID device has been plugged in and is recognized by the PC.
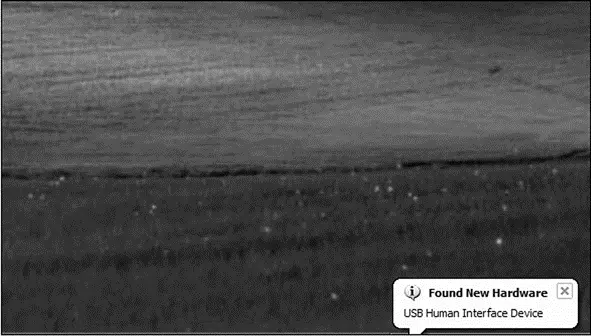
Figure 8.25: USB connection message
In addition, the device manager display should show an HID-compliant device and a USB human interface device as in Figure 8.26. The properties of these drivers can be displayed to make sure the VIP is 0x1234 and the PID is 1.
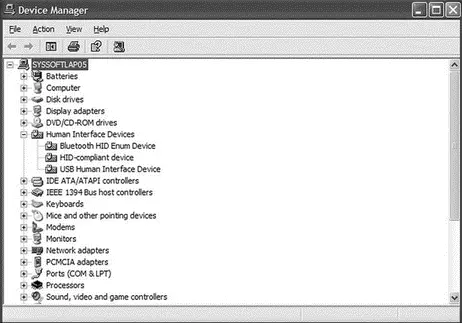
Figure 8.26: Device manager display showing the USB devices
Enter data into the Visual Basic form and click the CLICK TO SEND button. The corresponding microcontroller LEDs should turn on. For example, entering 3 should turn on LEDs 0 and 1.
Using a USB Protocol Analyzer
If for any reason the project is not working, a USB protocol analyzer can be used to check the data transactions on the USB bus. There are many USB protocol analyzers on the market. Some expensive professional ones are hardware-based and require the purchase of special hardware. Most low-cost USB protocol analyzers are software-based. Two such tools are described here briefly.
UVCView is a free Microsoft product that runs on a PC and displays the descriptors of a USB device after it is plugged in. Figure 8.27 shows the UVCView display after the microcontroller is plugged into the PC. The left side of the display shows the USB ports available in the system. Clicking on a device in this part of the display shows descriptor details of the device in the middle of the screen. In Figure 8.27 the descriptors of our device are shown. The UVCView display is useful when various fields of the device descriptors must be checked.
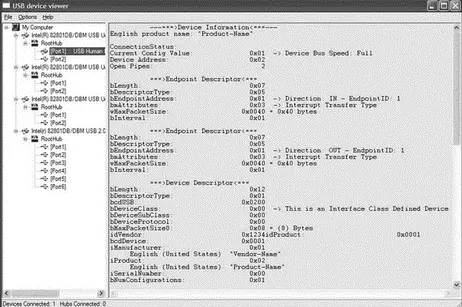
Figure 8.27: UVCView display of the project
USBTrace is a software USB protocol analyzer developed by SysNucleus (www.sysnucleus.com) and runs on a PC. The software monitors the USB ports of the PC it is running on and displays all the transactions on the bus. This software can be an invaluable tool when all the transactions on the line must be monitored and logged.
A limited-time demo version of USBTrace is available on the manufacturer’s web site. An example using the program is given in this section to show the data sent from the PC to the microcontroller:
• Start the USBTrace program.
• Connect the microcontroller to the USB port of the PC.
• Select the device from the left side of the display by checking the appropriate box.
• Start the Visual Basic program.
• Start capturing data by clicking the green arrow at the top left of the USBTrace menu. You should see the START OF LOG message in the middle part of the screen
• Enter number 3 on the Visual Basic form to turn on LEDs 0 and 1 of PORTB, and click the CLICK TO SEND button.
• You should see data packets in the middle of the screen as shown in Figure 8.28.
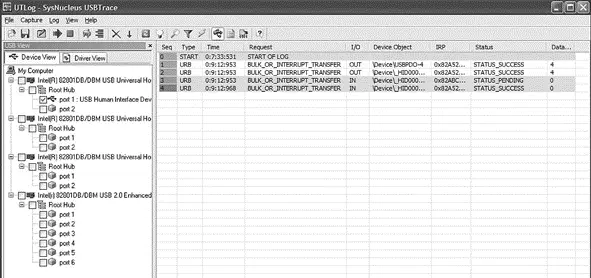
Figure 8.28: Transactions on the bus when CLICK TO SEND is clicked
• Move the cursor over the first packet. This is the packet sent from the PC to the microcontroller (OUT packet). A pop-up window will appear, and information about this packet will be displayed, with the data sent appearing in hexadecimal at the bottom of the display, as shown in Figure 8.29. Note that the data consists of the following 4 bytes:
50 3D 03 54
P = 3 T
which correspond to the ASCII string P=3T. This is the actual packet sent from the PC to the microcontroller.
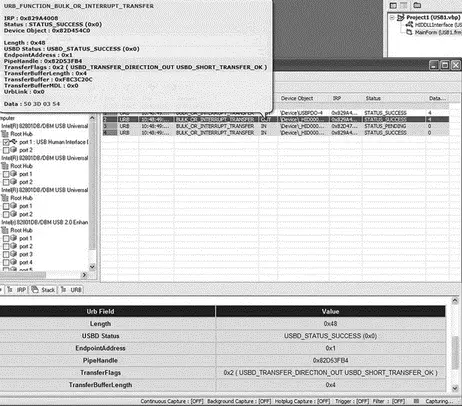
Figure 8.29: Displaying contents of the packet
USBTrace can also display the device descriptors in detail, as shown in the lower part of the screen in Figure 8.29.
Using the HID Terminal of mikroC
The mikroC IDE provides a USB terminal interface that can be used for sending and receiving data over the USB bus. This program can be used instead of the Visual Basic program to test the USB interface. The steps are as follows:
• In mikroC IDE, Select Tools→HID Terminal
• Plug the microcontroller into the PC’s USB port
• You should see the product ID under HID Devices:
○ To turn on LEDs 0,1,4, and 5, type P=3T under Communication and click the SEND button as shown in Figure 8.30 (remember that the ASCII value of number 3 has the bit pattern “0011 0011”)
○ LEDs 0,1,4, and 5 of the microcontroller should turn on
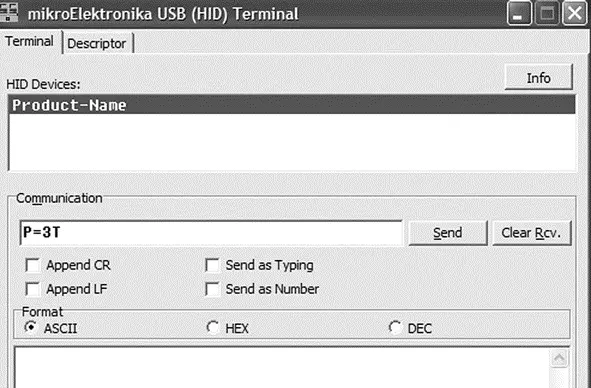
Figure 8.30: Using the HID terminal to send data to a USB device
PROJECT 8.2 — USB-Based Microcontroller Input/Output
This project is very similar to Project 8.1, except that it includes two-way communication, while in Project 8.1 data to be output on PORTB was sent to the microcontroller. In addition, PORTB data is received from the microcontroller and displayed on the PC.
The PC sends two commands to the microcontroller:
• Command P=nT requests the microcontroller to send data byte n to PORTB.
• Command P=?? requests the microcontroller to read its PORTB data and send it as a byte to the PC. The PC then displays this data on the screen. The microcontroller sends its data in the familiar format P=nT.
The hardware of this project is the same as the hardware for the previous project, shown in Figure 8.11, where eight LEDs are connected to PORTB of a PIC18F4550 microcontroller which is operated from a 8MHz crystal.
A single form is used in this project, and Figure 8.31 shows the format of this form. The upper part of the form is the same as in Project 8.1, i.e., sending data to PORTB of the microcontroller. A text box and a command button named CLICK TO RECEIVE are also placed on the form. When the button is pressed, the PC sends command P=?? to the microcontroller. The microcontroller reads its PORTB data and sends it in the format P=nT to the PC where it is displayed in the text box.
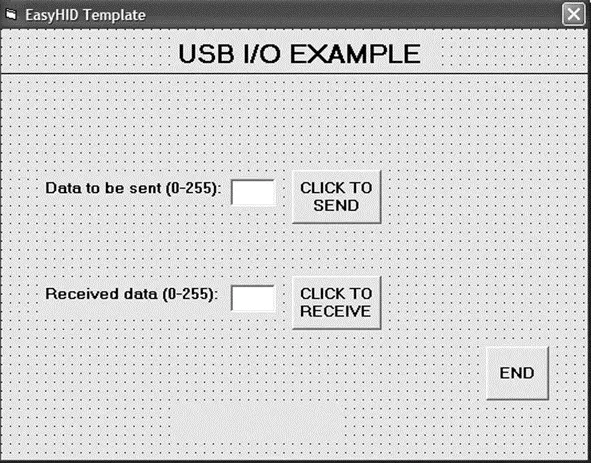
Figure 8.31: Visual Basic form of the project
Figure 8.32 shows the mikroC program of the project. The program is named USB2.C and is very similar to the one for the previous project. But here, in addition, when the command P=?? is received from the PC, the microcontroller reads PORTB data and sends it to the PC in the format using the mikroC function Hid_Write .
Читать дальшеИнтервал:
Закладка:
Похожие книги на «Advanced PIC Microcontroller Projects in C»
Представляем Вашему вниманию похожие книги на «Advanced PIC Microcontroller Projects in C» списком для выбора. Мы отобрали схожую по названию и смыслу литературу в надежде предоставить читателям больше вариантов отыскать новые, интересные, ещё непрочитанные произведения.


Обсуждение, отзывы о книге «Advanced PIC Microcontroller Projects in C» и просто собственные мнения читателей. Оставьте ваши комментарии, напишите, что Вы думаете о произведении, его смысле или главных героях. Укажите что конкретно понравилось, а что нет, и почему Вы так считаете.