Mark Murphy - Beginning Android
Здесь есть возможность читать онлайн «Mark Murphy - Beginning Android» весь текст электронной книги совершенно бесплатно (целиком полную версию без сокращений). В некоторых случаях можно слушать аудио, скачать через торрент в формате fb2 и присутствует краткое содержание. Город: New York, Год выпуска: 2009, ISBN: 2009, Издательство: Apress, Жанр: Программирование, на английском языке. Описание произведения, (предисловие) а так же отзывы посетителей доступны на портале библиотеки ЛибКат.

- Название:Beginning Android
- Автор:
- Издательство:Apress
- Жанр:
- Год:2009
- Город:New York
- ISBN:978-1-4302-2420-4
- Рейтинг книги:3 / 5. Голосов: 1
-
Избранное:Добавить в избранное
- Отзывы:
-
Ваша оценка:
Beginning Android: краткое содержание, описание и аннотация
Предлагаем к чтению аннотацию, описание, краткое содержание или предисловие (зависит от того, что написал сам автор книги «Beginning Android»). Если вы не нашли необходимую информацию о книге — напишите в комментариях, мы постараемся отыскать её.
Dear Reader,
First, welcome to the world of Android! We’re entering a new era of mobile application development, one marked by open platforms and open source, to take ‘walled gardens’ and make them green houses for any and all to participate in. Android is relatively easy for developers, and I believe that this innovation will help generate a large ecosystem of developers and consumers within a very short time. This means that budding developers such as yourself will have many opportunities to design and build your own applications and you’ll have a huge and hungry customer base.
Second, welcome to the book! Its purpose is to start you on your way with building Android applications, and to help you master the learning curve. Android is already a rich framework, comparable in many ways to the richness Android of desktop Java environments. This means that there is a lot of cool stuff for you to pick up along your journey in order to create the slickest, most useful apps Android you can imagine.
The source code for the code samples in this book is all available from the Apress site, so you can stay as hands-on and practical as you like while I introduce you to the core of Android, and invite you to experiment with the various classes and APIs we’ll be looking at. By the time you’ve finished this book, you’ll be creating your own Android applications and asking yourself what your next great application will be…!
Enjoy! Mark Murphy
Beginning Android — читать онлайн бесплатно полную книгу (весь текст) целиком
Ниже представлен текст книги, разбитый по страницам. Система сохранения места последней прочитанной страницы, позволяет с удобством читать онлайн бесплатно книгу «Beginning Android», без необходимости каждый раз заново искать на чём Вы остановились. Поставьте закладку, и сможете в любой момент перейти на страницу, на которой закончили чтение.
Интервал:
Закладка:
The Pieces
There are a few widgets and containers you need to use in order to set up a tabbed portion of a view:
• TabHostis the overarching container for the tab buttons and tab contents.
• TabWidgetimplements the row of tab buttons, which contain text labels and optionally contain icons.
• FrameLayoutis the container for the tab contents; each tab content is a child of the FrameLayout.
This is similar to the approach that Mozilla’s XUL takes. In XUL’s case, the tabboxelement corresponds to Android’s TabHost, the tabs element corresponds to TabWdget, and tabpanelscorresponds to the FrameLayout.
The Idiosyncrasies
There are a few rules to follow, at least in this milestone edition of the Android toolkit, in order to make these three work together:
• You mus t give the TabWidgetan android:idof @android:id/tabs.
• You must set aside some padding in the FrameLayoutfor the tab buttons.
• If you wish to use the TabActivity, you must give the TabHostan android:idof @android:id/tabhost.
TabActivity, like ListActivity, wraps a common UI pattern (activity made up entirely of tabs) into a pattern-aware activity subclass. You do not necessarily have to use TabActivity— a plain activity can use tabs as well.
With respect to the FrameLayoutpadding issue, for whatever reason, the TabWidgetdoes not seem to allocate its own space inside the TabHostcontainer. In other words, no matter what you specify for android:layout_height for the TabWidget, the FrameLayoutignores it and draws at the top of the overall TabHost. Your tab contents obscure your tab buttons. Hence, you need to leave enough padding (via android:paddingTop) in FrameLayoutto “shove” the actual tab contents down beneath the tab buttons.
In addition, the TabWidgetseems to always draw itself with room for icons, even if you do not supply icons. Hence, for this version of the toolkit, you need to supply at least 62 pixels of padding, perhaps more depending on the icons you supply.
For example, here is a layout definition for a tabbed activity, from Fancy/Tab:
android:orientation="vertical"
android:layout_width="fill_parent"
android:layout_height="fill_parent">
android:layout_width="fill_parent"
android:layout_height="fill_parent">
android:layout_width="fill_parent"
android:layout_height="wrap_content"
/>
android:layout_width="fill_parent"
android:layout_height="fill_parent"
android:paddingTop="62px">
android:layout_width="fill_parent"
android:layout_height="fill_parent"
android:layout_centerHorizontal="true"
/>
android:layout_width="fill_parent"
android:layout_height="fill_parent"
android:text="A semi-random button"
/>
Note that the TabWidgetand FrameLayoutare immediate children of the TabHost, and the FrameLayoutitself has children representing the various tabs. In this case, there are two tabs: a clock and a button. In a more complicated scenario, the tabs are probably some form of container (e.g., LinearLayout) with their own contents.
Wiring It Together
The Java code needs to tell the TabHostwhat views represent the tab contents and what the tab buttons should look like. This is all wrapped up in TabSpecobjects. You get a TabSpecinstance from the host via newTabSpec(), fill it out, then add it to the host in the proper sequence.
The two key methods on TabSpecare:
• setContent(), where you indicate what goes in the tab content for this tab, typically the android:idof the view you want shown when this tab is selected
• setIndicator(), where you provide the caption for the tab button and, in some flavors of this method, supply a Drawableto represent the icon for the tab
Note that tab “indicators” can actually be views in their own right, if you need more control than a simple label and optional icon.
Also note that you must call setup()on the TabHostbefore configuring any of these TabSpecobjects. The call to setup()is not needed if you are using the TabActivitybase class for your activity.
For example, here is the Java code to wire together the tabs from the preceding layout example:
packagecom.commonsware.android.fancy;
importandroid.app.Activity;
importandroid.os.Bundle;
importandroid.widget.TabHost;
public classTabDemo extendsActivity {
@Override
publicvoid onCreate(Bundle icicle) {
super. onCreate(icicle);
setContentView(R.layout.main);
TabHost tabs = (TabHost) findViewById(R.id.tabhost);
tabs. setup();
TabHost.TabSpec spec = tabs. newTabSpec(tag1);
spec. setContent(R.id.tab1);
spec. setIndicator(Clock);
tabs. addTab(spec);
spec = tabs. newTabSpec(tag2);
spec. setContent(R.id.tab2);
spec. setIndicator(Button);
tabs. addTab(spec);
tabs. setCurrentTab(0);
}
}
We find our TabHostvia the familiar findViewById()method, then have it call setup(). After that, we get a TabSpecvia newTabSpec(), supplying a tag whose purpose is unknown at this time. Given the spec, you call setContent()and setIndicator(), then call addTab()back on the TabHostto register the tab as available for use. Finally, you can choose which tab is the one to show via setCurrentTab(), providing the 0-based index of the tab.
The results can be seen in Figures 10-5 and 10-6.
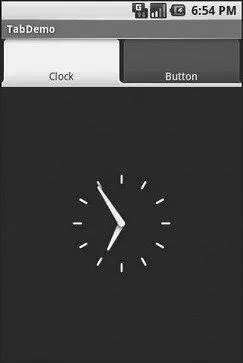
Figure 10-5. The TabDemo sample application, showing the first tab
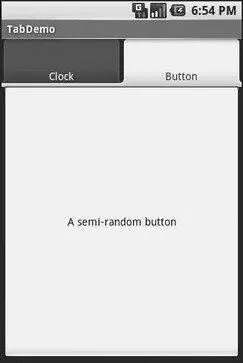
Figure 10-6. The same application, showing the second tab
Adding Them Up
TabWidgetis set up to allow you to easily define tabs at compile time. However, sometimes, you want to add tabs to your activity during runtime. For example, imagine an email client where individual emails get opened in their own tab for easy toggling between messages. In this case, you don’t know how many tabs or what their contents will be until runtime, when the user chooses to open a message.
Интервал:
Закладка:
Похожие книги на «Beginning Android»
Представляем Вашему вниманию похожие книги на «Beginning Android» списком для выбора. Мы отобрали схожую по названию и смыслу литературу в надежде предоставить читателям больше вариантов отыскать новые, интересные, ещё непрочитанные произведения.


Обсуждение, отзывы о книге «Beginning Android» и просто собственные мнения читателей. Оставьте ваши комментарии, напишите, что Вы думаете о произведении, его смысле или главных героях. Укажите что конкретно понравилось, а что нет, и почему Вы так считаете.