Olaf Kirch - Linux Network Administrator Guide, Second Edition
Здесь есть возможность читать онлайн «Olaf Kirch - Linux Network Administrator Guide, Second Edition» весь текст электронной книги совершенно бесплатно (целиком полную версию без сокращений). В некоторых случаях можно слушать аудио, скачать через торрент в формате fb2 и присутствует краткое содержание. Год выпуска: 2000, ISBN: 2000, Жанр: ОС и Сети, на английском языке. Описание произведения, (предисловие) а так же отзывы посетителей доступны на портале библиотеки ЛибКат.

- Название:Linux Network Administrator Guide, Second Edition
- Автор:
- Жанр:
- Год:2000
- ISBN:1-56592-400-2
- Рейтинг книги:3 / 5. Голосов: 1
-
Избранное:Добавить в избранное
- Отзывы:
-
Ваша оценка:
Linux Network Administrator Guide, Second Edition: краткое содержание, описание и аннотация
Предлагаем к чтению аннотацию, описание, краткое содержание или предисловие (зависит от того, что написал сам автор книги «Linux Network Administrator Guide, Second Edition»). Если вы не нашли необходимую информацию о книге — напишите в комментариях, мы постараемся отыскать её.
There are many books and other sources of information from which you can learn any of the topics covered in this book (with the possible exception of some of the truly Linux-specific features, such as the new Linux firewall interface, which is not well documented elsewhere) in greater depth. We've provided a bibliography for you to use when you are ready to explore more.
Linux Network Administrator Guide, Second Edition — читать онлайн бесплатно полную книгу (весь текст) целиком
Ниже представлен текст книги, разбитый по страницам. Система сохранения места последней прочитанной страницы, позволяет с удобством читать онлайн бесплатно книгу «Linux Network Administrator Guide, Second Edition», без необходимости каждый раз заново искать на чём Вы остановились. Поставьте закладку, и сможете в любой момент перейти на страницу, на которой закончили чтение.
Интервал:
Закладка:
# ipfwadm -F -f
# ipfwadm -F -p deny
# ipfwadm -F -a accept -P tcp -S 172.16.1.0/24 -D 0/0 80
# ipfwadm -F -a accept -P tcp -S 0/0 80 -D 172.16.1.0/24
The -F command-line argument tells ipfwadm that this is a forwarding rule. The first command instructs ipfwadm to "flush" all of the forwarding rules. This ensures we are working from a known state before we begin adding specific rules.
The second rule sets our default forwarding policy. We tell the kernel to deny or disallow forwarding of IP datagrams. It is very important to set the default policy, because this describes what will happen to any datagrams that are not specifically handled by any other rule. In most firewall configurations, you will want to set your default policy to "deny," as shown, to be sure that only the traffic you specifically allow past your firewall is forwarded.
The third and fourth rules are the ones that implement our requirement. The third command allows our datagrams out, and the fourth rule allows the responses back.
Let's review each of the arguments:
- F
This is a Forwarding rule.
- a accept
Append this rule with the policy set to "accept," meaning we will forward any datagrams that match this rule.
- P tcp
This rule applies to tcp datagrams (as opposed to UDP or ICMP).
- S 172.16.1.0/24
The Source address must have the first 24 bits matching those of the network address 172.16.1.0.
- D 0/0 80
The destination address must have zero bits matching the address 0.0.0.0. This is really a shorthand notation for "anything." The 80 is the destination port, in this case WWW. You may also use any entry that appears in the /etc/services file to describe the port, so -D 0/0 www would have worked just as well.
ipfwadm accepts network masks in a form with which you may not be familiar. The /nn notation is a means of describing how many bits of the supplied address are significant, or the size of the mask. The bits are always counted from left to right; some common examples are listed in Table 9.1.
Table 9.1: Common Netmask Bit Values
| Netmask | Bits |
|---|---|
| 255.0.0.0 | 8 |
| 255.255.0.0 | 16 |
| 255.255.255.0 | 24 |
| 255.255.255.128 | 25 |
| 255.255.255.192 | 26 |
| 255.255.255.224 | 27 |
| 255.255.255.240 | 28 |
| 255.255.255.248 | 29 |
| 255.255.255.252 | 30 |
We mentioned earlier that ipfwadm implements a small trick that makes adding these sorts of rules easier. This trick is an option called -b , which makes the command a bidirectional rule.
The bidirectional flag allows us to collapse our two rules into one as follows:
# ipfwadm -F -a accept -P tcp -S 172.16.1.0/24 -D 0/0 80 -b
An important refinement
Take a closer look at our ruleset. Can you see that there is still one method of attack that someone outside could use to defeat our firewall?
Our ruleset allows all datagrams from outside our network with a source port of 80 to pass. This will include those datagrams with the SYN bit set! The SYN bit is what declares a TCP datagram to be a connection request. If a person on the outside had privileged access to a host, they could make a connection through our firewall to any of our hosts, provided they use port 80 at their end. This is not what we intended.
Fortunately there is a solution to this problem. The ipfwadm command provides another flag that allows us to build rules that will match datagrams with the SYN bit set. Let's change our example to include such a rule:
# ipfwadm -F -a deny -P tcp -S 0/0 80 -D 172.16.10.0/24 -y
# ipfwadm -F -a accept -P tcp -S 172.16.1.0/24 -D 0/0 80 -b
The -y flag causes the rule to match only if the SYN flag is set in the datagram. So our new rule says: "Deny any TCP datagrams destined for our network from anywhere with a source port of 80 and the SYN bit set," or "Deny any connection requests from hosts using port 80."
Why have we placed this special rule before the main rule? IP firewall rules operate so that the first match is the rule that is used. Both rules would match the datagrams we want to stop, so we must be sure to put the deny rule before the accept rule.
Listing our rules
After we've entered our rules, we ask ipfwadm to list them for us using the command:
# ipfwadm -F -l
This command will list all of the configured forwarding rules. The output should look something like this:
# ipfwadm -F -l
IP firewall forward rules, default policy: accept
type prot source destination ports
deny tcp anywhere 172.16.10.0/24 www -> any
acc tcp 172.16.1.0/24 anywhere any -> www
The ipfwadm command will attempt to translate the port number into a service name using the /etc/services if an entry exists there.
The default output is lacking in some important detail for us. In the default listing output, we can't see the effect of the -y argument. The ipfwadm command is able to produce a more detailed listing output if you specify the -e (extended output) argument too. We won't show the whole output here because it is too wide for the page, but it includes an opt (options) column that shows the -y option controlling SYN packets:
# ipfwadm -F -l -e
P firewall forward rules, default policy: accept
pkts bytes type prot opt tosa tosx ifname ifaddress source ...
0 0 deny tcp --y- 0xFF 0x00 any any anywhere ...
0 0 acc tcp b--- 0xFF 0x00 any any 172.16.1.0/24 ...
A More Complex Example
The previous example was a simple one. Not all network services are as simple as the WWW service to configure; in practice, a typical firewall configuration would be much more complex. Let's look at another common example, this time FTP. We want our internal network users to be able to log into FTP servers on the Internet to read and write files. But we don't want people on the Internet to be able to log into our FTP servers.
We know that FTP uses two TCP ports: port 20 (ftp-data) and port 21 (ftp), so:
# ipfwadm -a deny -P tcp -S 0/0 20 -D 172.16.1.0/24 -y
# ipfwadm -a accept -P tcp -S 172.16.1.0/24 -D 0/0 20 -b
#
# ipfwadm -a deny -P tcp -S 0/0 21 -D 172.16.1.0/24 -y
# ipfwadm -a accept -P tcp -S 172.16.1.0/24 -D 0/0 21 -b
Right? Well, not necessarily. FTP servers can operate in two different modes: passive mode and active mode. [61] FTP active mode is somewhat nonintuitively enabled using the PORT command. FTP passive mode is enabled using the PASV command.
In passive mode, the FTP server listens for a connection from the client. In active mode, the server actually makes the connection to the client. Active mode is usually the default. The differences are illustrated in Figure 9.3.
Figure 9.3: FTP server modes
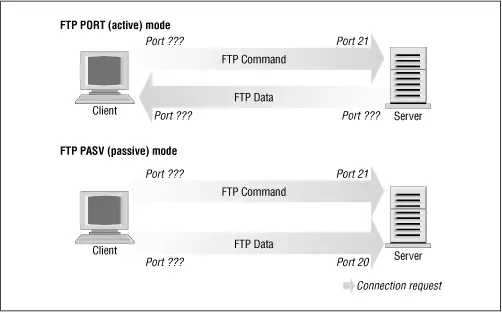
Many FTP servers make their data connection from port 20 when operating in active mode, which simplifies things for us a little, but unfortunately not all do. [62] The ProFTPd daemon is a good example of an FTP server that doesn't, at least in older versions.
Интервал:
Закладка:
Похожие книги на «Linux Network Administrator Guide, Second Edition»
Представляем Вашему вниманию похожие книги на «Linux Network Administrator Guide, Second Edition» списком для выбора. Мы отобрали схожую по названию и смыслу литературу в надежде предоставить читателям больше вариантов отыскать новые, интересные, ещё непрочитанные произведения.


![Andrew Radford - Linguistics An Introduction [Second Edition]](/books/397851/andrew-radford-linguistics-an-introduction-second-thumb.webp)


Обсуждение, отзывы о книге «Linux Network Administrator Guide, Second Edition» и просто собственные мнения читателей. Оставьте ваши комментарии, напишите, что Вы думаете о произведении, его смысле или главных героях. Укажите что конкретно понравилось, а что нет, и почему Вы так считаете.