Chris Tyler - Fedora Linux
Здесь есть возможность читать онлайн «Chris Tyler - Fedora Linux» весь текст электронной книги совершенно бесплатно (целиком полную версию без сокращений). В некоторых случаях можно слушать аудио, скачать через торрент в формате fb2 и присутствует краткое содержание. Год выпуска: 2006, ISBN: 2006, Издательство: O'Reilly, Жанр: ОС и Сети, на английском языке. Описание произведения, (предисловие) а так же отзывы посетителей доступны на портале библиотеки ЛибКат.

- Название:Fedora Linux
- Автор:
- Издательство:O'Reilly
- Жанр:
- Год:2006
- ISBN:978-0-596-52682-5
- Рейтинг книги:5 / 5. Голосов: 1
-
Избранное:Добавить в избранное
- Отзывы:
-
Ваша оценка:
Fedora Linux: краткое содержание, описание и аннотация
Предлагаем к чтению аннотацию, описание, краткое содержание или предисловие (зависит от того, что написал сам автор книги «Fedora Linux»). Если вы не нашли необходимую информацию о книге — напишите в комментариях, мы постараемся отыскать её.
Fedora Linux: A Complete Guide to Red Hat's Community Distribution In this book, you'll learn how to:
Install Fedora and perform basic administrative tasks
Configure the KDE and GNOME desktops
Get power management working on your notebook computer and hop on a wired or wireless network
Find, install, and update any of the thousands of packages available for Fedora
Perform backups, increase reliability with RAID, and manage your disks with logical volumes
Set up a server with file sharing, DNS, DHCP, email, a Web server, and more
Work with Fedora's security features including SELinux, PAM, and Access Control Lists (ACLs)
Whether you are running the stable version of Fedora Core or bleeding-edge Rawhide releases, this book has something for every level of user. The modular, lab-based approach not only shows you how things work - but also explains why--and provides you with the answers you need to get up and running with Fedora Linux.
Fedora Linux — читать онлайн бесплатно полную книгу (весь текст) целиком
Ниже представлен текст книги, разбитый по страницам. Система сохранения места последней прочитанной страницы, позволяет с удобством читать онлайн бесплатно книгу «Fedora Linux», без необходимости каждый раз заново искать на чём Вы остановились. Поставьте закладку, и сможете в любой момент перейти на страницу, на которой закончили чтение.
Интервал:
Закладка:
To add a zone which can be a complete domain or a subdomainclick on the DNS Server entry to highlight it, click the New button, and then select "zone" from the menu that appears. Figure 7-7 shows the small dialog box that appears.
Figure 7-7. New Zone dialog box
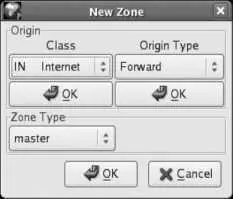
Click OK under Class, and then click OK under Origin Type. The dialog's controls will change to let you type in the Forward Zone Origin, as shown in Figure 7-8 . Enter the name of the domain with a period at the endfor example, fedorabook.com .
Figure 7-8. Zone Origin entry
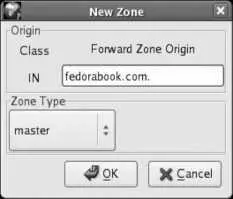
Click OK to create the zone. The window in Figure 7-9 will appear. Don't be alarmed by the number of controls!
Figure 7-9. Zone Authority configuration window
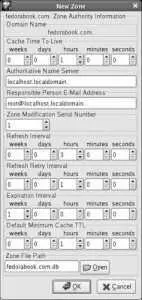
This window sets several overall values for the zone. Many of these are time values:
Cache Time to Live (TTL)
The maximum length of time that information should be cached by a client or remote nameserver. A higher value will result in a lower volume of DNS requests for your server to process and fewer delays for your users, but when you change a DNS entry, it will take longer to be "noticed" by other systems. A minimum value of three days is recommended once your configuration is stable ( RFC 1912); the default value of one hour is appropriate during initial setup and during periods of frequent changes.
Refresh Interval, Refresh Retry Interval, and Expiration Interval
These values configure communication between a master and a slave system. The Refresh Interval specifies how often the slave should get an update from the master, the Refresh Retry Interval specifies how long the slave should wait before retrying a refresh if it is unsuccessful, and the Expiration Interval specifies how long a slave can go without an update before it should stop responding to requests.
Default Minimum Cache TTL
The name of this field is somewhat misleading because the usage has changed. It is now used to indicate how long a negative response should be cached by a remote machine; in other words, this is the minimum length of time that a remote machine should wait before asking again if a domain exists. In this graphical configuration tool, this value also sets the default TTL for the rest of the records within this zone.
Leave these values at their defaults to start. If you are setting up DNS for a heavily used domain, you should go back and change the Cache Time to Live to the three-day recommended minimum (or longer) once you've confirmed that your configuration works correctly; you'll also need to change the TTL on each resource record in this zone (which I will come to in a minute).
Beside the time fields, there are only four pieces of information to fill in:
Authoritative Name Server
The hostname of the nameserver computer. If the host is in this zone, you can enter the hostname without the domain name portion (e.g., just bluesky for bluesky.fedorabook.com ); otherwise, enter the fully qualified domain name followed by a period (the hostname and domain name together, such as ns.global.proximity.on.ca. ).
Responsible Person E-mail Address
The email address of the person responsible for managing DNS, followed by a period (if the address is in this zone, you can enter just the username, such as jessica ). Ideally, this address should not be inside the zone that you're defining because people may want to use this address to reach you to tell you that something is wrong with the domainand that same problem may prevent mail from reaching you.
Zone Modification Serial Number
Any number can be used here, but it must be increased every time this zone's DNS information is updated. Most sites use one of these two approaches:
A straight serial number, initially set to 1 , incremented by one each time the zone information is changed. This graphical configuration tool will automatically increment this serial number when required.
The date and a sequence number in YYYYMMDDSS format, where YYYYMMDD is the year/month/day and SS is the sequence number of changes made on that date. For example, 2009021702 indicates the second change made on February 17, 2009. If you're going to use this format, you'll have to remember to update the serial number whenever you make a change.
Zone File Path
The name of the file that will store information for this zone. Use the default value for this field.
Click OK to save this information. You will see the domain listed in the main window, as in Figure 7-10 ; click on the arrow to the left of the domain name to see the entries within that domain.
Figure 7-10. A new zone entry in the main configuration window
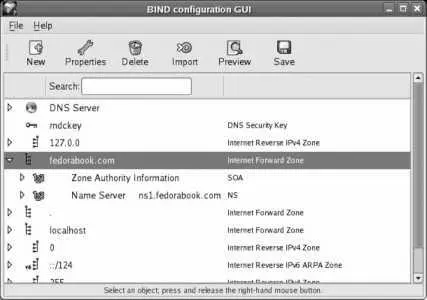
Note that two entries have been created: a Start of Authority (SOA) record, which contains basic information about the domain, plus an NS record, which contains information about the authoritative nameserver for the zone.
You'll now need to add resource records (RR) for the machines in this zone. Most domains need four types of records:
A
Defines the address for a hostname. Every host in the zone needs an A record; the next three record types are used in addition to an A record.
CNAME
Enables the use of nicknames for hosts. These records translate a host nickname into a canonical name (true hostname).
MX
Defines a mail exchanger ( SMTP server) within the domain.
NS
Identifies a nameserver for the zone.
To add these records, highlight the new zone you've created, click the Add button, and select the record type from the drop-down list that appears. One of the four windows shown in Figure 7-11 will appear, according to the type of resource record you are adding.
Figure 7-11. Resource record windows
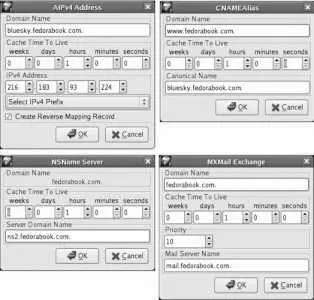
For an A record, insert the hostname in the Domain Name field and the IP address in the IPv4 Address field.
For a CNAME record, insert the nickname in the Domain Name field and the full name of the host in the Canonical Name field.
For an NS record, insert the hostname of the nameserver in the Server Domain Name field.
For an MX record, leave the Domain Name as it is written. If you have more than one mail exchanger for your domain (perhaps a master and a backup email server), enter a priority for each server; lower numbers take precedence over higher numbers. Enter the hostname of the mail server in the Mail Server Name field.
Make sure that an A record exists for each hostname mentioned in CNAME, NS, and MX records.
These hosts don't have to be in the same zone or domain; for example, it's possible for email and name service to be handled by a host outside that domain. In that case, the A record will not appear in this zone but must appear in the zone for that domain.
For example, if the mail server for fedorabook.com was global.proximity.on.ca , then the MX record could point to that host. There would be no A record for global.proximity.on.ca within the fedorabook.com zone, but there would have to be one within the proximity.on.ca zone (which might be on a different nameserver altogether).
Читать дальшеИнтервал:
Закладка:
Похожие книги на «Fedora Linux»
Представляем Вашему вниманию похожие книги на «Fedora Linux» списком для выбора. Мы отобрали схожую по названию и смыслу литературу в надежде предоставить читателям больше вариантов отыскать новые, интересные, ещё непрочитанные произведения.


Обсуждение, отзывы о книге «Fedora Linux» и просто собственные мнения читателей. Оставьте ваши комментарии, напишите, что Вы думаете о произведении, его смысле или главных героях. Укажите что конкретно понравилось, а что нет, и почему Вы так считаете.