Chris Tyler - Fedora Linux
Здесь есть возможность читать онлайн «Chris Tyler - Fedora Linux» весь текст электронной книги совершенно бесплатно (целиком полную версию без сокращений). В некоторых случаях можно слушать аудио, скачать через торрент в формате fb2 и присутствует краткое содержание. Год выпуска: 2006, ISBN: 2006, Издательство: O'Reilly, Жанр: ОС и Сети, на английском языке. Описание произведения, (предисловие) а так же отзывы посетителей доступны на портале библиотеки ЛибКат.

- Название:Fedora Linux
- Автор:
- Издательство:O'Reilly
- Жанр:
- Год:2006
- ISBN:978-0-596-52682-5
- Рейтинг книги:5 / 5. Голосов: 1
-
Избранное:Добавить в избранное
- Отзывы:
-
Ваша оценка:
Fedora Linux: краткое содержание, описание и аннотация
Предлагаем к чтению аннотацию, описание, краткое содержание или предисловие (зависит от того, что написал сам автор книги «Fedora Linux»). Если вы не нашли необходимую информацию о книге — напишите в комментариях, мы постараемся отыскать её.
Fedora Linux: A Complete Guide to Red Hat's Community Distribution In this book, you'll learn how to:
Install Fedora and perform basic administrative tasks
Configure the KDE and GNOME desktops
Get power management working on your notebook computer and hop on a wired or wireless network
Find, install, and update any of the thousands of packages available for Fedora
Perform backups, increase reliability with RAID, and manage your disks with logical volumes
Set up a server with file sharing, DNS, DHCP, email, a Web server, and more
Work with Fedora's security features including SELinux, PAM, and Access Control Lists (ACLs)
Whether you are running the stable version of Fedora Core or bleeding-edge Rawhide releases, this book has something for every level of user. The modular, lab-based approach not only shows you how things work - but also explains why--and provides you with the answers you need to get up and running with Fedora Linux.
Fedora Linux — читать онлайн бесплатно полную книгу (весь текст) целиком
Ниже представлен текст книги, разбитый по страницам. Система сохранения места последней прочитанной страницы, позволяет с удобством читать онлайн бесплатно книгу «Fedora Linux», без необходимости каждый раз заново искать на чём Вы остановились. Поставьте закладку, и сможете в любой момент перейти на страницу, на которой закончили чтение.
Интервал:
Закладка:
To configure Samba, select the menu option System→Administration→Server Settings→Samba, which will open the window shown in Figure 7-1.
Figure 7-1. Samba configuration window
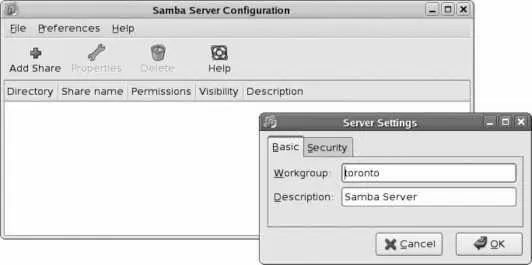
Click Preferences→Server Settings to open the small window shown at bottom right in Figure 7-1. Enter your local Windows workgroup name into the Workgroup field and click OK. The Sambaserver will be started automatically.
See Lab 4.7, "Managing Users and Groups," to create Fedora accounts for your users before enabling Samba access.
Next, select Preferences→Samba Users to bring up the user configuration dialog box shown in Figure 7-2. Click Add User, select an existing Linux user, enter a Windows username (which may be the same as the Linux username), and enter the Samba password of your choice twice. Click OK when you're done.
Figure 7-2. Samba user configuration

If you are using a firewall or have SELinux enforcing turned on, you will need to adjust your security settings to permit remote systems to access the Samba server (see Lab 8.2, "Using SELinux").
Your system will now be visible to local Windows computers; for example, on an XP system, click My Network Places and then "View workgroup computers," and your Fedora system will appear as an icon with the hostname that you have assigned to it, as shown in Figure 7-3 . Click on the computer icon to see the folders being shared by the Fedora system (after you enter your Samba user ID and password to authenticate).
Figure 7-3. Windows XP workgroup display showing Samba shares from a Fedora system

The folder labeled homes contains the home directory of the authenticated Samba user, and the Printers and Faxes folder will contain all of the printers configured on the Fedora system.
Although the Samba configuration tool starts the Samba system, you'll need to enable the Samba service if you want Samba to start every time you boot your systemsee Lab 4.6, "Managing and Configuring Services."
7.1.1.1. Adding additional Samba shares
To share an additional directory, start the Samba configuration tool (System→Administration→Server Settings→Samba) and click the Add button. The window shown in Figure 7-4 will appear.
Figure 7-4. Adding a Samba share
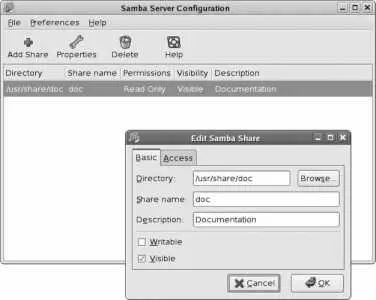
Under the Basic tab, enter the directory name, the name visible to the Windows systems (i.e., the share name), and a description of what is in the shared directory. Use the checkboxes to configure whether the directory is writable by Windows users, and whether it is visible when the Windows users are browsing using a tool such as Windows Explorer.
Under the Access tab, you can choose to make the directory available to all users, or you can go through the list of Samba users and select the specific ones you want to grant access to it. Click OK when you are done.
In order for a remote user to access a shared directory through Samba, that directory must have the appropriate permissions and SELinux context.
7.1.1.2. Accessing Fedora printers from a Windows system
Fedora's default Samba configuration will make all printers available to Windows users. To use a shared Samba printer in Windows XP, follow these instructions.
Although you can access Fedora printers through Samba printer sharing, it's often faster and easier to access those printers directly through CUPS printer sharing, regardless of the operating system in use.
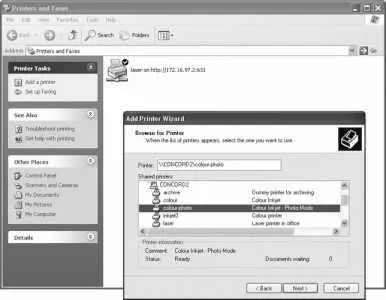
1. Go to Printers and Faxes and then click "Add a Printer." The Add Printer Wizard will appear. Click Next to get past the introductory message, then select "A network printer, or a printer attached to another computer" for the printer type, and then click Next. Select "Browse for a Printer," and then click Next to see a list of computers on the local Windows network. Double-click on the name of the Fedora system, which will reveal the names of the printers on that system, as shown in Figure 7-5 ; double-click on the desired printer.
Figure 7-5. Adding a Samba printer to a Windows XP system
1. You may receive a warning about installing printer drivers at this point. Click OK.
2. Select the printer manufacturer and model. Click OK.
If you do not see the printer listed, you will need to insert the printer's driver CD, click Have Disk, and then select the disk location. When the list of printer models appears, select the one that matches the printer you are installing.
1. If you already have a printer set up on the Windows system, you will be asked if the new printer should become the default. Choose Yes or No, and then click Next.
2. Click Finish .
You will now be able to print to the printer from any Windows application.
7.1.1.3. Configuring Samba from the command line
You can edit Samba's configuration from the command line instead of using the graphical configuration tool.
Samba's configuration file is /etc/samba/smb.conf , and it is a regular text file. Like most server programs, Samba has dozens of configuration options, which it calls parameters . This configuration file is divided into sections by lines of section names enclosed in square brackets (so, for example, the global configuration section starts with the line [global] ). Lines that start with a pound sign ( # ) are treated as comments and ignored.
The workgroup name and server description are configured at the top of the global section:
[global]
# workgroup = NT-Domain-Name or Workgroup-Name
workgroup = bluesky
# server string is the equivalent of the NT Description field
server string = Samba Server
Set the workgroup name to the value used by the local Windows workgroup or domain. The server string description can be any descriptive value (change the default if you don't want people to know you're running a Linux system). The system name will be the same as the hostname.
By default, only home directories and printers will be shared. To add additional shares, add an additional share section to the end of the configuration file. There are many examples in the configuration file, such as this one:
# The following two entries demonstrate how to share a directory so that two
# users can place files there that will be owned by the specific users. In this
# setup, the directory should be writable by both users and should have the
# sticky bit set on it to prevent abuse. Obviously this could be extended to
# as many users as required.
;[ myshare ]
; comment = Mary's and Fred's stuff
; path = /usr/somewhere/shared
Интервал:
Закладка:
Похожие книги на «Fedora Linux»
Представляем Вашему вниманию похожие книги на «Fedora Linux» списком для выбора. Мы отобрали схожую по названию и смыслу литературу в надежде предоставить читателям больше вариантов отыскать новые, интересные, ещё непрочитанные произведения.


Обсуждение, отзывы о книге «Fedora Linux» и просто собственные мнения читателей. Оставьте ваши комментарии, напишите, что Вы думаете о произведении, его смысле или главных героях. Укажите что конкретно понравилось, а что нет, и почему Вы так считаете.