Andrew Hudson - Fedora™ Unleashed, 2008 edition
Здесь есть возможность читать онлайн «Andrew Hudson - Fedora™ Unleashed, 2008 edition» весь текст электронной книги совершенно бесплатно (целиком полную версию без сокращений). В некоторых случаях можно слушать аудио, скачать через торрент в формате fb2 и присутствует краткое содержание. Город: Indianapolis, Год выпуска: 2008, ISBN: 2008, Издательство: Sams Publishing, Жанр: ОС и Сети, на английском языке. Описание произведения, (предисловие) а так же отзывы посетителей доступны на портале библиотеки ЛибКат.

- Название:Fedora™ Unleashed, 2008 edition
- Автор:
- Издательство:Sams Publishing
- Жанр:
- Год:2008
- Город:Indianapolis
- ISBN:978-0-672-32977-7
- Рейтинг книги:5 / 5. Голосов: 1
-
Избранное:Добавить в избранное
- Отзывы:
-
Ваша оценка:
Fedora™ Unleashed, 2008 edition: краткое содержание, описание и аннотация
Предлагаем к чтению аннотацию, описание, краткое содержание или предисловие (зависит от того, что написал сам автор книги «Fedora™ Unleashed, 2008 edition»). Если вы не нашли необходимую информацию о книге — напишите в комментариях, мы постараемся отыскать её.
Finding information you need is not always easy. This short index provides a list of common tasks discussed inside this book. Browse the table of contents or index for detailed listings and consult the specified chapter for in-depth discussions about each subject.
left How Do I…?
See…
How Do I…?
See…
left Back up my system?
Chapter 13
Partition a hard drive?
Appendix B, Chapters 1, 35
left Build a new Linux kernel?
Chapter 36
Play MP3s and other music?
Chapter 7
left Burn a CD?
Chapter 7
Print a file?
Chapter 8
left Change a password?
Chapter 4
Read a text file?
Chapter 4
left Change the date and time?
Chapter 32
Read or send email?
Chapter 21
left Compress a file?
Chapter 13
Read or post to newsgroups?
Chapter 5
left Configure a modem?
Chapter 2
Reboot Fedora?
Chapter 1
left Configure a printer?
Chapter 8
Rescue my system?
Chapter 13
left Configure a scanner?
Chapter 7
Set up a DNS server?
Chapter 23
left Configure a sound card?
Chapter 7
Set up a firewall?
Chapter 14
left Configure my desktop settings?
Chapter 3
Set up a web server?
Chapter 15
left Connect to the Internet?
Chapter 5
Set up an FTP server?
Chapter 20
left Control a network interface?
Chapter 14
Set up Samba with SWAT?
Chapter 19
left Copy files or directories?
Chapters 13, 32
Set up wireless networking?
Chapter 14
left Create a boot disk to boot Fedora?
Chapter 1
Shut down Fedora?
Chapter 1
left Create a database?
Chapter 16
Use a spreadsheet?
Chapter 6
left Create a user?
Chapter 4
Use Instant Messaging?
Chapter 5
left Delete a file or directory?
Chapter 32
Watch television on my computer?
Chapter 7
left Get images from a digital camera?
Chapter 7
Edit a text file?
Chapter 4
left Install Fedora?
Chapter 1
Make Fedora more secure?
Chapter 14
left Log in to Fedora?
Chapter 1
Mount a CD-ROM or hard drive?
Chapter 35
Fedora™ Unleashed, 2008 edition — читать онлайн бесплатно полную книгу (весь текст) целиком
Ниже представлен текст книги, разбитый по страницам. Система сохранения места последней прочитанной страницы, позволяет с удобством читать онлайн бесплатно книгу «Fedora™ Unleashed, 2008 edition», без необходимости каждый раз заново искать на чём Вы остановились. Поставьте закладку, и сможете в любой момент перейти на страницу, на которой закончили чтение.
Интервал:
Закладка:
x:5:respawn:/etc/X11/prefdm -nodaemon
According to this script, the display manager is based on the file named desktopunder the /etc/sysconfigdirectory. The words GNOME, KDE, and XDMfollowing a DESKTOP= entry determine what display manager is used for login. The following sections describe how to configure the three most commonly used display managers: gdm, kdm, and xdm.
gdmThe gdmdisplay manager is part of the GNOME library and client distribution included with Fedora, and it provides a graphical login when a system boots directly to X. Its login (which is actually displayed by the gdmloginclient) hosts pop-up menus of window managers, languages, and system options for shutting down (halting) or rebooting the workstation. Although you can edit (as root) gdm.confunder the /etc/X11/gdmdirectory to configure gdm, a much better way to configure GNOME's display manager is to use the gdmsetupclient.
You can use the gdmsetupclient to configure many aspects of how GDM appears and behaves. You launch this client from the GNOME System menu, under Administration, Login Window.
When gdmsetuploads, you'll see the GDM Setup window, as shown in Figure 3.8.
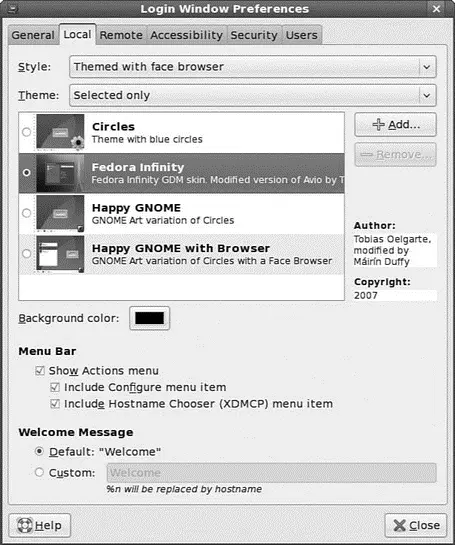
FIGURE 3.8 You use gdmsetupto configure the gdmloginscreen when using gdmas a display manager.
You can specify settings for security, remote network logins, the X server, and session and session chooser setup by clicking the tabs in the GDM Setup dialog.
kdmThe kdmclient, which is part of KDE (which is covered later in this chapter), offers a graphical login similar to gdm.You configure kdm by running the KDE Control Center client kcontrol, as the root operator, which you do by clicking the Control Center menu item from the KDE kickeror desktop panel menu.
In the Index tab of the left pane of the KDE Control Center window, you click the System Administration menu item to open its contents, and then you click the Login Manager menu item. The right pane of the Control Center window displays the tabs and configuration options for the kdmLogin Manager, as shown in Figure 3.9.
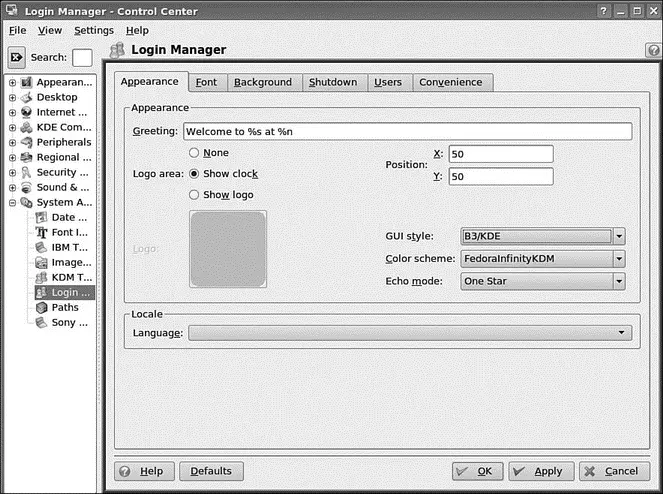
FIGURE 3.9 You configure kdm by choosing tabs and settings in the Control Center dialog box.
To make any changes to the KDE display manager while logged in as a regular user, you must first click the Administrator Mode button, and then enter the root operator pass word. You can click a tab in the Control Center dialog to set configuration options. Options in these tabs enable you to control the login display, prompts, user icons, session management, and configuration of system options (for shutting down or rebooting). After you make your configuration choices in each tab, click the Apply button to apply the changes immediately; otherwise, the changes are applied when the X server restarts.
xdmDisplay ManagerThe xdmdisplay manager is part of the Xorgdistribution and offers a bare-bones login for using X. Although it is possible to configure xdmby editing various files under the /etc/X11/xdmdirectory, GNOME and KDE offer a greater variety of options in display manager settings. The default xdmlogin screen's display is handled by the xsetrootclient, which is included with Xorg, and Owen Taylor's xsriclient, as specified in the file Xsetup_0in the xdmdirectory under /etc/X11. The xsriclient can be used to set the back ground color of the login display's desktop and to place an image in the initial display.
Starting X from the Console by Using startx
If you have Fedora set to boot to runlevel 3, a text-based console login, you can start an X session from the command line. You use the startx command (which is actually a shell script) to do so. You launch the X server and an X session by using startx, like this:
$ startx
startxfirst looks in your home directory for a file named .xinitrc. This file can contain settings that will launch an alternative desktop and X clients for your X session. The default system .xinitrcis found in the /etc/X11/xinitdirectory, but a local file can be used instead to customize an X session and launch default clients.
Using a custom .xinitrcis not necessary if you're using Fedora's desktop, which runs X and either a GNOME-aware window manager or KDE as a desktop environment.
You can also use the startxcommand with one or more command-line options. These options are passed to the X server before it launches an X session. For example, you can use startxto specify a color depth for an X session by using the -depthoption, followed by a number such as 8, 16, 24, or 32 for 256, thousands, or millions of colors (as defined in the X configuration file and if supported). Using different color depths can be useful during development for testing how X clients look on different displays, or to conserve use of video memory, such as when trying to get the highest resolution (increased color depth can sometimes affect the maximum resolution of older video cards).
For example, to start a session with thousands of colors, you use the startx command like this:
$ startx -- -depth 16
Another option that can be passed is a specific dots per inch (dpi) resolution that is to be used for the X session. For example, to use 100dpi, you use the - dpioption followed by 100, like this:
$ startx -- -dpi 100
You can also use startxto launch multiple X sessions. This feature comes as a result of Fedora's support for virtual consoles, or multiple text-based displays. To start the first X session, you use the startxcommand followed by a display number , or an X server instance (the first is 0, using screen 0) and a number that represents a virtual console. The default console used for X is number 7, so you can start the session like this:
$ startx -- :0 vt7
After X starts and the window manager appears, you press Ctrl+Alt+F2 and then log in again at the prompt. Next, you start another X session like this, specifying a different display number and virtual console:
$ startx -- :1 vt8
Another X session starts. To jump to the first X session, press Ctrl+Alt+F7. You use Ctrl+Alt+F8 to return to the second session. If you exit the current session and go to another text-based login or shell, you use Alt+F7 or Alt+F8 to jump to the desired session.
Using startxis a flexible way to launch X sessions, but multiple sessions can be confusing, especially to new users, and are a horrific resource drain on a system that does not have enough CPU horsepower and memory. A better approach is to use multiple workspaces, also known as virtual desktops , as discussed in the following section.
Интервал:
Закладка:
Похожие книги на «Fedora™ Unleashed, 2008 edition»
Представляем Вашему вниманию похожие книги на «Fedora™ Unleashed, 2008 edition» списком для выбора. Мы отобрали схожую по названию и смыслу литературу в надежде предоставить читателям больше вариантов отыскать новые, интересные, ещё непрочитанные произведения.


![Andrew Radford - Linguistics An Introduction [Second Edition]](/books/397851/andrew-radford-linguistics-an-introduction-second-thumb.webp)


Обсуждение, отзывы о книге «Fedora™ Unleashed, 2008 edition» и просто собственные мнения читателей. Оставьте ваши комментарии, напишите, что Вы думаете о произведении, его смысле или главных героях. Укажите что конкретно понравилось, а что нет, и почему Вы так считаете.