$ telnet 192.168.2.52
Trying 192.168.2.52...
Connected to 192.168.2.52 (192.168.2.52).
Escape character is '^]'.
Welcome to Print Server
PS> monitor
(P1)STATE: Idle
TYPE: Parallel
PRINTER STATUS: On-Line
PS> exit
Connection closed by foreign host.
TIP
Curiously, NETGEAR does not promote the PS101 as Linux-supported hardware even though it works. Other types of network-attached print devices include Bluetooth- enabled printers and 802.11b wireless ethernet print servers such as TRENDnet's TEW-PS3, HP/Compaq's parallel-port-based WP 110, and the JetDirect 380x with USB. As always, research how well a product, such as a printer or print server, works with Linux before purchasing!
Using the Common UNIX Printing System GUI
You can use CUPS to create printer queues, get print server information, and manage queues by launching a browser (such as Firefox) and browsing to http://localhost:631. CUPS provides a web-based administration interface, as shown in Figure 19.12.
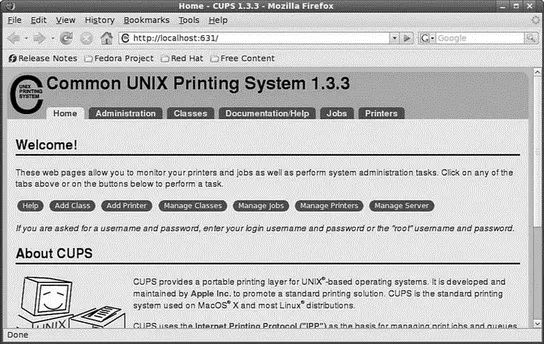
FIGURE 19.12 Use the web-based CUPS administrative interface to configure and manage printing.
This section provides a short example of creating a Linux printer entry, using CUPS's web-based interface. Use the CUPS interface to create a printer and device queue type (such as local, remote, serial port, or Internet); then you enter a device uniform resource identifier (URI) , such as lpd://192.168.2.35/lp, which represents the IP address of a remote UNIX print server, and the name of the remote print queue on the server. You also need to specify the model or make of printer and its driver. A Printers page link allows you to print a test page, stop the printing service, manage the local print queue, modify the printer entry, or add another printer.
In the Administration page, click the Add Printer button and then enter a printer name in the Name field (such as lp), a physical location of the printer in the Location field, and a short note about the printer (such as its type) in the Description field. Figure 19.13 shows a sample entry for a Brother Multi Function Printer.
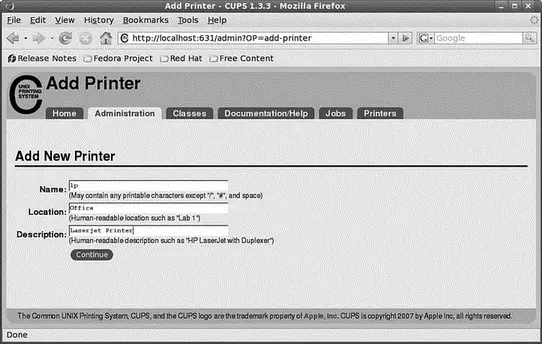
FIGURE 19.13 Use CUPS to create a new printer queue.
Click the Continue button. You can then select the type of printer access (local, remote, serial port, or Internet) in the Device page, as shown in Figure 19.14. For example, to configure printing to a local printer, select Parallel Port #1 or, for a remote printer, select the LPD/LPR Host or Printer entry. When you've made your selection, click Continue to proceed to the connection options screen, as shown in Figure 19.15.
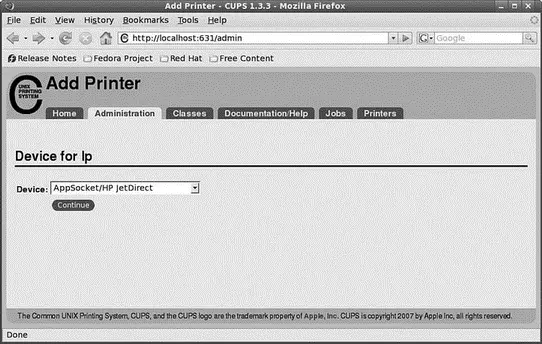
FIGURE 19.14 Select how the printer is connected.
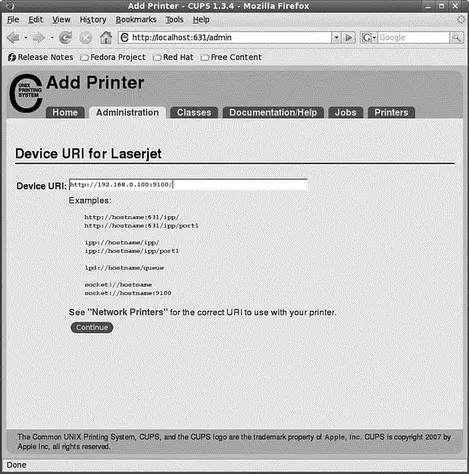
FIGURE 19.15 Enter the connection details as appropriate for your printer connection and as shown in the examples.
Again click Continue and select a printer make, as requested in the dialog box shown in Figure 19.16.
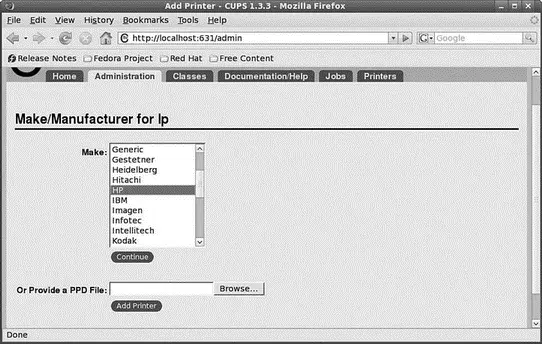
FIGURE 19.16 Select a printer make when creating a new queue.
After you click Continue, you then select the driver. After creating the printer, you can then use the Printer page, as shown in Figure 19.17, to print a test page, stop printing service, manage the local print queue, modify the printer entry, or add another printer.
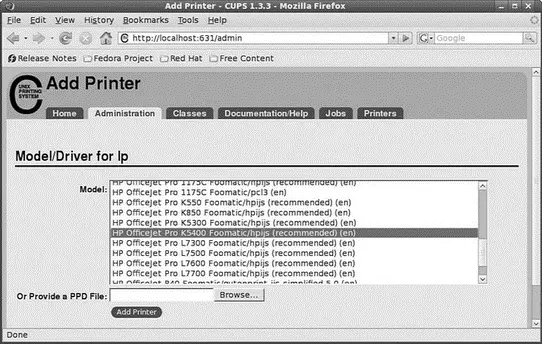
FIGURE 19.17 Manage printers easily, using the CUPS Printer page.
CUPS offers many additional features and after it is installed, configured, and running, and provides transparent traditional UNIX printing support for Fedora.
NOTE
To learn more about CUPS and to get a basic overview of the system, browse to http://www.cups.org/.
Older versions of Red Hat Linux used the 4.3BSD line-printer spooling system and its suite of text-based printing utilities. Newer versions of these utilities, with the same names, are included with your Fedora DVD, but are part of the CUPS package. The commands support the launching of print jobs in the background (as a background process), the printing of multiple documents, the capability to specify local and networked printers, control of the printers, and management of the queued documents waiting in the printer's spool queue.
Using Basic Print Commands
After configuring your printer, you can print from the desktop, using any printer-capable graphical clients. If you do not use the desktop but prefer to use or access your Fedora system via a text-based interface, you can enter a number of print commands from the command line, too. The main CUPS commands used to print and control printing from the command line are as follows:
► lp — The line-printer spooling command; used to print documents that use a specific printer
► lpq — The line-printer queue display command; used to view the existing list of documents waiting to be printed
► lpstat — Displays server and printer status information
► lprm — The line-printer queue management command; used to remove print jobs from a printer's queue
► lpc — The line-printer control program; used by the root operator to manage print spooling, the lpddaemon, and printer activity
These commands offer a subset of the features provided by CUPS, but can be used to start and control printers and print queues from the command line.
You print files (documents or images) by using the lpcommand, along with a designated printer and filename. For example, to print the file mydoc.txtwith the printer named lp, use the lpcommand, its - dcommand-line option, and the printer's name, like this:
# lp -dlp mydoc.txt
You can also print multiple documents from the command line. For example, to simultaneously print a number of files to the lp printer, use lprlike so:
# lp -dlp *.txt
This approach uses the wildcard capabilities of the shell to feed the lprcommand all files in the current directory with a name ending in .txtfor printing. Use the lpqcommand to view the printer's queue, as follows:
# lpq
lp is ready and printing
Rank Owner Job File(s) Total Size
active root 7 classes.conf 3072 bytes
The lpqcommand reports on the job, owner, job number, file being printed, and size of job. The job number ( 7in this example) is used by CUPS to keep track of documents printing or waiting to be printed. Each job has a unique job number. To stop the print job in this example, use the lprmcommand, followed by the job number, like this:
Читать дальше


![Andrew Radford - Linguistics An Introduction [Second Edition]](/books/397851/andrew-radford-linguistics-an-introduction-second-thumb.webp)


