Andrew Hudson - Fedora™ Unleashed, 2008 edition
Здесь есть возможность читать онлайн «Andrew Hudson - Fedora™ Unleashed, 2008 edition» весь текст электронной книги совершенно бесплатно (целиком полную версию без сокращений). В некоторых случаях можно слушать аудио, скачать через торрент в формате fb2 и присутствует краткое содержание. Город: Indianapolis, Год выпуска: 2008, ISBN: 2008, Издательство: Sams Publishing, Жанр: ОС и Сети, на английском языке. Описание произведения, (предисловие) а так же отзывы посетителей доступны на портале библиотеки ЛибКат.

- Название:Fedora™ Unleashed, 2008 edition
- Автор:
- Издательство:Sams Publishing
- Жанр:
- Год:2008
- Город:Indianapolis
- ISBN:978-0-672-32977-7
- Рейтинг книги:5 / 5. Голосов: 1
-
Избранное:Добавить в избранное
- Отзывы:
-
Ваша оценка:
Fedora™ Unleashed, 2008 edition: краткое содержание, описание и аннотация
Предлагаем к чтению аннотацию, описание, краткое содержание или предисловие (зависит от того, что написал сам автор книги «Fedora™ Unleashed, 2008 edition»). Если вы не нашли необходимую информацию о книге — напишите в комментариях, мы постараемся отыскать её.
Finding information you need is not always easy. This short index provides a list of common tasks discussed inside this book. Browse the table of contents or index for detailed listings and consult the specified chapter for in-depth discussions about each subject.
left How Do I…?
See…
How Do I…?
See…
left Back up my system?
Chapter 13
Partition a hard drive?
Appendix B, Chapters 1, 35
left Build a new Linux kernel?
Chapter 36
Play MP3s and other music?
Chapter 7
left Burn a CD?
Chapter 7
Print a file?
Chapter 8
left Change a password?
Chapter 4
Read a text file?
Chapter 4
left Change the date and time?
Chapter 32
Read or send email?
Chapter 21
left Compress a file?
Chapter 13
Read or post to newsgroups?
Chapter 5
left Configure a modem?
Chapter 2
Reboot Fedora?
Chapter 1
left Configure a printer?
Chapter 8
Rescue my system?
Chapter 13
left Configure a scanner?
Chapter 7
Set up a DNS server?
Chapter 23
left Configure a sound card?
Chapter 7
Set up a firewall?
Chapter 14
left Configure my desktop settings?
Chapter 3
Set up a web server?
Chapter 15
left Connect to the Internet?
Chapter 5
Set up an FTP server?
Chapter 20
left Control a network interface?
Chapter 14
Set up Samba with SWAT?
Chapter 19
left Copy files or directories?
Chapters 13, 32
Set up wireless networking?
Chapter 14
left Create a boot disk to boot Fedora?
Chapter 1
Shut down Fedora?
Chapter 1
left Create a database?
Chapter 16
Use a spreadsheet?
Chapter 6
left Create a user?
Chapter 4
Use Instant Messaging?
Chapter 5
left Delete a file or directory?
Chapter 32
Watch television on my computer?
Chapter 7
left Get images from a digital camera?
Chapter 7
Edit a text file?
Chapter 4
left Install Fedora?
Chapter 1
Make Fedora more secure?
Chapter 14
left Log in to Fedora?
Chapter 1
Mount a CD-ROM or hard drive?
Chapter 35
Fedora™ Unleashed, 2008 edition — читать онлайн бесплатно полную книгу (весь текст) целиком
Ниже представлен текст книги, разбитый по страницам. Система сохранения места последней прочитанной страницы, позволяет с удобством читать онлайн бесплатно книгу «Fedora™ Unleashed, 2008 edition», без необходимости каждый раз заново искать на чём Вы остановились. Поставьте закладку, и сможете в любой момент перейти на страницу, на которой закончили чтение.
Интервал:
Закладка:
To enable sharing, start system-config-printer, and then select the Server Settings option in the left pane. All you need to do is select Share Published Printers Connected to This System to automatically allow access to all your printers, as shown in Figure 19.9.
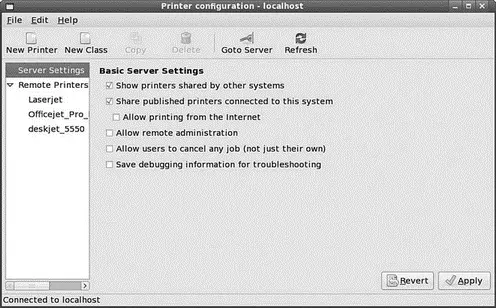
FIGURE 19.9 Sharing enables you to offer a locally attached printer as a remote printer on your network.
By default, all users are allowed access to the printer. You can change this setting by selecting the Access Control tab and adding users into the list.
Finally, you need to allow Fedora to publish your selected shared printers across the network. Click the Server Settings and make sure the Share Published Printers Connected to This System option is checked.
If you will share your CUPS-managed printer with other Linux hosts on a LAN using the Berkeley-type print spooling daemon, lpd, check the Enable LPD Protocol item under the Sharing dialog box's General tab. Next, check that the file cups-lpdunder the /etc/xinetd.ddirectory contains the setting disable = noand then restart xinetd. This enables CUPS to run the cups-lpdserver and accept remote print jobs sent by lpdfrom remote hosts. Do not forget to save your changes and restart CUPS!
When finished, click the Apply button and then select Quit from the Action menu to exit.
To create a printer queue to access a remote UNIX print server, use system-config-printerto create a printer but select the Internet Printing Protocol (IPP) type. Click Forward and enter a printer name and description; you are then asked to enter the hostname (or IP address) of the remote computer with a printer, along with the printer name, as shown in Figure 19.10.
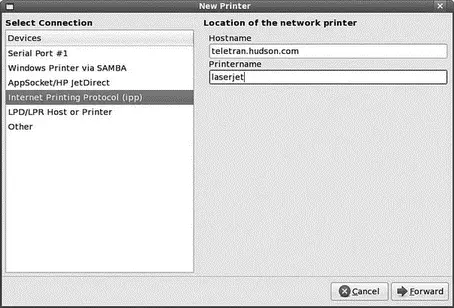
FIGURE 19.10 Enter the hostname or IP address of the remote computer with a printer, along with the remote printer's queue name.
Browse to http://www.faqs.org/rfcs/rfc1179.html to read more about using the Strict RFC 1179 Compliance option when configuring Fedora to be able to print to a remote UNIX printer. This 13-year-old Request For Comments (RFC) document describes printing protocols for the BSD line-printer spooling system. The option is used to allow your documents to print to remote servers using the older print system or software conforming to the standard.
Click the Forward button after entering this information; then continue to configure the new entry as if the remote printer were attached locally (use the same print driver setting as the remote printer). When finished, do not forget to save the changes!
You can also test the new remote printer by clicking the Tests menu item and using one of the test page items, such as the ASCII or PostScript test pages. The ASCII test page prints a short amount of text to test the spacing and page width; the PostScript test page prints a page of text with some information about your printer, a set of radial lines one degree apart, and a color wheel (if you use a color printer).
Session Message Block Printing
Printing to an SMB printer requires Samba, along with its utilities such as the smbclientand associated smbprintprinting filter. You can use the Samba software included with Fedora to print to a shared printer on a Windows network or set up a printer attached to your system as an SMB printer. This section describes how to use SMB to create a local printer entry to print to a remote shared printer.
The Control Panel's Network device is the usual means for setting up an SMB or shared printer under Windows operating systems through configuration settings. After enabling print sharing, reboot the computer. In the My Computer, Printers folder, right-click the name or icon of the printer you want to share and select Sharing from the pop-up menu. Set the Shared As item, and then enter a descriptive shared name, such as HP2100 , and a password.
You must enter a shared name and password to configure the printer when running Linux. You also need to know the printer's workgroup name, IP address, and printer name, and have the username and password on hand. To find this information, select Start, Settings, Printers; then right-click the shared printer's listing in the Printers window and select Properties from the pop-up window.
On your Fedora system, use system-config-printerto create a new local printer queue and assign it a name; then select the Networked Windows (SMB) type in the list on the right side. Enter the connection details in the field at the top (preceded by smb://) and type your authentication details at the bottom ( miniin the example shown in Figure 19.11). SMB printers offered by the server appear in the list and can be selected for use.
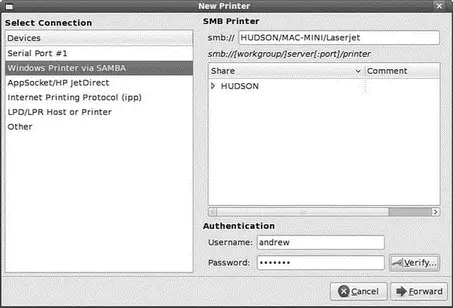
FIGURE 19.11 Create a shared remote printer, using required information for Windows.
Click Forward, and then create a printer with characteristics that match the remote printer. (For example, if the remote printer is an HP 2100 LaserJet, select the driver listed for that device in your configuration.)
Network-Attached Printer Configuration and Printing
Fedora supports other methods of remote printing, such as using a Novell Netware-based print queue or using a printer attached directly to your network with an HP JetDirect adapter. Some manufacturers even offer Linux-specific drivers and help. For example, HP provides graphical printer configuration tools and software drivers for other Linux distributions at http://h20000.www2.hp.com/bizsupport/TechSupport/Home.jsp.
You can set up network-attached printing quickly and easily, using a variety of devices. For example, NETGEAR's PS101 print server adapter works well with Linux. This tiny device (a self-hosted print server) is an adapter that directly attaches to a printer's Centronics port, eliminates the use of a parallel-port cable, and enables the use of the printer over a network. The PS101 offers a single 10Mbps ethernet jack and, after initial configuration and assignment of a static IP address, can be used to print to any attached printer supported by Fedora.
A JetDirect- or UNIX-based configuration using system-config-printercan be used to allow you to print to the device from Fedora or other remote Linux hosts. To see any open ports or services on the device, use the nmapcommand with the print server adapter's IP address like this:
$ nmap 192.168.0.9
Starting Nmap 4.20 ( http://insecure.org ) at 2007-10-23 21:11 BST
Interesting ports on 192.168.0.9:
Not shown: 1691 closed ports
PORT STATE SERVICE
80/tcp open http
443/tcp open https
515/tcp open printer
9100/tcp open jetdirect
9101/tcp open jetdirect
9102/tcp open jetdirect
Nmap finished: 1 IP address (1 host up) scanned in 1.532 seconds
To configure printing, select system-config-printer's JetDirect option; then specify the device's IP address (192.168.0.9 in the example) and port 9100 (as shown previously — you are clued that this is the correct port by the Service entry, which states jetdirectin the example). Alternatively, you can configure the device and attached printer as a UNIX-based print server, but you need to use PS1 as the name of the remote printer queue. Note that the device hosts a built-in web server (HTTP on port 80); you can administer the device by browsing to its IP address (such as http://192.168.2.52 in the example). Other services, such as FTP and Telnet, are supported but undocumented:
Интервал:
Закладка:
Похожие книги на «Fedora™ Unleashed, 2008 edition»
Представляем Вашему вниманию похожие книги на «Fedora™ Unleashed, 2008 edition» списком для выбора. Мы отобрали схожую по названию и смыслу литературу в надежде предоставить читателям больше вариантов отыскать новые, интересные, ещё непрочитанные произведения.


![Andrew Radford - Linguistics An Introduction [Second Edition]](/books/397851/andrew-radford-linguistics-an-introduction-second-thumb.webp)


Обсуждение, отзывы о книге «Fedora™ Unleashed, 2008 edition» и просто собственные мнения читателей. Оставьте ваши комментарии, напишите, что Вы думаете о произведении, его смысле или главных героях. Укажите что конкретно понравилось, а что нет, и почему Вы так считаете.