William Stanek - Windows Server 2012 R2 Storage, Security, & Networking Pocket Consultant
Здесь есть возможность читать онлайн «William Stanek - Windows Server 2012 R2 Storage, Security, & Networking Pocket Consultant» весь текст электронной книги совершенно бесплатно (целиком полную версию без сокращений). В некоторых случаях можно слушать аудио, скачать через торрент в формате fb2 и присутствует краткое содержание. Жанр: ОС и Сети, на английском языке. Описание произведения, (предисловие) а так же отзывы посетителей доступны на портале библиотеки ЛибКат.
- Название:Windows Server 2012 R2 Storage, Security, & Networking Pocket Consultant
- Автор:
- Жанр:
- Год:неизвестен
- ISBN:нет данных
- Рейтинг книги:3 / 5. Голосов: 1
-
Избранное:Добавить в избранное
- Отзывы:
-
Ваша оценка:
Windows Server 2012 R2 Storage, Security, & Networking Pocket Consultant: краткое содержание, описание и аннотация
Предлагаем к чтению аннотацию, описание, краткое содержание или предисловие (зависит от того, что написал сам автор книги «Windows Server 2012 R2 Storage, Security, & Networking Pocket Consultant»). Если вы не нашли необходимую информацию о книге — напишите в комментариях, мы постараемся отыскать её.
Windows Server 2012 R2 Storage, Security, & Networking Pocket Consultant — читать онлайн бесплатно полную книгу (весь текст) целиком
Ниже представлен текст книги, разбитый по страницам. Система сохранения места последней прочитанной страницы, позволяет с удобством читать онлайн бесплатно книгу «Windows Server 2012 R2 Storage, Security, & Networking Pocket Consultant», без необходимости каждый раз заново искать на чём Вы остановились. Поставьте закладку, и сможете в любой момент перейти на страницу, на которой закончили чтение.
Интервал:
Закладка:
Windows Vista with SP1 or later and later releases of Windows use an RDP 6.1 or later compatible client. Here, RDP files can be digitally signed to prevent users from opening or running potentially dangerous RDP files from unknown sources. Administrators can sign RDP files by using a signing tool provided by Microsoft. Three related settings can be configured through Group Policy or through the registry. These settings include a comma-separated list of certificate hashes that are trusted by the administrator (known as the trusted publishers list ), an option to enable users to decide to accept untrusted publishers (enabled by default), and an option to enable users to accept unsigned files (enabled by default).
Windows 8.1 and Windows Server 2012 R2 have a number of enhancements in their built-in DNS clients that improve name resolution on IPv4 and IPv6 networks. With adaptive query timeout, the DNS client adapts the timeout interval based on the time required for previous queries. Thus, instead of waiting 1000 milliseconds (ms) before timing out a query, the timeout is adjusted based on past performance for the network, resulting in timeouts between 25 ms and 1000 ms.
The DNS client for Windows 8.1 and Windows Server 2012 R2 also supports query coalescing, parallel queries, and persistent caching. With query coalescing, the DNS client combines multiple DNS queries for the same name. This results in only one query and optimizes performance. With parallel queries, the DNS client issues IPv4 and IPv6 queries for A and AAAA records in parallel when both IP interfaces are enabled, which streamlines the query process and improves performance. Link-local multicast name resolution (LLMNR) and NETBIOS queries are also issued in parallel for IPv4 and IPv6. With a persistent cache, the DNS client maintains the DNS cache across changes that occur on the same network. For example, the DNS client now persists the cache after address change notifications and when the computer is resuming from the sleep or standby state.
Installing TCP/IP networking

To install networking on a computer, you must install TCP/IP networking and a network adapter. Windows Server 2012 R2 uses TCP/IP as the default wide area network (WAN) protocol. Typically, you install networking during Windows Server 2012 R2 setup. You can also install TCP/IP networking through network connection properties.
To install TCP/IP after installing Windows Server 2012 R2, log on to the computer by using an account with administrator privileges, and then follow these steps:
1.In Control Panel, access Network And Sharing Center by tapping or clicking View Network Status And Tasks under the Network And Internet heading.
2.In Network And Sharing Center, tap or click Change Adapter Settings.
3.In Network Connections, press and hold or right-click the connection with which you want to work, and then tap or click Properties. This displays a Properties dialog box for the connection, shown in Figure 7–3.
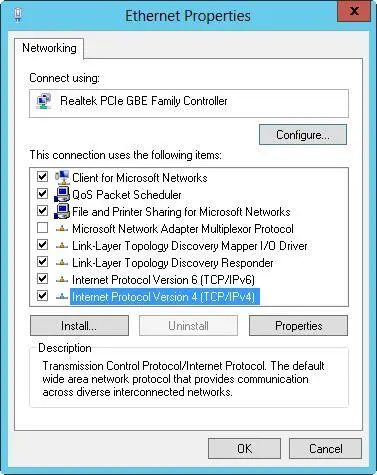
FIGURE 7–3Install and configure TCP/IP protocols.
4.If Internet Protocol Version 6 (TCP/IPv6), Internet Protocol Version 4 (TCP/IPv4), or both aren’t shown in the list of installed components, you need to install them. Tap or click Install. Tap or click Protocol, and then tap or click Add. In the Select Network Protocol dialog box, select the protocol to install, and then tap or click OK. If you are installing both TCP/IPv6 and TCP/IPv4, repeat this procedure for each protocol.
5.In the Properties dialog box for the network connection, be sure that Internet Protocol Version 6 (TCP/IPv6), Internet Protocol Version 4 (TCP/IPv4), or both are selected, and then tap or click OK.
6.As necessary, follow the instructions in the next section for configuring network connections for the computer.
Configuring TCP/IP networking
A network connection is created automatically if a computer has a network adapter and is connected to a network. If a computer has multiple network adapters and is connected to a network, one network connection is created for each adapter. If no network connection is available, you should connect the computer to the network or create a different type of connection.
Computers use IP addresses to communicate over TCP/IP. Windows Server 2012 R2 provides the following ways to configure IP addresses:
■ ManuallyIP addresses that are assigned manually are called static IP addresses . Static IP addresses are fixed and don’t change unless you change them. You usually assign static IP addresses to Windows servers, and when you do this, you need to configure additional information to help the server navigate the network.
■ DynamicallyA DHCP server (if one is installed on the network) assigns dynamic IP addresses at startup, and the addresses might change over time. Dynamic IP addressing is the default configuration.
■ Alternate addresses (IPv4 only)When a computer is configured to use DHCPv4 and no DHCPv4 server is available, Windows Server 2012 R2 assigns an alternate private IP address automatically. By default, the alternate IPv4 address is in the range 169.254.0.1 to 169.254.255.254 with a subnet mask of 255.255.0.0. You can also specify a user-configured alternate IPv4 address, which is particularly useful for laptop users.
Configuring a static IP addresses
When you assign a static IP address, you need to tell the computer the IP address you want to use, the subnet mask for this IP address, and, if necessary, the default gateway to use for internetwork communications. An IP address is a numeric identifier for a computer. IP addressing schemes vary according to how your network is configured, but they’re typically assigned based on a particular network segment.
IPv6 addresses and IPv4 addresses are very different. With IPv6, the first 64 bits represent the network ID and the remaining 64 bits represent the network interface. With IPv4, a variable number of the initial bits represent the network ID and the rest of the bits represent the host ID. For example, if you’re working with IPv4 and a computer on the network segment 10.0.10.0 with a subnet mask of 255.255.255.0, the first three octets (8-bit groups) represent the network ID, and the address range you have available for computer hosts is 10.0.10.1 to 10.0.10.254. In this range, the address 10.0.10.255 is reserved for network broadcasts.
If you’re on a private network that is indirectly connected to the Internet, you should use private IPv4 addresses. Table 7–1 summarizes private network IPv4 addresses.
TABLE 7–1Private IPv4 network addressing
| PRIVATE NETWORK ID | SUBNET MASK | NETWORK ADDRESS RANGE |
|---|---|---|
| 10.0.0.0 | 255.0.0.0 | 0.0.0.0-10.255.255.255 |
| 172.16.0.0 | 255.240.0.0 | 172.16.0.0-172.31.255.255 |
| 192.168.0.0 | 255.255.0.0 | 192.168.0.0-192.168.255.255 |
All other IPv4 network addresses are public and must be leased or purchased. If the network is connected directly to the Internet and you’ve obtained a range of IPv4 addresses from your Internet service provider, you can use the IPv4 addresses you’ve been assigned.
Читать дальшеИнтервал:
Закладка:
Похожие книги на «Windows Server 2012 R2 Storage, Security, & Networking Pocket Consultant»
Представляем Вашему вниманию похожие книги на «Windows Server 2012 R2 Storage, Security, & Networking Pocket Consultant» списком для выбора. Мы отобрали схожую по названию и смыслу литературу в надежде предоставить читателям больше вариантов отыскать новые, интересные, ещё непрочитанные произведения.


Обсуждение, отзывы о книге «Windows Server 2012 R2 Storage, Security, & Networking Pocket Consultant» и просто собственные мнения читателей. Оставьте ваши комментарии, напишите, что Вы думаете о произведении, его смысле или главных героях. Укажите что конкретно понравилось, а что нет, и почему Вы так считаете.