William Stanek - Windows Server 2012 R2 Storage, Security, & Networking Pocket Consultant
Здесь есть возможность читать онлайн «William Stanek - Windows Server 2012 R2 Storage, Security, & Networking Pocket Consultant» весь текст электронной книги совершенно бесплатно (целиком полную версию без сокращений). В некоторых случаях можно слушать аудио, скачать через торрент в формате fb2 и присутствует краткое содержание. Жанр: ОС и Сети, на английском языке. Описание произведения, (предисловие) а так же отзывы посетителей доступны на портале библиотеки ЛибКат.
- Название:Windows Server 2012 R2 Storage, Security, & Networking Pocket Consultant
- Автор:
- Жанр:
- Год:неизвестен
- ISBN:нет данных
- Рейтинг книги:3 / 5. Голосов: 1
-
Избранное:Добавить в избранное
- Отзывы:
-
Ваша оценка:
Windows Server 2012 R2 Storage, Security, & Networking Pocket Consultant: краткое содержание, описание и аннотация
Предлагаем к чтению аннотацию, описание, краткое содержание или предисловие (зависит от того, что написал сам автор книги «Windows Server 2012 R2 Storage, Security, & Networking Pocket Consultant»). Если вы не нашли необходимую информацию о книге — напишите в комментариях, мы постараемся отыскать её.
Windows Server 2012 R2 Storage, Security, & Networking Pocket Consultant — читать онлайн бесплатно полную книгу (весь текст) целиком
Ниже представлен текст книги, разбитый по страницам. Система сохранения места последней прочитанной страницы, позволяет с удобством читать онлайн бесплатно книгу «Windows Server 2012 R2 Storage, Security, & Networking Pocket Consultant», без необходимости каждый раз заново искать на чём Вы остановились. Поставьте закладку, и сможете в любой момент перейти на страницу, на которой закончили чтение.
Интервал:
Закладка:
NOTE You don’t have to assign volumes a drive letter or a path. A volume with no designators is considered to be unmounted and is for the most part unusable. An unmounted volume can be mounted by assigning a drive letter or a path at a later date. See “Assigning drive letters and paths” in Chapter 2.

FIGURE 1–4On the Assign Drive Letter Or Path page, assign the drive designator or choose to wait until later.
4.On the Format Partition page, shown in Figure 1–5, determine whether and how the volume should be formatted. If you want to format the volume, select Format This Volume With The Following Settings, and then configure the following options:
■ File SystemSets the file system type as FAT, FAT32, exFAT, NTFS, or ReFS. The file system types available depend on the size of the volume you are formatting. If you use FAT32, you can later convert to NTFS with the Convert utility. You can’t, however, convert NTFS partitions to FAT32.
■ Allocation Unit SizeSets the cluster size for the file system. This is the basic unit in which disk space is allocated. The default allocation unit size is based on the size of the volume and is set dynamically prior to formatting by default. To override this feature, you can set the allocation unit size to a specific value. If you use many small files, you might want to use a smaller cluster size, such as 512 or 1,024 bytes. With these settings, small files use less disk space. Note that ReFS volumes have a fixed allocation unit size.
■ Volume LabelSets a text label for the partition. This label is the partition’s volume name and is set to New Volume by default. You can change the volume label at any time by pressing and holding or right-clicking the volume in File Explorer, tapping or clicking Properties, and typing a new value in the Label box provided on the General tab.
■ Perform A Quick FormatTells Windows Server 2012 R2 to format without checking the partition for errors. With large partitions, this option can save you a few minutes. However, it’s usually better to check for errors, which enables Disk Management to mark bad sectors on the disk and lock them out.
■ Enable File And Folder CompressionTurns on compression for the disk. Built-in compression is available only for NTFS (and is not supported for FAT, FAT32, exFAT, or ReFS). Under NTFS, compression is transparent to users and compressed files can be accessed just like regular files. If you select this option, files and directories on this drive are compressed automatically. For more information on compressing drives, files, and directories, see “Compressing drives and data” later in this chapter.
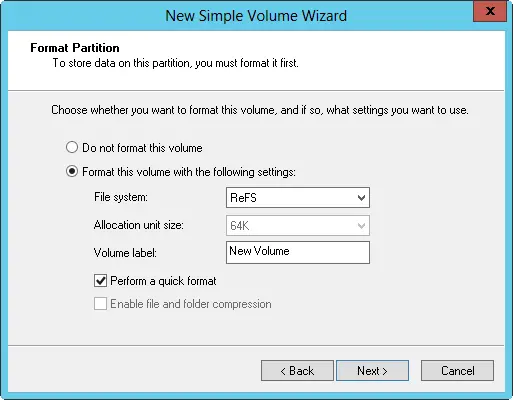
FIGURE 1–5Set the formatting options for the partition on the Format Partition page.
Formatting partitions
Formatting creates a file system on a partition and permanently deletes any existing data. This is high-level formatting that creates the file system structure rather than low-level formatting that initializes a drive for use. To format a partition, press and hold or right-click the partition, and then tap or click Format. This opens the Format dialog box, shown in Figure 1–6.
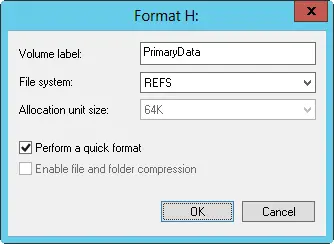
FIGURE 1–6Format a partition in the Format dialog box by specifying its file system type and volume label.
You use the formatting options as follows:
■ Volume LabelSpecifies a text label for the partition. This label is the partition’s volume name.
■ File SystemSpecifies the file system type as FAT, FAT32, exFAT, NTFS, or ReFS. The file system types available depend on the size of the volume you are formatting.
■ Allocation Unit SizeSpecifies the cluster size for the file system. This is the basic unit in which disk space is allocated. The default allocation unit size is based on the size of the volume and is set dynamically prior to formatting. To override this feature, you can set the allocation unit size to a specific value. If you use lots of small files, you might want to use a smaller cluster size, such as 512 or 1,024 bytes. With these settings, small files use less disk space.
■ Perform A Quick FormatTells Windows Server 2012 R2 to format without checking the partition for errors. With large partitions, this option can save you a few minutes. However, it’s more prudent to check for errors, which allows Disk Management to mark bad sectors on the disk and lock them out.
When you’re ready to proceed, tap or click OK. Because formatting a partition destroys any existing data, Disk Management gives you one last chance to cancel the procedure. Tap or click OK to start formatting the partition. Disk Management changes the drive’s status to reflect the formatting and the percentage of completion. When formatting is complete, the drive status changes to reflect this.
Compressing drives and data

When you format a drive for NTFS, Windows Server 2012 R2 allows you to turn on the built-in compression feature. With compression, all files and directories stored on a drive are automatically compressed when they’re created. Because this compression is transparent to users, compressed data can be accessed just like regular data. The difference is that you can store more information on a compressed drive than you can on an uncompressed drive.
IMPORTANT File explorer shows the names of compressed resources in blue. It’s also important to point out that ReFS does not support NTFS compression.
REAL WORLD Although compression is certainly a useful feature when you want to save disk space, you can’t encrypt compressed data. Compression and encryption are mutually exclusive alternatives for NTFS volumes, which means you have the choice of using compression or using encryption. You can’t use both techniques. For more information on encryption, see “Encrypting drives and data” later in this chapter. If you try to compress encrypted data, Windows Server 2012 R2 automatically decrypts the data, and then compresses it. Likewise, if you try to encrypt compressed data, Windows Server 2012 R2 uncompresses the data, and then encrypts it.
Compressing drives
To compress a drive and all its contents, follow these steps:
1.In File Explorer or Disk Management, press and hold or right-click the drive you want to compress, and then tap or click Properties.
2.On the General tab, select Compress Drive To Save Disk Space, and then tap or click OK.
3.In the Confirm Attribute Changes dialog box, select whether to apply the changes to subfolders and files, and then tap or click OK.
Compressing directories and files
If you decide not to compress a drive, Windows Server 2012 R2 lets you selectively compress directories and files. To compress a file or directory, follow these steps:
1.In File Explorer, press and hold or right-click the file or directory you want to compress, and then tap or click Properties.
Читать дальшеИнтервал:
Закладка:
Похожие книги на «Windows Server 2012 R2 Storage, Security, & Networking Pocket Consultant»
Представляем Вашему вниманию похожие книги на «Windows Server 2012 R2 Storage, Security, & Networking Pocket Consultant» списком для выбора. Мы отобрали схожую по названию и смыслу литературу в надежде предоставить читателям больше вариантов отыскать новые, интересные, ещё непрочитанные произведения.


Обсуждение, отзывы о книге «Windows Server 2012 R2 Storage, Security, & Networking Pocket Consultant» и просто собственные мнения читателей. Оставьте ваши комментарии, напишите, что Вы думаете о произведении, его смысле или главных героях. Укажите что конкретно понравилось, а что нет, и почему Вы так считаете.