William Stanek - Windows Server 2012 R2 Storage, Security, & Networking Pocket Consultant
Здесь есть возможность читать онлайн «William Stanek - Windows Server 2012 R2 Storage, Security, & Networking Pocket Consultant» весь текст электронной книги совершенно бесплатно (целиком полную версию без сокращений). В некоторых случаях можно слушать аудио, скачать через торрент в формате fb2 и присутствует краткое содержание. Жанр: ОС и Сети, на английском языке. Описание произведения, (предисловие) а так же отзывы посетителей доступны на портале библиотеки ЛибКат.
- Название:Windows Server 2012 R2 Storage, Security, & Networking Pocket Consultant
- Автор:
- Жанр:
- Год:неизвестен
- ISBN:нет данных
- Рейтинг книги:3 / 5. Голосов: 1
-
Избранное:Добавить в избранное
- Отзывы:
-
Ваша оценка:
Windows Server 2012 R2 Storage, Security, & Networking Pocket Consultant: краткое содержание, описание и аннотация
Предлагаем к чтению аннотацию, описание, краткое содержание или предисловие (зависит от того, что написал сам автор книги «Windows Server 2012 R2 Storage, Security, & Networking Pocket Consultant»). Если вы не нашли необходимую информацию о книге — напишите в комментариях, мы постараемся отыскать её.
Windows Server 2012 R2 Storage, Security, & Networking Pocket Consultant — читать онлайн бесплатно полную книгу (весь текст) целиком
Ниже представлен текст книги, разбитый по страницам. Система сохранения места последней прочитанной страницы, позволяет с удобством читать онлайн бесплатно книгу «Windows Server 2012 R2 Storage, Security, & Networking Pocket Consultant», без необходимости каждый раз заново искать на чём Вы остановились. Поставьте закладку, и сможете в любой момент перейти на страницу, на которой закончили чтение.
Интервал:
Закладка:
The VHD is attached automatically and added as a new disk. To initialize the disk for use, press and hold or right-click the disk entry in Graphical View, and then tap or click Initialize Disk. In the Initialize Disk dialog box, the disk is selected for initialization. Specify the disk type as MBR or GPT, and then tap or click OK.
After initializing the disk, press and hold or right-click the unpartitioned space on the disk and create a volume of the appropriate type. After you create the volume, the VHD is available for use.
After you’ve created, attached, initialized, and formatted a VHD, you can work with a virtual disk in much the same way as you work with other disks. You can write data to and read data from a VHD. You can boot the computer from a VHD. You are able to take a VHD offline or put a VHD online by pressing and holding or right-clicking the disk entry in Graphical View and selecting Offline or Online, respectively. If you no longer want to use a VHD, you can detach it by pressing and holding or right-clicking the disk entry in Graphical View, selecting Detach VHD, and then tapping or clicking OK in the Detach Virtual Hard Disk dialog box.
You can use VHDs created with other programs as well. If you created a VHD using another program or have a detached VHD you want to attach, you can work with the VHD by completing the following steps:
1.In Disk Management, tap or click the Attach VHD option on the Action menu.
2.In the Attach Virtual Hard Disk dialog box, tap or click Browse. Use the Browse Virtual Disk Files dialog box to select the.vhd file for the VHD, and then tap or click Open.
3.If you want to attach the VHD in read-only mode, select Read-Only. Tap or click OK to attach the VHD.
Using basic disks and partitions

When you install a new computer or update an existing computer, you often need to partition the drives on the computer. You partition drives by using Disk Management.
Partitioning basics
In Windows Server 2012 R2, a physical drive using the MBR partition style can have up to four primary partitions and one extended partition. This allows you to configure MBR drives in one of two ways: by using one to four primary partitions, or by using one to three primary partitions and one extended partition. A primary partition can fill an entire disk, or you can size it as appropriate for the workstation or server you’re configuring. Within an extended partition, you can create one or more logical drives. A logical drive is simply a section of a partition with its own file system. Generally, you use logical drives to divide a large drive into manageable sections. With this in mind, you might want to divide a 600-GB extended partition into three logical drives of 200 GB each. Physical disks with the GPT partition style can have up to 128 partitions.
After you partition a drive, you format the partitions. This is high-level formatting that creates the file system structure rather than low-level formatting that sets up the drive for initial use. You’re probably very familiar with the C drive used by Windows Server 2012 R2. Well, the C drive is simply the designator for a disk partition. If you partition a disk into multiple sections, each section can have its own drive letter. You use the drive letters to access file systems in various partitions on a physical drive. Unlike MS-DOS, which assigns drive letters automatically starting with the letter C, Windows Server 2012 R2 lets you specify drive letters. Generally, the drive letters C through Z are available for your use.
NOTE The drive letter A used to be assigned to a system’s floppy disk drive. If the system had a second floppy disk drive, the letter B was assigned to it, so you could use only the letters C through Z. Don’t forget that DVD drives and other types of media drives need drive letters as well. The total number of drive letters you can use at one time is 24. If you need additional volumes, you can create them by using drive paths.
By using drive letters, you can have only 24 active volumes. To get around this limitation, you can mount disks to drive paths. A drive path is set as a folder location on another drive. For example, you might mount additional drives as E: \Data1, E: \Data2, and E: \Data3. You can use drive paths with basic and dynamic disks. The only restriction for drive paths is that you mount them on empty folders that are on NTFS drives.
To help you differentiate between primary partitions and extended partitions with logical drives, Disk Management color codes the partitions. For example, primary partitions might be color coded with a dark-blue band and logical drives in extended partitions might be color coded with a light-blue band. The key for the color scheme is shown at the bottom of the Disk Management window. You can change the colors in the Settings dialog box by choosing Settings from the View menu.
Creating partitions and simple volumes
Windows Server 2012 R2 simplifies the Disk Management user interface by using one set of dialog boxes and wizards for both partitions and volumes. The first three volumes on a basic drive are created automatically as primary partitions. If you try to create a fourth volume on a basic drive, the remaining free space on the drive is converted automatically to an extended partition with a logical drive of the size you designate by using the new volume feature in the extended partition. Any subsequent volumes are created in the extended partitions as logical drives automatically.
In Disk Management, you create partitions, logical drives, and simple volumes by following these steps:
1.In Disk Management’s Graphical View, press and hold or right-click an unallocated or free area, and then tap or click New Simple Volume. This starts the New Simple Volume Wizard. Read the Welcome page, and then tap or click Next.
2.The Specify Volume Size page in the New Simple Volume Wizard, shown in Figure 1–3, specifies the minimum and maximum size for the volume in megabytes and lets you size the volume within these limits. Size the partition in megabytes in the Simple Volume Size In MB box, and then tap or click Next.
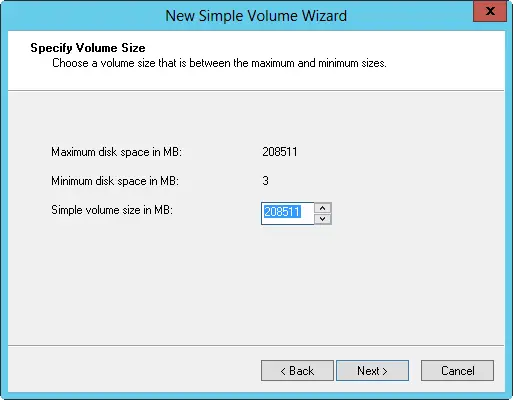
FIGURE 1–3Set the size of the volume on the Specify Volume Size page in the New Simple Volume Wizard.
3.On the Assign Drive Letter Or Path page, shown in Figure 1–4, specify whether you want to assign a drive letter or path, and then tap or click Next. The following options are available:
■ Assign The Following Drive LetterChoose this option to assign a drive letter. Then select an available drive letter in the list provided. By default, Windows Server 2012 R2 selects the lowest available drive letter and excludes reserved drive letters as well as those assigned to local disks or network drives.
■ Mount In The Following Empty NTFS FolderChoose this option to mount the partition in an empty NTFS folder. You must then type the path to an existing folder or tap or click Browse to search for or create a folder to use.
■ Do Not Assign A Drive Letter Or Drive PathChoose this option if you want to create the partition without assigning a drive letter or path. If you later want the partition to be available for storage, you can assign a drive letter or path at that time.
Читать дальшеИнтервал:
Закладка:
Похожие книги на «Windows Server 2012 R2 Storage, Security, & Networking Pocket Consultant»
Представляем Вашему вниманию похожие книги на «Windows Server 2012 R2 Storage, Security, & Networking Pocket Consultant» списком для выбора. Мы отобрали схожую по названию и смыслу литературу в надежде предоставить читателям больше вариантов отыскать новые, интересные, ещё непрочитанные произведения.


Обсуждение, отзывы о книге «Windows Server 2012 R2 Storage, Security, & Networking Pocket Consultant» и просто собственные мнения читателей. Оставьте ваши комментарии, напишите, что Вы думаете о произведении, его смысле или главных героях. Укажите что конкретно понравилось, а что нет, и почему Вы так считаете.