William Stanek - Windows Server 2012 R2 Storage, Security, & Networking Pocket Consultant
Здесь есть возможность читать онлайн «William Stanek - Windows Server 2012 R2 Storage, Security, & Networking Pocket Consultant» весь текст электронной книги совершенно бесплатно (целиком полную версию без сокращений). В некоторых случаях можно слушать аудио, скачать через торрент в формате fb2 и присутствует краткое содержание. Жанр: ОС и Сети, на английском языке. Описание произведения, (предисловие) а так же отзывы посетителей доступны на портале библиотеки ЛибКат.
- Название:Windows Server 2012 R2 Storage, Security, & Networking Pocket Consultant
- Автор:
- Жанр:
- Год:неизвестен
- ISBN:нет данных
- Рейтинг книги:3 / 5. Голосов: 1
-
Избранное:Добавить в избранное
- Отзывы:
-
Ваша оценка:
Windows Server 2012 R2 Storage, Security, & Networking Pocket Consultant: краткое содержание, описание и аннотация
Предлагаем к чтению аннотацию, описание, краткое содержание или предисловие (зависит от того, что написал сам автор книги «Windows Server 2012 R2 Storage, Security, & Networking Pocket Consultant»). Если вы не нашли необходимую информацию о книге — напишите в комментариях, мы постараемся отыскать её.
Windows Server 2012 R2 Storage, Security, & Networking Pocket Consultant — читать онлайн бесплатно полную книгу (весь текст) целиком
Ниже представлен текст книги, разбитый по страницам. Система сохранения места последней прочитанной страницы, позволяет с удобством читать онлайн бесплатно книгу «Windows Server 2012 R2 Storage, Security, & Networking Pocket Consultant», без необходимости каждый раз заново искать на чём Вы остановились. Поставьте закладку, и сможете в любой момент перейти на страницу, на которой закончили чтение.
Интервал:
Закладка:
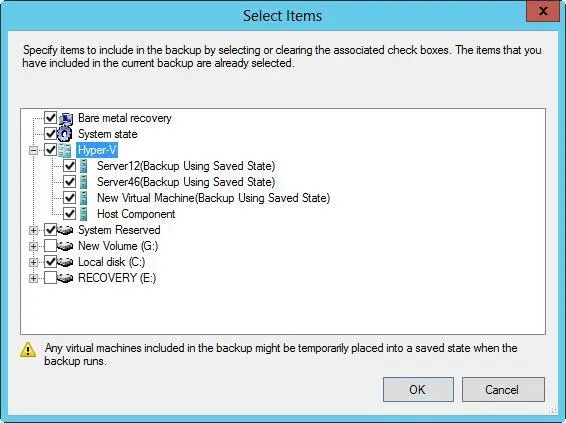
FIGURE 11-4Select the items to include in the backup.
4.On the Specify Backup Time page, shown in Figure 11-5, you can specify how often and when you want to run backups. To perform backups daily at a specific time, choose Once A Day, and then select the time to start running the daily backup. To perform backups multiple times each day, choose More Than Once A Day. Next, tap or click a start time under Available Time, and then tap or click Add to move the time under Scheduled Time. Repeat this process for each start time you want to add. Tap or click Next when you are ready to continue.
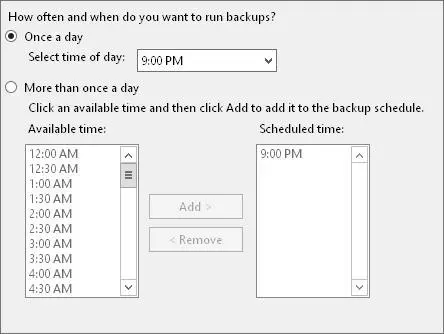
FIGURE 11-5Select the time to start running the backup.
5.On the Specify Destination Type page, you have these options:
■ Back Up To A Hard Disk That Is Dedicated For BackupsEnables you to specify a dedicated hard disk for backups. Although you can use multiple disks for backups, any disk you select will be formatted, and then dedicated only to backups. This option is recommended because you’ll get the best performance. If you select this option, tap or click Next, select the disk or disks to use, and then tap or click Next again.
■ Back Up To A VolumeEnables you to write backups to individual volumes on a hard disk. Because any volume you select is not dedicated to backups, it can be used for other purposes. However, the performance of any of the selected volumes is reduced while backups are being written. If you select this option, tap or click Next, use the Add and Remove options to select the volumes to use, and then tap or click Next again.
■ Back Up To A Shared Network FolderEnables you to specify a shared network folder for backups. With this option, you can have only one backup at a time because each new backup overwrites the previous backup. If you select this option, tap or click Next. When prompted, tap or click OK. Enter the UNC path to the network share, such as \\FileServer25\Backups\Exchange. If you want the backup to be accessible to everyone who has access to the shared folder, select Inherit under Access Control. If you want to restrict access to the shared folder to the current user and members of the Administrators and Backup Operators groups, select Do Not Inherit under Access Control. Tap or click Next. When prompted to provide access credentials, enter the user name and password for an account authorized to access and write to the shared folder.
6.On the Confirmation page, review the details, and then tap or click Finish. The wizard formats the disk. The formatting process might take several minutes or considerably longer depending on the size of the disk.
7.On the Summary page, tap or click Close. Your backups are now scheduled for the selected server.
With Wbadmin, you can schedule backups by using the ENABLE BACKUP command. ENABLE BACKUP accepts the following parameters:
■ —addTargetSets the storage location for backups according to the GUID of the disk you want to use. The GUID of a disk is listed as the disk identifier in the output of the Wbadmin GET DISKS command.
■ —removeTargetSets the storage location to remove from the backup schedule according to the GUID of the disk you want to use. The GUID of a disk is listed as the disk identifier in the output of the Wbadmin GET DISKS command.
■ —includeSets a comma-delimited list of volume drive letters, volume mount points, and GUID volume names to back up.
■ —allCriticalIncludes all operating system volumes in the backup automatically.
■ —quietSpecifies that you want to run the command with no prompts to the user.
To understand how ENABLE BACKUP is used, consider the following examples:
wbadmin enable backup -addTarget:{06d88776-0000-0000-0000-000000000000}
-schedule:18:00 -include: c:,d:
wbadmin enable backup -ddTarget:{06d88776-0000-0000-0000-000000000000}
-schedule:06:00,18:00 -allCritical
Modifying or stopping scheduled backups
After you’ve configured scheduled backups on a server, you can modify or stop the scheduled backups by following these steps:
1.Start Windows Server Backup. Tap or click Backup Schedule on the Action menu or in the Actions pane to start the Backup Schedule Wizard. Tap or click Next.
2.On the Modify Scheduled Backup Settings page, tap or click Modify Backup if you want to add or remove backup items, times, or targets, and then follow steps 3–7 in the section “Configuring scheduled backups” earlier in the chapter. If you want to stop the scheduled backups from running, tap or click Stop Backup, tap or click Next, and then tap or click Finish. When prompted to confirm, tap or click Yes, and then tap or click Close.
NOTE Stopping backups releases backup disks for ordinary use. Backup archives are not deleted from the backup disks and remain available for use in recovery.
With Wbadmin, you can modify scheduled backups by using the ENABLE BACKUP command. For targets, you must use the -addTarget and -removeTarget parameters to modify the target disks. For the run schedule and included volumes, you just set the new values you want to use. Consider the following examples:
wbadmin enable backup -addTarget:{41cd2567-0000-0000-0000-000000000000}
wbadmin enable backup -removeTarget:{06d88776-0000-0000-0000-000000000000}
wbadmin enable backup -schedule:03:00 -include: c:,d:,e:
Creating and scheduling backups with Wbadmin
One way to create manual backups is to use the Wbadmin START BACKUP command. START BACKUP accepts the following parameters:
■ —backupTargetSets the storage location for the backup as either a drive letter or UNC path to a shared folder on a remote server.
■ —includeSets a comma-delimited list of volume drive letters, volume mount points, and GUID volume names to back up.
■ —allCriticalIncludes all operating system volumes in the backup automatically.
■ —inheritAclSpecifies that you want the backup folder at the remote shared folder to inherit the security permissions of the shared folder. If you do not specify this parameter, the backup folder is accessible only to the user you specify in the -user parameter, administrators, and backup operators.
■ —noVerifySpecifies that you do not want to verify backups written to removable media. If you do not specify this parameter, backups written to removable media are verified.
■ —passwordSets the password to use when connecting to the remote shared folder.
■ —quietSpecifies that you want to run the command with no prompts to the user.
■ —userSets the user name to use when connecting to the remote shared folder.
Читать дальшеИнтервал:
Закладка:
Похожие книги на «Windows Server 2012 R2 Storage, Security, & Networking Pocket Consultant»
Представляем Вашему вниманию похожие книги на «Windows Server 2012 R2 Storage, Security, & Networking Pocket Consultant» списком для выбора. Мы отобрали схожую по названию и смыслу литературу в надежде предоставить читателям больше вариантов отыскать новые, интересные, ещё непрочитанные произведения.


Обсуждение, отзывы о книге «Windows Server 2012 R2 Storage, Security, & Networking Pocket Consultant» и просто собственные мнения читателей. Оставьте ваши комментарии, напишите, что Вы думаете о произведении, его смысле или главных героях. Укажите что конкретно понравилось, а что нет, и почему Вы так считаете.