Rockridge Press - The Preppers Cookbook
Здесь есть возможность читать онлайн «Rockridge Press - The Preppers Cookbook» весь текст электронной книги совершенно бесплатно (целиком полную версию без сокращений). В некоторых случаях можно слушать аудио, скачать через торрент в формате fb2 и присутствует краткое содержание. Город: Berkeley, Год выпуска: 2013, ISBN: 2013, Издательство: Rockridge Press, Жанр: Кулинария, на английском языке. Описание произведения, (предисловие) а так же отзывы посетителей доступны на портале библиотеки ЛибКат.
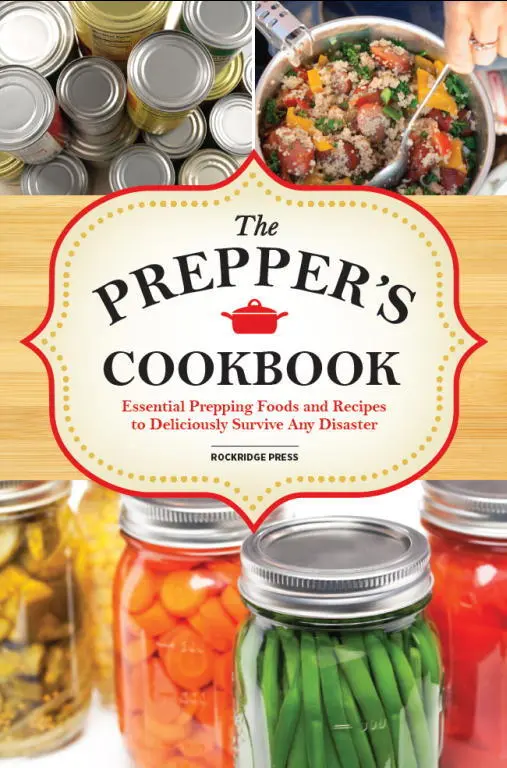
- Название:The Preppers Cookbook
- Автор:
- Издательство:Rockridge Press
- Жанр:
- Год:2013
- Город:Berkeley
- ISBN:978-1-62315-197-3
- Рейтинг книги:3 / 5. Голосов: 1
-
Избранное:Добавить в избранное
- Отзывы:
-
Ваша оценка:
The Preppers Cookbook: краткое содержание, описание и аннотация
Предлагаем к чтению аннотацию, описание, краткое содержание или предисловие (зависит от того, что написал сам автор книги «The Preppers Cookbook»). Если вы не нашли необходимую информацию о книге — напишите в комментариях, мы постараемся отыскать её.
.
Prepping your own food—choosing the right ingredients, in the right quantities, with the right methods—is the best way to ensure that you and your family will be ready for any disaster. This is the ultimate preppers cookbook for preparing in a safe and smart way.
With the help of
you’ll be able to:
• Get started with handy checklists and instructions to begin preparing immediately
• Use
to quickly learn and start using different food-preservation methods such as canning, pickling, and dehydrating
• Choose from delicious recipes from the
for every meal and situation, including breakfast, dessert, and snacks
• Keep track of your calories, water supply, and macronutrients using proper guidelines
• Easily organize your disaster response with helpful tips and suggestions from Regardless of what reality TV would have you believe, most preppers are real-world people just like you, who simply want to be prepared to survive any emergency that may arise. Advance preparation will be crucial to making it through a disaster, even if it’s for only a few days. With dozens of useful recipes, and with tutorials on crucial topics such as alternate food sources, reliable cooking methods, and water purification,
will help get your family prepared for any situation.
The Preppers Cookbook — читать онлайн бесплатно полную книгу (весь текст) целиком
Ниже представлен текст книги, разбитый по страницам. Система сохранения места последней прочитанной страницы, позволяет с удобством читать онлайн бесплатно книгу «The Preppers Cookbook», без необходимости каждый раз заново искать на чём Вы остановились. Поставьте закладку, и сможете в любой момент перейти на страницу, на которой закончили чтение.
Интервал:
Закладка:
2. In 4–6 days, you’ll notice that it’s bubbling and smelling wonderfully yeasty. It’s now ready. Keep it going by stirring in 2 cups of flour and about ¾ cup of lukewarm water whenever you use a cup of the starter.
Yields 1 batch of starter.
Personal Hygiene Items
It may seem now that if you’re in a survival situation, you won’t be worrying much about smelling good. That may be true for the first few days. After that, however, the niceties will become luxuries to you. If you talk to survivors of great disasters or war, they will tell you that often even small amounts of deodorant, shampoo, or toothpaste were more valuable than food.
Although you probably won’t have access to many of these ingredients post-disaster, they’re great to make and keep in your emergency supply for both personal use and for barter. They’re all chemical-free and actually good for you, so making your own is just one more way to be healthier and less dependent upon commercial substances.
You’ll note that coconut oil is a key component in several of these, and though it’s a little expensive, its health benefits are amazing. Since it has antibacterial and antimicrobial properties, it’s a great base for many personal hygiene products. Use organic, unrefined oil when possible. If you don’t want the coconut smell, use expeller-pressed oil so it doesn’t lose its efficacy through heating.
Deodorant
Coconut oil hovers between liquid and solid at room temperature, so it will probably be a bit liquid once you start working with it. That’s normal. Although this isn’t an antiperspirant, once you wear it for a while and your body becomes accustomed to not depending on chemical inhibitors, you’ll notice that you won’t produce as much underarm sweat.
• ¼ cup arrowroot powder or cornstarch
• ¼ cup baking soda
• 7 tablespoons coconut oil, approximately
1. Combine the arrowroot and baking soda, and then add the coconut oil 1 tablespoon at a time until a nice thick paste forms, similar to store-bought deodorant.
2. Store in a jar or other container, and just smooth a teaspoon or two under each armpit.
Yields about 1 cup.
Body Lotion Bars
These are similar to bars of soap, but when you rub it on your skin, it leaves a nice layer of moisturizer. Feel free to add essential oils for health or scent properties. These have a nice coconut, nutty scent just the way they are.
• 1/3 cup coconut oil
• 1/3 cup shea, mango, cocoa, kokum, or illipe butter, or any combination of these
• 1/3 cup beeswax
• 1 teaspoon vitamin e oil
• A few drops of essential oil (optional)
1. Line a muffin pan with parchment paper, or use mini loaf pans lined with plastic wrap or parchment paper. You could also use soap molds or basically any kind of container you’d like to use to shape these bars.
2. Combine all the ingredients except the essential oils in a glass canning jar, and place it in a pan of warm water. Heat over medium fire until the water is starting to simmer, and then remove from the heat. Stir mixture and let it warm to the point of melting. When liquefied, stir well and then add the essential oil.
3. Pour into your molds and allow to cool completely before removing. Store in resealable plastic bags or airtight plastic containers.
4. When you want to use a lotion bar, just run it over your skin for a nice layer of moisturizing lotion.
Yields about 3 bars, using muffin tins filled halfway.
Antiseptic Ointment
This ointment is all-natural and has antibacterial, antifungal, antibiotic, antiviral, and analgesic properties.
• 2 ounces beeswax, softened
• 1 cup coconut or almond oil
• ½ teaspoon tea tree oil
• ½ teaspoon vitamin E oil
• 1 ounce jojoba oil
• 24 drops lavender essential oil
• 12 drops lemon essential oil
1. Combine all the ingredients, warming slightly to liquefy the mixture so the oils meld.
2. Store in an airtight tin or jar, and use on cuts, skin irritations, or any other condition that requires a salve.
Yields about 1½ cups.
Soothing Sunscreen Lip Balm
• 3 tablespoons coconut oil
• 3 drops tea tree oil
• 3 drops lemon oil
• 1 tablespoon shea butter
1. Combine all the ingredients and store in an airtight tin in a cool, dry place. Apply as often as necessary.
Yields about 3 tablespoons.
Homemade Toothpaste
Many people don’t know it, but salt is one of the best disinfectants you can use. It also helps remove food particles and buildup from your teeth.
• 1/3 cup baking soda
• 1 teaspoon unrefined sea salt
• 1 teaspoon peppermint extract to taste (or spearmint, cinnamon, etc.)
• About 2 tablespoons water
1. Combine baking soda, salt, and extract with enough water to create the consistency of toothpaste.
2. Store in an airtight tin or jar. Use like regular toothpaste.
Yields about ½ cup.
CONCLUSION
In a survival situation, how you get things done won’t be nearly as important as getting them done. Fancy pots, difficult-to-make intricate recipes, and commercial hair products will be replaced with iron skillets, Dutch ovens, and whatever food and hygiene products you have stored or that you can make yourself from your supplies.
Advance preparation will be crucial to giving you a fighting chance of making it through a disaster, even if it’s for only a few days. Stocking foodstuffs that don’t spoil easily, don’t need refrigeration, and can be used in many different ways will make your life infinitely easier.
Canning is a great way to preserve foods without worrying about chemicals and excess sodium. It’s also inexpensive, especially if you’re fortunate enough to be able to grow your own foods. Virtually any individual food or recipe can be canned, too, so having some of your favorite meals already preserved, cooked, and ready to eat will really make life without power or other modern conveniences a little easier to bear. One can live happily on plain canned tuna for only so long.
Other items that are extremely useful to keep stocked include herbs and spices, both for seasoning and medicinal purposes. Consider buying a book specifically about the various uses of herbs and keep it nearby.
Thanks for reading and using this book, and we hope that you found the information interesting and useful. If you’re fortunate, you’ll never need either the information or the emergency supply, but it’s much better to be prepared than not to be!
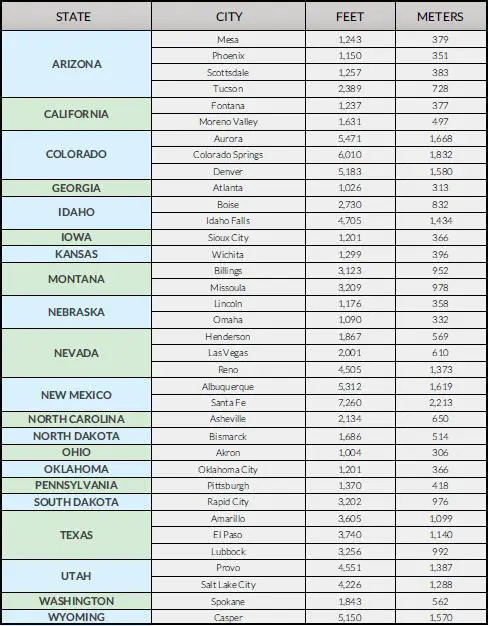
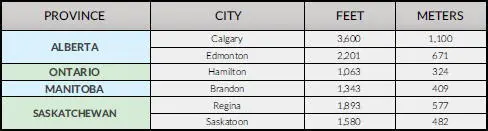
ALTITUDE CHART
Below are altitudes of selected cities in the United States and Canada. To find the exact altitude of your location, use the search features on the EarthTools website ( www.earthtools.org).
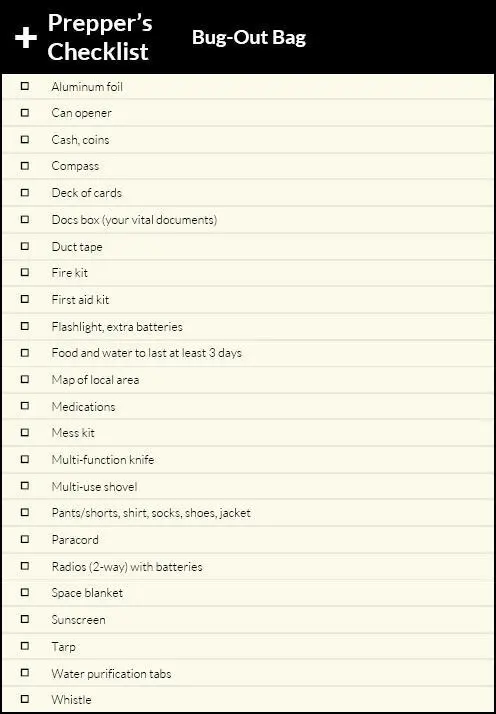
BUG-OUT BAG CHECKLIST
Copyright
Copyright © 2013 by Rockridge Press, Berkeley, California
No part of this publication may be reproduced, stored in a retrieval system or transmitted in any form or by any means, electronic, mechanical, photocopying, recording, scanning or otherwise, except as permitted under Sections 107 or 108 of the 1976 United States Copyright Act, without the prior written permission of the Publisher. Requests to the Publisher for permission should be addressed to the Permissions Department, Rockridge Press, 918 Parker St, Suite A-12, Berkeley, CA 94710.
Читать дальшеИнтервал:
Закладка:
Похожие книги на «The Preppers Cookbook»
Представляем Вашему вниманию похожие книги на «The Preppers Cookbook» списком для выбора. Мы отобрали схожую по названию и смыслу литературу в надежде предоставить читателям больше вариантов отыскать новые, интересные, ещё непрочитанные произведения.


Обсуждение, отзывы о книге «The Preppers Cookbook» и просто собственные мнения читателей. Оставьте ваши комментарии, напишите, что Вы думаете о произведении, его смысле или главных героях. Укажите что конкретно понравилось, а что нет, и почему Вы так считаете.