Peter Beale - Fallen Sentinel - Australian Tanks in World War II
Здесь есть возможность читать онлайн «Peter Beale - Fallen Sentinel - Australian Tanks in World War II» весь текст электронной книги совершенно бесплатно (целиком полную версию без сокращений). В некоторых случаях можно слушать аудио, скачать через торрент в формате fb2 и присутствует краткое содержание. Город: Newport, Год выпуска: 2011, ISBN: 2011, Издательство: Big Sky Publishing, Жанр: military_history, на английском языке. Описание произведения, (предисловие) а так же отзывы посетителей доступны на портале библиотеки ЛибКат.
- Название:Fallen Sentinel: Australian Tanks in World War II
- Автор:
- Издательство:Big Sky Publishing
- Жанр:
- Год:2011
- Город:Newport
- ISBN:978-1-92194-102-3
- Рейтинг книги:5 / 5. Голосов: 1
-
Избранное:Добавить в избранное
- Отзывы:
-
Ваша оценка:
Fallen Sentinel: Australian Tanks in World War II: краткое содержание, описание и аннотация
Предлагаем к чтению аннотацию, описание, краткое содержание или предисловие (зависит от того, что написал сам автор книги «Fallen Sentinel: Australian Tanks in World War II»). Если вы не нашли необходимую информацию о книге — напишите в комментариях, мы постараемся отыскать её.
Fallen Sentinel presents a careful dissection of government process in the crucible of war, a rare gem in an age when most wartime histories focus on the front-line soldier. Peter Beale presents a damning indictment of the frailty of government under pressure, a bureaucracy in crisis and the extraordinary failure of government process at the highest level. Modern-day governments would do well to heed the lessons of this book.
Fallen Sentinel: Australian Tanks in World War II — читать онлайн бесплатно полную книгу (весь текст) целиком
Ниже представлен текст книги, разбитый по страницам. Система сохранения места последней прочитанной страницы, позволяет с удобством читать онлайн бесплатно книгу «Fallen Sentinel: Australian Tanks in World War II», без необходимости каждый раз заново искать на чём Вы остановились. Поставьте закладку, и сможете в любой момент перейти на страницу, на которой закончили чтение.
Интервал:
Закладка:
Two more tanks disappeared into the blue heading towards Hendecourt with a party of Australians trailing behind. Neither tanks nor diggers were seen again. 6Two tanks were trooped in slow time through Berlin shortly afterwards, and they may have been these. It is hardly surprising that the Germans were not inspired to build tanks for themselves on the evidence of this abysmal performance.
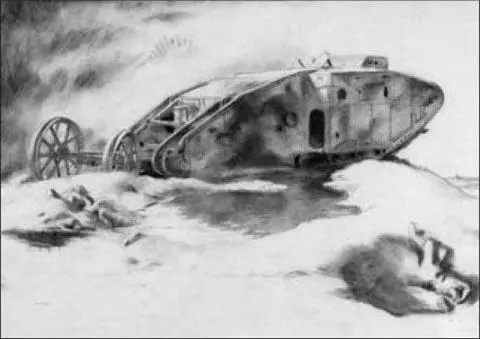
One tank, commanded by Lieutenant Money, seems to have reached the German wire before a direct hit from a field gun set it ablaze. 7The crew members, who had escaped relatively unscathed, took all the weapons they could find, including Lewis guns and revolvers, and joined whatever unit could make use of them. All the same, when an Australian Brigadier told Major Watson that ‘his tanks were bloody useless’, Watson could hardly argue. 8
As Bean notes, ‘Throughout the 4th Australian Division the chief blame for the miscarriage and the very heavy casualties was naturally laid on the tanks, and the bitterness against them was intense… The performance of several of the tank crews reached the highest standards of British devotion… A proportion were quite unfit for the task, became badly shaken, and undoubtedly failed to rise to the exacting expectations of the Australian infantry.’ 9
It was not only the Australians who thought tanks were close to useless at this point. The tank command and the crews themselves felt that they had been thrust into action piecemeal and much too soon given their level of training. The Mark I and Mark II tanks were, as demonstrated at Bullecourt, slow, unreliable, and vulnerable to a broad range of enemy fire.
By the middle of 1917, few people had much faith in tanks. Fortunately for the tanks and, in the long run, for the infantry, one person who had faith in them was the British Commander-in-Chief, Douglas Haig. He informed the War Office on 5 June 1917 that ‘events have proved the utility of tanks, both as a means of overcoming hostile resistance… and as a means of reducing casualties in the attacking troops and I consider that sufficient experience has now been gained to warrant the adoption of the tank as a recognised addition to the existing means of conducting offensive operations.’ 10
As well as benefitting from Haig’s faith, the Tank Corps was further encouraged by the improved performance of the Mark IV tank, which began to appear in tank battalions in mid-1917. 11The volume of tanks delivered also made possible the employment of tanks en masse, a policy which had been recommended by tank commanders and strategists from the outset. The policy produced a rousing success at Cambrai in November 1917, and inspired the belief that the ‘Cambrai key’ could well be the key to the future.
The German Spring Offensive of 1918 gave the tanks a role in defence, which regrettably left many tanks abandoned on the battlefield to be captured by the enemy. However, this period also saw the delivery of the improved Mark V tank. 12Thus, by the time the Australians were prepared to have a second go at using tanks, the Tank Corps was a much better instrument than it had been in the spring of 1917.
The tanks were more powerful, easier to manoeuvre, more reliable, and better armoured; the crews were experienced and skilful; and the commanders had developed procedures for making good use of tanks to support the infantry. Hamel was the next major battle, and it was to prove significant for the Australians, the Tank Corps, and for the conduct of the war on the Western Front as a whole.
The German onslaught which began on 21 March 1918 created havoc, particularly on the front occupied by the British Fifth Army. 14As the German advance continued it threatened to drive a wedge between the British armies under Haig and the French armies under Petain. This was a crisis of command and, to meet the crisis, a conference was held at Doullens on 26 March. After some sharp exchanges, and largely on the initiative of Haig, a formula was agreed and signed: ‘General Foch is charged by the British and French Governments with the co-ordination of the action of the Allied Armies on the Western Front.’ 15
Foch’s powers were further increased at a second conference held at Beauvais on 3 April, where he was entrusted with ‘the strategic direction of military operations’. 16He was now the Supreme Allied Commander, and bore responsibility for both Britain and France.
By early June, the German offensive had been halted and Foch was convinced that the time had come for an Allied attack. Foch ordered a series of minor offensives which could take the form of substantial raids on a scale of 100 to 200 men or the capture of territory of tactical value to the enemy, as a means to destroy the enemy’s defensive organisation. The order was conveyed through Haig and then Rawlinson, commanding the British Fourth Army, who passed it to his Corps Commanders, including General Monash, Commander of the Australian Corps.
General MacLagan, GOC 4th Division, positioned opposite Hamel, proposed the capture of Vaire Wood on his right front. He considered that this action ‘would need six battalions, and should not take place at present.’ There were sound tactical reasons for not immediately attacking Hamel and the ridge beyond it, all sufficiently compelling to avoid the casualties that would almost certainly result.
In the middle of June, the tanks of 5th Tank Brigade began to arrive by rail in an area just north of Amiens, only a few miles from the front opposite Hamel. The brigade consisted of the 2nd, 8th, and 13th Battalions of the Tank Corps, and a company of Whippets, the new light tanks. 17The three heavy battalions were armed with the new Mark V tanks.
The 5th Tank Brigade was commanded by Brigadier General Anthony Courage, and both he and Brigadier General Hugh Elles, commanding the Tank Corps as a whole, were anxious to prove the value of their new weapon. 18Elles invited Monash and his Chief of Staff, Brigadier General Thomas Blamey, to see the new tanks at work.
Monash and Blamey were impressed by the performance of the new tanks, and decided that the Hamel operation was feasible if the presence of tanks could reduce casualties. Monash drew up a plan which he described as ‘primarily a tank action’, and an outline was submitted to Rawlinson on 21 June. Rawlinson liked the plan and submitted it to Haig on 23 June with the comment, ‘If the operation is successful then the casualties should not be great, as it is intended to make the operation essentially a surprise tank attack. I consider that the advantages to be gained are well worth the cost.’
Читать дальшеИнтервал:
Закладка:
Похожие книги на «Fallen Sentinel: Australian Tanks in World War II»
Представляем Вашему вниманию похожие книги на «Fallen Sentinel: Australian Tanks in World War II» списком для выбора. Мы отобрали схожую по названию и смыслу литературу в надежде предоставить читателям больше вариантов отыскать новые, интересные, ещё непрочитанные произведения.


Обсуждение, отзывы о книге «Fallen Sentinel: Australian Tanks in World War II» и просто собственные мнения читателей. Оставьте ваши комментарии, напишите, что Вы думаете о произведении, его смысле или главных героях. Укажите что конкретно понравилось, а что нет, и почему Вы так считаете.