Gretel Parker - Little Needle-felt Animals
Здесь есть возможность читать онлайн «Gretel Parker - Little Needle-felt Animals» — ознакомительный отрывок электронной книги совершенно бесплатно, а после прочтения отрывка купить полную версию. В некоторых случаях можно слушать аудио, скачать через торрент в формате fb2 и присутствует краткое содержание. Жанр: unrecognised, на английском языке. Описание произведения, (предисловие) а так же отзывы посетителей доступны на портале библиотеки ЛибКат.
- Название:Little Needle-felt Animals
- Автор:
- Жанр:
- Год:неизвестен
- ISBN:нет данных
- Рейтинг книги:4 / 5. Голосов: 1
-
Избранное:Добавить в избранное
- Отзывы:
-
Ваша оценка:
Little Needle-felt Animals: краткое содержание, описание и аннотация
Предлагаем к чтению аннотацию, описание, краткое содержание или предисловие (зависит от того, что написал сам автор книги «Little Needle-felt Animals»). Если вы не нашли необходимую информацию о книге — напишите в комментариях, мы постараемся отыскать её.
Little Needle-felt Animals — читать онлайн ознакомительный отрывок
Ниже представлен текст книги, разбитый по страницам. Система сохранения места последней прочитанной страницы, позволяет с удобством читать онлайн бесплатно книгу «Little Needle-felt Animals», без необходимости каждый раз заново искать на чём Вы остановились. Поставьте закладку, и сможете в любой момент перейти на страницу, на которой закончили чтение.
Интервал:
Закладка:
• And my favourite, Anchor Pearl Cotton, has so many gorgeous colours for stylish embroidery and for making beautiful cords for dangles.
Beads and Findings
I like to have as wide a variety of beads as possible. On my larger pieces I usually use the traditional looped black ‘English’ glass eyes. They range in size from the very tiny (2mm) upwards, but black glass seed beads also make good eyes and I often use them on smaller projects. Jewellery findings, such as clips, dangles, brooches, or hat pins, are useful for adding different ways to use your creations.
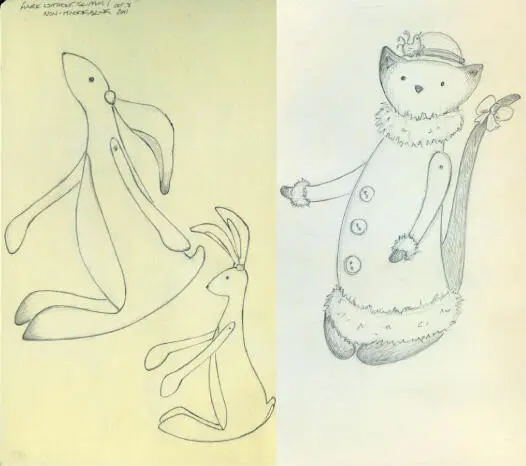
Sketch Before you Stab
Before my workshop students begin needle-felting, I encourage them to do a little pre-sketch of what they want to make. This usually produces groans of ‘I can’t draw!’ But it only has to be the roughest of doodles. Drawing an idea not only gives a visual guide to the finished size, but also helps fix the image in your head as you work, making it easier to create the design you have imagined. I very rarely start a design in my hands – it usually starts on my sketchbook page. My stock of drawings is invaluable for storing ideas – every crafter should have one.
Repeated Elements
Needle-felting is really a form of free sculpture, but here are some tried and tested methods I’ve perfected over the years. These will help you achieve good results, whether follow the patterns or work on your own designs.
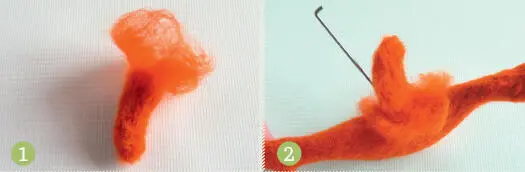
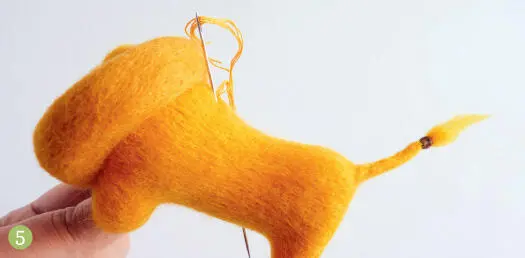
Joining Parts
Wool sticks to itself as you work, so joining is easy – no thread, no glue, just the wool itself and your needle. Here’s how to do it:
1 Loosely shape the arm or leg, leaving the fibres loose where it is to join the body.
2 Splay the loose fibres apart so that they spread evenly over the join area. You can use a spare needle to hold the limb to the body while you are working, then remove it once it is attached safely.
3 Finish shaping the wool so that it becomes a natural part of the body. You may have to add small amounts of extra wool to fill in awkward-looking gaps, but that is fine.
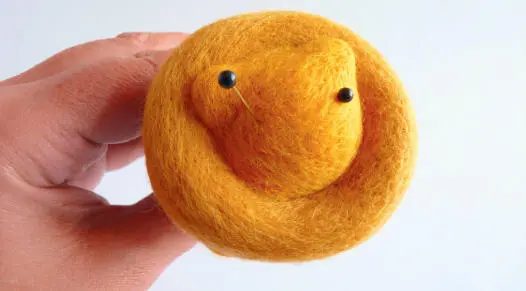
Attaching Eyes
I use a traditional toy maker’s method of sewing in eyes, which can be used with specialist looped glass eyes (commonly used for miniature teddy bears) or seed beads. A strong thread, such as that made by Gutermann, is best. Where possible, use a thread that matches the colour of the piece you are working on. Eyes are a vital part of your animal or bird and will instantly give it life. The size of the eye can change its character, so experiment with different sizes. The position of the eyes is also important, so before you actually sew them in, use a pair of black-headed pins to judge where the eyes are going to go and play around with them. Large, wide apart eyes give an innocent expression. Front-facing eyes are a sign of a hunting type of animal, whereas bird eyes are often small and on the sides of the head. Look at real creatures to see what a variety of eyes there are in the natural world.
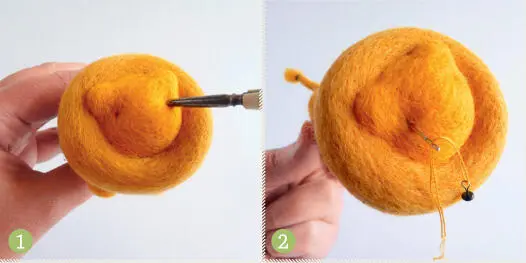
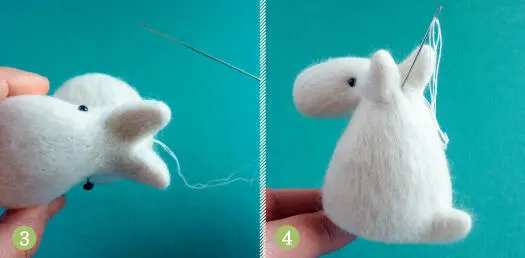
Front-Facing Method
1 Using an awl, drill a hole where each eye is to go; this makes a little socket for it to sit in.
2 Thread each eye singly with a good length of strong cotton. Thread a long needle with the first eye, take the needle into a socket and bring it out behind the head, around the back of the neck. Draw it through, pulling the eye snug into the face.
3 Repeat with the second eye, bringing the thread out at the same place as the first thread, on the back of the neck.
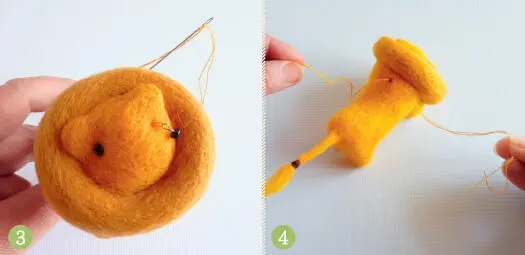
4 Tie the two loose threads together, tugging gently to ensure that the eyes are tight within the felt, and finish off the knot.
5 Rethread the needle with all four strands of thread. Take the needle back into the body so that the threads emerge some distance away from the knot; this is to avoid the knot untying and loosening the eyes. If needs be, patch and tidy (see here) the little area where the knot is.
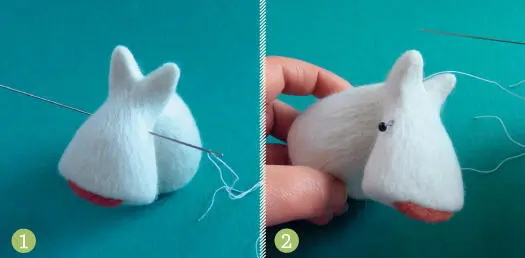
Sideways Method
1 Using an awl, drill a hole on either side of the face where the eyes are to sit. Thread a long needle with a good length of cotton and take it from one eye socket through to the one on the other side.
2 Unthread the needle and put an eye on to one of the cotton strands. Rethread the needle and take the needle into the socket, bringing it out at a point behind the head to ensure that the eye is sitting neatly in the socket.
3 Repeat on the other side, bringing the cotton out at the same point.
4 Pull the strands tight, without breaking them, so that the eyes sit snugly in the face. Tie off the strands, rethread them on to the needle and take the needle back into the body, bringing them out some distance away from the knot, as for the front-facing method. If needs be, patch and tidy the little area where the knot is.
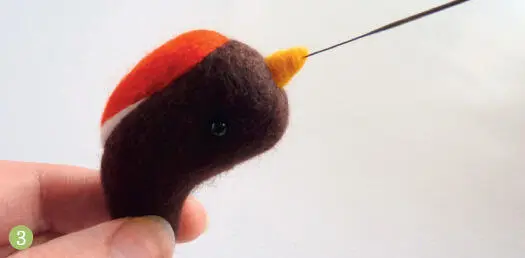
Adding Beaks
Roly-poly Robinand Marching Penguinboth have small, pointy beaks. The technique to make beaks can be quite fiddly, so use a spare needle as a guide. This is a great way to get any tiny beak made – simply adjust the amounts of wool to suit the bird you’re working on.
1 Position a guide needle in the spot where the beak is to go. Take a very small amount of wool and, using another needle, anchor one end of the wool into the body.
2 Wind the wool around the guide needle and carefully stab at it until the beak is strong enough that you can remove the guide needle.
3 Finish firming up until you have a nice pointy beak. How easy was that?

Stitching Noses
1 To stitch a nose, preferably use thick cotton or a waxed thread. Thread a long needle and knot one end of the thread. Take the thread in at the side of the face, a little distance from where the nose is to be.
Читать дальшеИнтервал:
Закладка:
Похожие книги на «Little Needle-felt Animals»
Представляем Вашему вниманию похожие книги на «Little Needle-felt Animals» списком для выбора. Мы отобрали схожую по названию и смыслу литературу в надежде предоставить читателям больше вариантов отыскать новые, интересные, ещё непрочитанные произведения.


Обсуждение, отзывы о книге «Little Needle-felt Animals» и просто собственные мнения читателей. Оставьте ваши комментарии, напишите, что Вы думаете о произведении, его смысле или главных героях. Укажите что конкретно понравилось, а что нет, и почему Вы так считаете.