Gretel Parker - Little Needle-felt Animals
Здесь есть возможность читать онлайн «Gretel Parker - Little Needle-felt Animals» — ознакомительный отрывок электронной книги совершенно бесплатно, а после прочтения отрывка купить полную версию. В некоторых случаях можно слушать аудио, скачать через торрент в формате fb2 и присутствует краткое содержание. Жанр: unrecognised, на английском языке. Описание произведения, (предисловие) а так же отзывы посетителей доступны на портале библиотеки ЛибКат.
- Название:Little Needle-felt Animals
- Автор:
- Жанр:
- Год:неизвестен
- ISBN:нет данных
- Рейтинг книги:4 / 5. Голосов: 1
-
Избранное:Добавить в избранное
- Отзывы:
-
Ваша оценка:
Little Needle-felt Animals: краткое содержание, описание и аннотация
Предлагаем к чтению аннотацию, описание, краткое содержание или предисловие (зависит от того, что написал сам автор книги «Little Needle-felt Animals»). Если вы не нашли необходимую информацию о книге — напишите в комментариях, мы постараемся отыскать её.
Little Needle-felt Animals — читать онлайн ознакомительный отрывок
Ниже представлен текст книги, разбитый по страницам. Система сохранения места последней прочитанной страницы, позволяет с удобством читать онлайн бесплатно книгу «Little Needle-felt Animals», без необходимости каждый раз заново искать на чём Вы остановились. Поставьте закладку, и сможете в любой момент перейти на страницу, на которой закончили чтение.
Интервал:
Закладка:
Flat Bottoms
Several of the designs need a nice flat bottom to sit on. If you hold the body vertically on the felting mat, so that it is already ‘sitting’, you will get a preliminary flat base, which you can then pick up and work on. Using your thumb and index finger as a circular template helps define a neatly curved edge.
Turning Work
Unless you actually want a flat design, turn your project as you work so that you are treating all sides equally. It’s quite tempting sometimes to get so involved with one area that the rest is forgotten, which results in overworked areas. A project is never entirely finished until the final stage, when the fine-tuning takes place. For me, this is the part that takes the most time.
Patching and Tidying
There will be times (such as when you have added elements) when there is a visible join. This is where wool shines as a medium. Simply use tiny tufts of wool to fill in any gaps and then cover over the filled join with a thin layer of wool. Work carefully and neatly, and the added wool will blend in, making your work appear seamless.
Layering and Finishing Off
1 The final finish of any piece of work is so important. If, like me, you want as neat and smooth a surface as possible, then be prepared to put the time in. Use very thin veils of wool, teased out so finely that you can see through them.
2 Carefully cover your work with this thin veil of wool, using two 40 or 42 needles. Work closely and with regular movements, not jabbing too hard. The wool fibres should follow the length of the body and lie in the same direction as much as possible.
3 Look carefully at the surface; it will look like orange peel. Using one needle, poke the tiny dimples down. When you’ve done this all over, go back and do it again and again, until you are satisfied.
Fuzzies
Fuzzies are inevitable. Merino wool is especially hairy. Layering and careful needling means that you will get a finer finish, but there is no shame in trimming your work. I shear mine by holding scissor blades flat across the surface, but do be careful that you don’t damage your work when you do this.
Use Your Judgement
No matter how closely you follow a pattern, needle-felting is mostly a matter of judgement. How does the felted wool feel in your hands? Is it too loose, too hard, or just right? If it’s too hard, it will be difficult to add extra parts. If it’s too soft, it is not so easy to sculpt. As you do more and more needle-felting, however, judging the wool will become second nature – rather like sensing the right tension in knitting.
Take Your Time
Getting a fine finish can take some time, so if you want to make something quick, start with a small pattern, such as the Happy Hedgehogor Chunky Funky Snail. Needle-felting is not a craft to be hurried, and many people find the gentle pace very therapeutic.
And Finally...
Don’t worry if your animal doesn’t turn out exactly as the one in the photograph. The wonderful thing about needle-felting is that it is such an expressive craft; that each person brings their own touch, and no two styles are the same. There are no strict rules. Follow the patterns, try the techniques, but most important, have fun!
Needle-Felting Tools
Make sure you have all the tools and materials you need before you get started with needle-felting. With each pattern I recommend how many needles and what size to use for the best finish, but work with whatever you feel comfortable with.
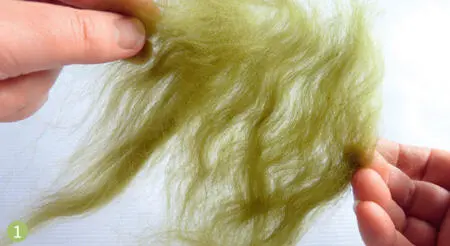
Wool
You can use any wool to needle-felt – coarser wools stick together more quickly, but I always use merino as it gives me the fine, tight finish I prefer. Roving (or tops, as it is also known) comes in long lengths that are usually about 4cm wide.
The measurements of wool that I give in the patterns are fairly precise, but don’t worry if you are a bit over or under; things usually turn out fine, I’ve found.
Felting Sponges and Mats
Always work on a protective sponge or brush mat, especially when beginning a piece of work. If you try needle-felting on your lap without a mat, you will stab yourself as well as your work, which is very painful! Felting sponges should be firm and tight-grained. If you are unsure whether needle-felting is for you, buy sponge for cheapness. For longevity, though, invest in a felting brush mat, which will last for years. I recommend covering the bristles with a thin, smooth textile covering, otherwise the wool sticks directly to the brush.
Needle Holders
There are all kinds of holders for needles. The one I use all the time is the pen holder because it holds the needles very close together, making it more efficient in matting the wool and better for small projects. Other kinds work well, too, and are preferable to simply holding a needle in your hand, which can cause cramps. The fitting end of all needles is the same (see the needles on the right in the photograph) and fits any holder.
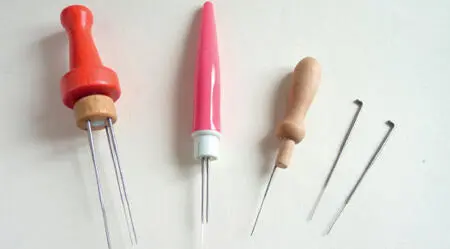
Needles
Needles come in a variety of sizes and shapes: the larger the needle size, the finer it is. They range in size from very thick (size 32) to ultra fine (size 43). The needle stems can be cross-shaped, star-shaped, spiral or triangular (the most popular).
I don’t use many types of needle. The majority of my work is made with one or two size 40 triangular needles, though I also use sizes 42 and even 43 for surface finishing. While it’s tempting to try larger gauge needles for quickness, they are not as effective with fine wools such as merino. The really important thing to remember about any size of felting needle is that they are very sharp, so be careful when you are working! They are also very thin, so if you stab too hard or bend them too far, they will snap.
Extra Tools
I use all kinds of extra bits and pieces when working:
• Pliers for bending wire.
• Wire cutters.
• An awl, for so many things; I could not do without mine. Before adding ears to a head, I drill holes so that the ear sits more deeply in the wool. I also make little eye sockets before sewing in the eyes, so that they sit within the head instead of resting on the surface.
• A variety of needles for stitching.
• Long doll needles for thread jointing.
• Beading needles for sewing on seed beads.
• A pair of fine-tipped tweezers, mostly for picking out rogue-coloured fibres from whatever I’m working on.
• Scissors, small and large: I often use the large ones for shearing the fuzzy haze from my work in the final stages (see here).
Threads
I can never have enough threads, as they are all so useful in their own particular ways. Look out for:
• Gutermann polyester threads, which are strong and useful for tying in eyes.
• Thick waxed cord in various colours for tails.
• Thick black cotton thread for noses.
• Sturdy cottons, which are good for thread jointing.
• Coarser linen threads, which are nice for simple rustic pattern stitching.
• Standard embroidery floss, pure silk threads and the vibrant cotton ‘Flower’ threads are all also great for a variety of decorative stitching.
Читать дальшеИнтервал:
Закладка:
Похожие книги на «Little Needle-felt Animals»
Представляем Вашему вниманию похожие книги на «Little Needle-felt Animals» списком для выбора. Мы отобрали схожую по названию и смыслу литературу в надежде предоставить читателям больше вариантов отыскать новые, интересные, ещё непрочитанные произведения.


Обсуждение, отзывы о книге «Little Needle-felt Animals» и просто собственные мнения читателей. Оставьте ваши комментарии, напишите, что Вы думаете о произведении, его смысле или главных героях. Укажите что конкретно понравилось, а что нет, и почему Вы так считаете.