Andrew Robson - The Times Beginner’s Guide to Bridge - All you need to play the game
Здесь есть возможность читать онлайн «Andrew Robson - The Times Beginner’s Guide to Bridge - All you need to play the game» — ознакомительный отрывок электронной книги совершенно бесплатно, а после прочтения отрывка купить полную версию. В некоторых случаях можно слушать аудио, скачать через торрент в формате fb2 и присутствует краткое содержание. Жанр: unrecognised, на английском языке. Описание произведения, (предисловие) а так же отзывы посетителей доступны на портале библиотеки ЛибКат.
- Название:The Times Beginner’s Guide to Bridge: All you need to play the game
- Автор:
- Жанр:
- Год:неизвестен
- ISBN:нет данных
- Рейтинг книги:5 / 5. Голосов: 1
-
Избранное:Добавить в избранное
- Отзывы:
-
Ваша оценка:
The Times Beginner’s Guide to Bridge: All you need to play the game: краткое содержание, описание и аннотация
Предлагаем к чтению аннотацию, описание, краткое содержание или предисловие (зависит от того, что написал сам автор книги «The Times Beginner’s Guide to Bridge: All you need to play the game»). Если вы не нашли необходимую информацию о книге — напишите в комментариях, мы постараемся отыскать её.
The Times Beginner’s Guide to Bridge: All you need to play the game — читать онлайн ознакомительный отрывок
Ниже представлен текст книги, разбитый по страницам. Система сохранения места последней прочитанной страницы, позволяет с удобством читать онлайн бесплатно книгу «The Times Beginner’s Guide to Bridge: All you need to play the game», без необходимости каждый раз заново искать на чём Вы остановились. Поставьте закладку, и сможете в любой момент перейти на страницу, на которой закончили чтение.
Интервал:
Закладка:
Trumps are diamonds
Overtrumping
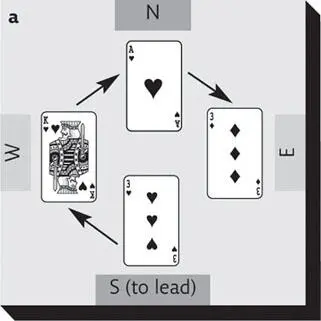
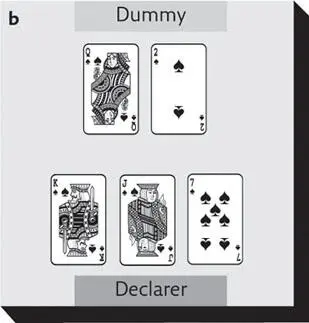
If another player trumps, and you (also) have no cards in the lead suit, you have the option of overtrumping that player. In (b), clubs are trumps and West leads. South doesn’t hold a spade so can overtrump East’s ♣4 with ♣7, and win the trick. Note that if East had followed with a spade, South would not need to trump because his partner (North) would be winning the trick with ♠A.
Overtrumping with clubs as trumps
must know
Never lose sight of the fact that bridge is a partnership game – you play as a team with the person sitting opposite.
Your 13 cards – your ‘hand’
Once the cards have been dealt you can pick up your cards and sort them into suits. Place the highest card at one end of each suit, the lowest card at the other. Split up the colours (black-red-black-red or red-black-red-black) to avoid muddling the suits; hearts and diamonds are particularly easy to confuse.
The following diagram shows a typical bridge hand, in ranking order.
To save space, this will generally be represented as:
Notice the distribution, or ‘shape’, of the hand. It contains a four-card suit, a three-card suit, a two-card suit and another four-card suit. The number of cards in each suit determines the suit ‘length’ – a shorter length has fewer cards; a longer length has more cards. Rearranging the suit lengths, in the example we have a 4432 distribution. The more you play, the more you’ll realize that distribution is the key to bridge and can more than compensate for a low point score (see the following section).
Counting points
There is a unique method in bridge of evaluating the power of your hand – its trick-taking potential – based on the high cards. For each ace, the best card in the suit, you count four points, each king counts three, each queen is two and each jack (knave) one. No points are counted for tens and below.
As soon as you’ve sorted your hand and noted its distribution, you should count your points. There are 40 points in the whole pack – four aces, four kings, four queens and four jacks. The average number of points in any one hand is ten (one ace, one king, one queen and one jack). The hand in the previous diagram contains only seven points; if this were yours you should hope that your partner has a few more points.
Useful tip
Tens and nines may not count as points, but they are nevertheless potentially useful cards, and better than twos and threes.
Making tricks
The basic card-playing principles involved in making tricks are best learnt before tackling the bidding part of bridge – even though the bidding occurs first in practice. They will give you a feel for how many tricks to aim for at the bidding stage.
Counting tricks
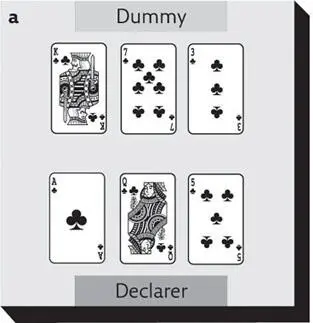
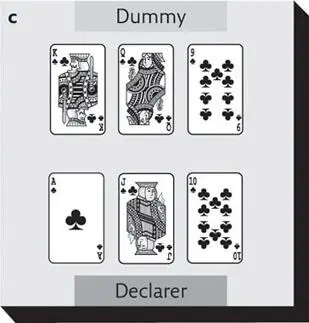
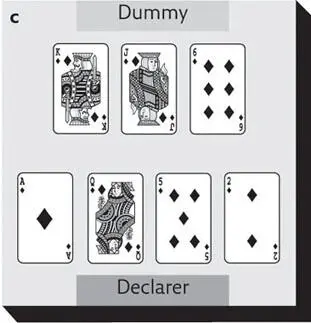
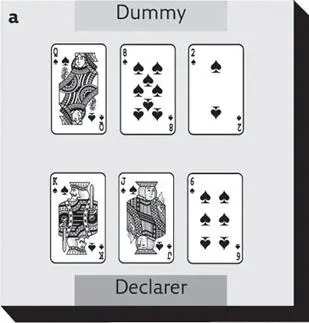
The partnership that wins the bidding contracts to make a certain number of tricks during the play phase of bridge. Within this partnership there is a ‘declarer’ and a ‘dummy’ (for more on these roles, see pp. 22–3). The declarer controls his own hand and dummy’s (his partner’s) hand, playing cards from both to try and achieve their trick target. In the following examples, imagine you are playing the role of the declarer and see how many tricks you can expect to make by playing out the suit in each case:
In (a), you can make three tricks if you play just one high card per trick. In (b), you can make four tricks by playing one high card for each of the four rounds. In (c), although you have the six top clubs, you must follow suit and can make only three tricks overall.
must know
Bidding occurs before trick-taking. It establishes:
• which (if any) suit is trumps;
• the trick target for each partnership;
• which player within the highest-bidding partnership is ‘the declarer’ and which is ‘the dummy’. The declarer controls both his hand and dummy’s.
Which order to take (‘cash’) the tricks
In the examples on p. 14, it doesn’t matter which hand is the declarer or the dummy, or from which you lead first. However, in many real-life cases, the order in which you play the cards is important if you want to make the maximum number of tricks available.
In (a), where there’s an unequal number of cards in the two hands, there are three available tricks to be made, one after the other, but only if you cash them in the correct order. If you play ♦A first (or ♦4 to ♦A), you will then have to lead ♦2 to ♦K – because the hand winning the previous trick always leads to the next trick – and will be stuck in the wrong hand, unable to win ♦Q. To avoid being ‘blocked’ in this way, lead ♦K (or ♦2 to ♦K) first, then follow with ♦4 to ♦AQ.
In (b), you should play ♦Q and ♦5 on the first round, then ♦3 to ♦AKJ. Only in this way can you make four consecutive diamond tricks.
In (c), lead ♦2 to ♦K (or ♦K to ♦2). Follow with ♦J and ♦5, then ♦6 over to ♦AQ.
Note that these examples assume your opponents do not have a trump card that would win the trick (more on the use of trump cards on pp. 18–19).
must know
The Unblocking Rule (a guideline for cashing winners in the right order):
• If leading from the hand with the shorter length, lead the highest card.
• If leading from the hand with the longer length, lead the lowest card.
• You may find it helpful to remember ‘L’ for ‘Lead Longest Lowest’.
Extra tricks by force
So far you have cashed your ‘top’ tricks and your opponents have not had a look-in. Now consider the next three examples. In each case you are missing a high, winning card (or cards), and in order to make tricks in the suit you must ‘force’ out that card from the opposition partnership.
In (a), you are missing ♠A and need to force it out from the opposition. You can use any high card in the suit to do this, then go on to win the other two high cards when you regain the lead. In this way you promote two tricks by ‘force’. Note that if your opponent withholds their ♠A on the first round, you’ll win the trick anyway, effectively ‘promoting’ the high card you use to lead. You can then sacrifice a second high card in order to promote the third. Both scenarios give you your two tricks.
Example (b) contains the same high cards but in this case it’s better to start specifically with ♠Q (or ♠7 to ♠Q) to force out ♠A. You’ll then hold ♠2 in one hand and ♠KJ in the other, which avoids ‘blockage’.
Интервал:
Закладка:
Похожие книги на «The Times Beginner’s Guide to Bridge: All you need to play the game»
Представляем Вашему вниманию похожие книги на «The Times Beginner’s Guide to Bridge: All you need to play the game» списком для выбора. Мы отобрали схожую по названию и смыслу литературу в надежде предоставить читателям больше вариантов отыскать новые, интересные, ещё непрочитанные произведения.


Обсуждение, отзывы о книге «The Times Beginner’s Guide to Bridge: All you need to play the game» и просто собственные мнения читателей. Оставьте ваши комментарии, напишите, что Вы думаете о произведении, его смысле или главных героях. Укажите что конкретно понравилось, а что нет, и почему Вы так считаете.