U.S. Department of Defense - The Survival Handbook
Здесь есть возможность читать онлайн «U.S. Department of Defense - The Survival Handbook» — ознакомительный отрывок электронной книги совершенно бесплатно, а после прочтения отрывка купить полную версию. В некоторых случаях можно слушать аудио, скачать через торрент в формате fb2 и присутствует краткое содержание. Жанр: unrecognised, на английском языке. Описание произведения, (предисловие) а так же отзывы посетителей доступны на портале библиотеки ЛибКат.

- Название:The Survival Handbook
- Автор:
- Жанр:
- Год:неизвестен
- ISBN:нет данных
- Рейтинг книги:4 / 5. Голосов: 1
-
Избранное:Добавить в избранное
- Отзывы:
-
Ваша оценка:
The Survival Handbook: краткое содержание, описание и аннотация
Предлагаем к чтению аннотацию, описание, краткое содержание или предисловие (зависит от того, что написал сам автор книги «The Survival Handbook»). Если вы не нашли необходимую информацию о книге — напишите в комментариях, мы постараемся отыскать её.
Contents:
Psychology of Survival
Survival Planning and Survival Kits
Basic Survival Medicine
Shelters
Water Procurement
Firecraft
Food Procurement
Field-Expedient Weapons, Tools, and Equipment
Desert Survival
Tropical Survival
Cold Weather Survival
Sea Survival
Expedient Water Crossings
Field-Expedient Direction Finding
Signaling Techniques
Survival Movement in Hostile Areas
Camouflage
Contact With People
Survival in Man-Made Hazards
The Survival Handbook — читать онлайн ознакомительный отрывок
Ниже представлен текст книги, разбитый по страницам. Система сохранения места последней прочитанной страницы, позволяет с удобством читать онлайн бесплатно книгу «The Survival Handbook», без необходимости каждый раз заново искать на чём Вы остановились. Поставьте закладку, и сможете в любой момент перейти на страницу, на которой закончили чтение.
Интервал:
Закладка:
B -Blend in with the surroundings. L -Low silhouette. I -Irregular shape. S -Small. S -Secluded location.
Types of Shelters
Table of Contents
When looking for a shelter site, keep in mind the type of shelter (protection) you need. However, you must also consider-
• How much time and effort you need to build the shelter.
• If the shelter will adequately protect you from the elements (sun, wind, rain, snow).
• If you have the tools to build it. If not, can you make improvised tools?
• If you have the type and amount of materials needed to build it.
To answer these questions, you need to know how to make various types of shelters and what materials you need to make them.
Poncho Lean-To
It takes only a short time and minimal equipment to build this lean-to (Figure 5-1). You need a poncho, 2 to 3 meters of rope or parachute suspension line, three stakes about 30 centimeters long, and two trees or two poles 2 to 3 meters apart. Before selecting the trees you will use or the location of your poles, check the wind direction. Ensure that the back of your lean-to will be into the wind.
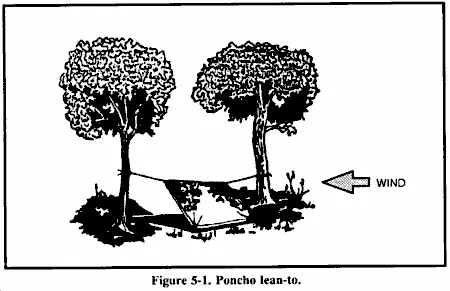
To make the lean-to-
• Tie off the hood of the poncho. Pull the drawstring tight, roll the hood longways, fold it into thirds, and tie it off with the drawstring.
• Cut the rope in half. On one long side of the poncho, tie half of the rope to the corner grommet. Tie the other half to the other corner grommet.
• Attach a drip stick (about a 10-centimeter stick) to each rope about 2.5 centimeters from the grommet. These drip sticks will keep rainwater from running down the ropes into the lean-to. Tying strings (about 10 centimeters long) to each grommet along the poncho's top edge will allow the water to run to and down the line without dripping into the shelter.
• Tie the ropes about waist high on the trees (uprights). Use a round turn and two half hitches with a quick-release knot.
• Spread the poncho and anchor it to the ground, putting sharpened sticks through the grommets and into the ground.
If you plan to use the lean-to for more than one night, or you expect rain, make a center support for the lean-to. Make this support with a line. Attach one end of the line to the poncho hood and the other end to an overhanging branch. Make sure there is no slack in the line.
Another method is to place a stick upright under the center of the lean-to. This method, however, will restrict your space and movements in the shelter.
For additional protection from wind and rain, place some brush, your rucksack, or other equipment at the sides of the lean-to.
To reduce heat loss to the ground, place some type of insulating material, such as leaves or pine needles, inside your lean-to.
Note: When at rest, you lose as much as 80 percent of your body heat to the ground.
To increase your security from enemy observation, lower the lean-to's silhouette by making two changes. First, secure the support lines to the trees at knee height (not at waist height) using two knee-high sticks in the two center grommets (sides of lean-to). Second, angle the poncho to the ground, securing it with sharpened sticks, as above.
Poncho Tent
This tent ( Figure 5-2) provides a low silhouette. It also protects you from the elements on two sides. It has, however, less usable space and observation area than a lean-to, decreasing your reaction time to enemy detection. To make this tent, you need a poncho, two 1.5- to 2.5-meter ropes, six sharpened sticks about 30 centimeters long, and two trees 2 to 3 meters apart.
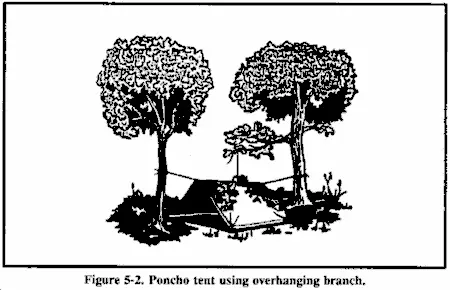
To make the tent-
• Tie off the poncho hood in the same way as the poncho lean-to.
• Tie a 1.5- to 2.5-meter rope to the center grommet on each side of the poncho.
• Tie the other ends of these ropes at about knee height to two trees 2 to 3 meters apart and stretch the poncho tight.
• Draw one side of the poncho tight and secure it to the ground pushing sharpened sticks through the grommets.
• Follow the same procedure on the other side.
If you need a center support, use the same methods as for the poncho lean-to. Another center support is an A-frame set outside but over the center of the tent (Figure 5-3). Use two 90- to 120-centimeter-long sticks, one with a forked end, to form the A-frame. Tie the hood's drawstring to the A-frame to support the center of the tent.

Three-Pole Parachute Tepee
If you have a parachute and three poles and the tactical situation allows, make a parachute tepee. It is easy and takes very little time to make this tepee. It provides protection from the elements and can act as a signaling device by enhancing a small amount of light from a fire or candle. It is large enough to hold several people and their equipment and to allow sleeping, cooking, and storing firewood.
You can make this tepee using parts of or a whole personnel main or reserve parachute canopy. If using a standard personnel parachute, you need three poles 3.5 to 4.5 meters long and about 5 centimeters in diameter.
To make this tepee (Figure 5-4)-
• Lay the poles on the ground and lash them together at one end.
• Stand the framework up and spread the poles to form a tripod.
• For more support, place additional poles against the tripod. Five or six additional poles work best, but do not lash them to the tripod.
• Determine the wind direction and locate the entrance 90 degrees or more from the mean wind direction.
• Lay out the parachute on the "backside" of the tripod and locate the bridle loop (nylon web loop) at the top (apex) of the canopy.
• Place the bridle loop over the top of a free-standing pole. Then place the pole back up against the tripod so that the canopy's apex is at the same height as the lashing on the three poles.
• Wrap the canopy around one side of the tripod. The canopy should be of double thickness, as you are wrapping an entire parachute. You need only wrap half of the tripod, as the remainder of the canopy will encircle the tripod in the opposite direction.
• Construct the entrance by wrapping the folded edges of the canopy around two freestanding poles. You can then place the poles side by side to close the tepee's entrance.
• Place all extra canopy underneath the tepee poles and inside to create a floor for the shelter.
• Leave a 30- to 50-centimeter opening at the top for ventilation if you intend to have a fire inside the tepee.

One-Pole Parachute Tepee
You need a 14-gore section (normally) of canopy, stakes, a stout center pole, and inner core
You need a 14-gore section (normally) of canopy, stakes, a stout center pole, and inner core centimeter lengths at the canopy's lower lateral band.
To make this tepee (Figure 5-5)-
• Select a shelter site and scribe a circle about 4 meters in diameter on the ground.
• Stake the parachute material to the ground using the lines remaining at the lower lateral band.
Читать дальшеИнтервал:
Закладка:
Похожие книги на «The Survival Handbook»
Представляем Вашему вниманию похожие книги на «The Survival Handbook» списком для выбора. Мы отобрали схожую по названию и смыслу литературу в надежде предоставить читателям больше вариантов отыскать новые, интересные, ещё непрочитанные произведения.


Обсуждение, отзывы о книге «The Survival Handbook» и просто собственные мнения читателей. Оставьте ваши комментарии, напишите, что Вы думаете о произведении, его смысле или главных героях. Укажите что конкретно понравилось, а что нет, и почему Вы так считаете.