Ramesh Singh - Arc Welding Processes Handbook
Здесь есть возможность читать онлайн «Ramesh Singh - Arc Welding Processes Handbook» — ознакомительный отрывок электронной книги совершенно бесплатно, а после прочтения отрывка купить полную версию. В некоторых случаях можно слушать аудио, скачать через торрент в формате fb2 и присутствует краткое содержание. Жанр: unrecognised, на английском языке. Описание произведения, (предисловие) а так же отзывы посетителей доступны на портале библиотеки ЛибКат.
- Название:Arc Welding Processes Handbook
- Автор:
- Жанр:
- Год:неизвестен
- ISBN:нет данных
- Рейтинг книги:5 / 5. Голосов: 1
-
Избранное:Добавить в избранное
- Отзывы:
-
Ваша оценка:
Arc Welding Processes Handbook: краткое содержание, описание и аннотация
Предлагаем к чтению аннотацию, описание, краткое содержание или предисловие (зависит от того, что написал сам автор книги «Arc Welding Processes Handbook»). Если вы не нашли необходимую информацию о книге — напишите в комментариях, мы постараемся отыскать её.
The prefect handbook for those professionals who need an “up- to-date” reference to advance processes as well as those welders new to the field and need to hone their skills. five-part treatment starts with a clear and rigorous exposition of the applications and equipment of Shielded Metal Arc Welding (SMAW) and Gas Tungsten Arc Welding (GTAW), followed by self-contained parts concerning processes applications and equipment for Gas Metal Arc Welding (GMAW), Flux Core Arc Welding (FCAW), and Submerged Arc welding (SAW). Case studies taken directly from the field are included to highlight each part of the handbook.
An applied reference, each Part of
offersvaluable advice regarding the industry or industries where the process is commonly used as well as a description the equipment. The Handbook reaches deeply into the area of nondestructive testing and science. In addition, this Handbook discusses the challenges presented by a number of corrosion-resistant alloys (CRAs). Case studies are included throughout the reference to reinforce an understanding of how these processes were applied in the field and how they intersect with issues that may arise with equipment use and materials.
Arc Welding Processes Handbook — читать онлайн ознакомительный отрывок
Ниже представлен текст книги, разбитый по страницам. Система сохранения места последней прочитанной страницы, позволяет с удобством читать онлайн бесплатно книгу «Arc Welding Processes Handbook», без необходимости каждый раз заново искать на чём Вы остановились. Поставьте закладку, и сможете в любой момент перейти на страницу, на которой закончили чтение.
Интервал:
Закладка:
Library of Congress Cataloging-in-Publication Data
ISBN 978-1-119-81905-9
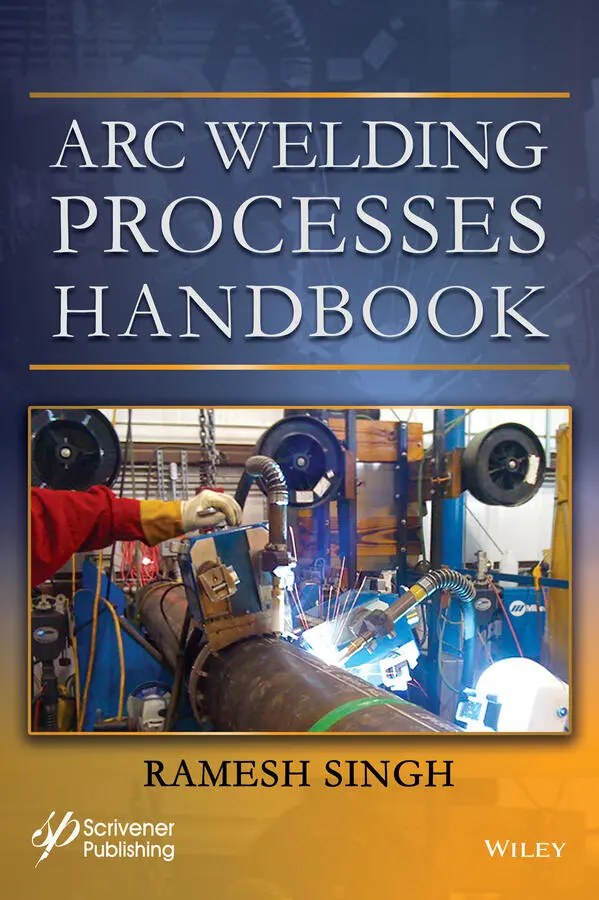
Cover image: Double headed GMAW system provided by the author
Cover design by Russell Richardson
Set in size of 11pt and Minion Pro by Manila Typesetting Company, Makati, Philippines
Printed in the USA
10 9 8 7 6 5 4 3 2 1
List of Figures
Figure 1.1 General lay out of welding and joining processes
Figure 2.3 A SMAW welder welding on a pipeline project
Figure 2.4 Typical SMAW setup
Figure 2.5 Welding arc action and various components of welding
Figure 2.6 Above (2 graphs), graph 1 above, shows the volt-ampere curve, (output curve or slope) at lower stings. Graph 2 below, shows the volt-ampere curve, (output curve or slope) the steep slope of a “Drooper” type of constant current arc welder
Figure 2.7 The schematic above shows the key components of an AC transformer
Figure 2.7.3 Schematic of a movable shunt type transformer control
Figure 2.7.4 A schematic of a movable coil reactor, the position of the reactor coil causes the inductive reactance of the secondary output coil resulting in the variance in current output
Figure 2.7.5 A magnetic amplifier transformer output control, the diode allows the current to flow in one direction, and this allows a remote control operation possible
Figure 2.7.6 The top portion of the figure shows the use of diodes – shown in Red color, and it compare it with Silicon controlled rectifiers (SCRs)
Figure 2.7.7 A schematic drawing of single-phase DC power source with SCR bridge control
Figure 2.8.1 Shows the schematic of single phase bridge type rectifier
Figure 2.8.2 Three phase bridge-type rectifier
Figure 2.8.1.1 Schematic diagram of a DC generator
Figure 2.8.1.2 Circuitry of an exciter system
Figure 2.8.3 Current conversion and resulting wave forms
Figure 2.8.3.1 Copper and aluminum welding leads: note the number of fine wires that compose a cable, and the rubber sheathing that covers them
Figure 2.8.3.2 Different types of SMAW electrode holders
Figure 2.8.4.1 Various types of cable connectors, and ground clamp. Pictures courtesy of LENCO ®catalogue
Figure 2.8.5.1 NEMA rating
Figure 2.9.1 A typical hand-held welding shield
Figure 2.9.2 Miller Digital Elite helmet
Figure 2.9.3 A typical welding helmet
Figure 2.10.2 Portfolio of SMAW electrodes
Figure 2.10.3 AWS electrode classification method
Figure 2.10.5.1 Shop use electrode drying oven
Figure 2.10.5.2 Portable electrode holder also called quivers
Figure 2.11.1 Different types of weld joints
Figure 2.11.2 Different types of weld designs
Figure 2.11.3 Welding positions for welding a plate, the positions are primarily designated in relation to the position of the weld to the horizontal surface of the earth
Figure 2.11.4 Positions of plate and pipe butt welds and fillet welds with both AWS and European designations
Figure 2.11.5 Above figure shows the permitted angular tolerance for specifically designated welding positions for pipe welding
Figure 2.11.3.1 Testing a fillet weld
Figure 2.11.3.2 Testing a fillet weld using a hammer
Figure 2.11.3.3 Size and nomenclature of fillet weld
Figure 2.11.3.4 A single pass fillet weld
Figure 2.11.3.5 A single pass fillet weld with (arc termination) stop in the middle and restarted (arc re-initiation) from that point
Figure 2.11.3.6 A multi-passes fillet weld-note the termination of arc start and stops are staggered
Figure 2.11.3.7 A micro-etch of a double sided two pass fillet weld – compare the weld with the nomenclatures figure given above, to see how these two welds meet the standard requirements
Figure 2.11.4.1 Weld appearances matched with arc current, and arc travel speed
Figure 2.11.4.2 Pictures of the weld appearances and probable cause for the quality of weld produced
Figure 2.11.5.1 Offsetting the weld setup for distortion control
Figure 2.11.9 This is a rotator with one end of the pipe held in a three-jaw, self-centering chuck the free end of the pipe rests on a free rotating roller, it can be raised or lowered to level the pipe to align the weld ends
Figure 2.11.10 This rotator is similar to the one above except that the pipe end is placed on a motor driven set of rollers on one end, and the other end is on the set of idle rollers, which can be lowered or raised to align and level the weld joint
Figure 2.11.11 A heavy-duty rotator
Figure 2.11.12 Weld tacks bridging two pieces of pipe
Figure 2.11.13 Shows a removable tack
Figure 2.11.14 This picture shows both the bridge tack using external pieces of metal below, and just above that is the tack within the groove using welding
Figure 2.11.15 Typical CS pipe weld
Figure 2.11.10.1 Bevel edge preparation for vertical-up pipe in 6G position
Figure 2.11.10.2 The vertical up progression – note the direction of electrode movement
Figure 2.11.11.1 Vertical down progression
Figure 2.11.11.2 Weld profile of each pass
Figure 2.11.11.3 The sketch above shows a typical weld layers of several passes - note the sequencing numbers on each pass
Figure 2.12.6 Aluminum fillet weld-bend testing
Figure 2.12.12 Typical stainless-steel pipe weld, and weld-o-let on the header
Figure 2.12.13 Pipe is assembled and prior to welding, the welder is tacking them with the GTAW process
Figure 2.12.18 Schaeffler diagram
Figure 2.12.19 DeLong diagram
Figure 2.14 Nickel alloy plate being welded
Figure 2.1 Nickel is in 10th group and 4th period in the periodic table, its atomic number is
Figure 2.14.2 Typical nickel welding electrodes – note the electrode identification making on the electrode
Figure 2.14.3 Nickel alloy welding (note the fillet weld in upward progression)
Figure 3.3.1 Typical GTAW welding
Figure 3.3.2 A GTAW welder, note the welding torch, and the filler wire in each hand
Figure 3.4.1 Typical GTAW welding process with details of the welding torch
Figure 3.5.1 A typical GTAW set-up with positions of gas cylinder, welding machine, electrode holder and work-piece
Figure 3.5.2 The cleaning process by the current cycle
Figure 3.5.3 High and low frequency currents in pulsing
Figure 3.6.1 DC HF output circuit
Figure 3.7.1 The graph
Figure 3.7.2 Four AC wave forms
Figure 3.7.2.2 Effect of Independent AC amperage control on weld penetration and weld bead profile
Figure 3.7.2.3 Effect of variation in AC frequency on the weld profile and penetration
Figure 3.7.2.4 Provides an example of a weld done at 150 Hz and 40 Hz
Figure 3.7.2.5 Weld profile as a result of extended EN of the cycle
Figure 3.7.2.6 Weld profile as a result of reduced EN cycle
Figure 3.7.4.1 A schematic drawing of single-phase DC power source with SCR bridge control
Figure 3.7.6.1 Schematic diagram of a DC generator
Figure 3.7.6.2 DC excitation circuit
Figure 3.9.1 Gas flow meters (A) shows the tube type flow meter, and the bottom (B) has a gauge type flow meter both calibrated in L/min
Figure 3.10.1 A typical manual welding torch, note the water cooling, gas supply and tungsten electrode assembly
Figure 3.10.2 Various nozzles types and sizes
Figure 3.10.3 A gas lens, with mesh, and holding circlip
Figure 3.10.4 An assortment of manual welding GTAW torch components
Figure 3.11.1 Electrode tips
Figure 3.11.2.1 The tip angle 60°, note the depth of the deeper penetration and the shape and depth of the HAZ
Figure 3.11.2.2 The tip angle 30°, note the depth of the shallower penetration and the shape of the HAZ
Figure 3.11.2.3 The tip angle 15°, note the depth of the shallowest penetration and the shape of the HAZ
Читать дальшеИнтервал:
Закладка:
Похожие книги на «Arc Welding Processes Handbook»
Представляем Вашему вниманию похожие книги на «Arc Welding Processes Handbook» списком для выбора. Мы отобрали схожую по названию и смыслу литературу в надежде предоставить читателям больше вариантов отыскать новые, интересные, ещё непрочитанные произведения.


Обсуждение, отзывы о книге «Arc Welding Processes Handbook» и просто собственные мнения читателей. Оставьте ваши комментарии, напишите, что Вы думаете о произведении, его смысле или главных героях. Укажите что конкретно понравилось, а что нет, и почему Вы так считаете.