David H. Ringstrom - QuickBooks Online For Dummies
Здесь есть возможность читать онлайн «David H. Ringstrom - QuickBooks Online For Dummies» — ознакомительный отрывок электронной книги совершенно бесплатно, а после прочтения отрывка купить полную версию. В некоторых случаях можно слушать аудио, скачать через торрент в формате fb2 и присутствует краткое содержание. Жанр: unrecognised, на английском языке. Описание произведения, (предисловие) а так же отзывы посетителей доступны на портале библиотеки ЛибКат.
- Название:QuickBooks Online For Dummies
- Автор:
- Жанр:
- Год:неизвестен
- ISBN:нет данных
- Рейтинг книги:3 / 5. Голосов: 1
-
Избранное:Добавить в избранное
- Отзывы:
-
Ваша оценка:
QuickBooks Online For Dummies: краткое содержание, описание и аннотация
Предлагаем к чтению аннотацию, описание, краткое содержание или предисловие (зависит от того, что написал сам автор книги «QuickBooks Online For Dummies»). Если вы не нашли необходимую информацию о книге — напишите в комментариях, мы постараемся отыскать её.
QuickBooks Online For Dummies
QuickBooks Online For Dummies
QuickBooks Online For Dummies — читать онлайн ознакомительный отрывок
Ниже представлен текст книги, разбитый по страницам. Система сохранения места последней прочитанной страницы, позволяет с удобством читать онлайн бесплатно книгу «QuickBooks Online For Dummies», без необходимости каждый раз заново искать на чём Вы остановились. Поставьте закладку, и сможете в любой момент перейти на страницу, на которой закончили чтение.
Интервал:
Закладка:
An additional benefit of using QB Payments is that your payments and deposit transactions are entered automatically for you, based on when they’re funded, so you don’t have to spend time entering those transactions later.
Reviewing advanced preferences
 The Advanced tab of the Account and Settings dialog box enables you to change a variety of QBO settings (see Figure 3-17). Choose Settings ⇒ Account and Settings ⇒ Advanced to view and update these settings:
In the Accounting group, you can control fiscal-year settings and the accounting method your company uses (cash or accrual).
Use the Company Type group to select the tax form your company uses, based on its legal organization.
When you create a new company, QBO automatically sets up the chart of accounts that it thinks you’ll need. Because QBO doesn’t use account numbers in the chart of accounts, you can turn them on in the Chart of Accounts group — something that most accountants prefer you do. You can replace the chart of accounts that QBO sets up with a chart of accounts that you create outside QBO (in Excel or Google Sheets) and then import. The file you import needs to follow a particular format. You can download a sample layout file when you choose Settings ⇒ Import Data.
Depending on the version of QBO you use, you can use the Categories section to opt to track information by using classes, locations, or both. You can also have QBO warn you if you don’t assign a class to a transaction, and you can assign a class to each line of a transaction or assign one class to the entire transaction. For locations, you can choose among seven labels; one of these choices might better describe your intended use of the Location category. FIGURE 3-17:The Advanced tab of the Account and Settings dialog box.
In the Automation group, you can control some of QBO’s automated behavior. If you don’t want QBO to prefill new forms with information from forms you entered previously, for example, feel free to turn that setting off.
In the Projects section, you can enable QBO’s project-tracking features; if you do, QBO organizes all job-related activity in one place. You can read more about projects in Chapter 6.
In the Time Tracking section, you can control the appearance of time sheets. You can add a service field to time sheets, for example, so that you can select services performed for each time entry. By default, QBO includes a customer field on time sheets so that you can optionally charge work performed for a customer. If time tracking is an integral part of your business, you might consider purchasing the QuickBooks Time add-on app (formerly known as TSheets Time Tracking). It integrates with QBO and gives you extensive time-tracking capabilities, including scheduling employees and letting employees track billable and nonbillable time in the mobile version of the app. Visit the QBO App Center by clicking Apps on the navigation bar of QBO.
Use the Currency section to turn on multicurrency tracking and to set your company’s home currency. If you change the home-currency symbol, QBO changes the symbol for future transactions; existing transactions will still be calculated at the original currency value. For more information, see “ Working with Multiple Currencies” later in this chapter.CATEGORIES, CLASSES, AND LOCATIONS … OH, MY!Don’t confuse the Classes and Locations options you see in the Categories section of the Account and Settings dialog box with the Product Category feature. The Product Category feature is separate from the features shown in the Account and Settings dialog box.If you turn on the Class and Location options in the Account and Settings dialog box, you can assign classes and locations to transactions to help you break down financial data beyond the account level. To create classes and locations, first enable them in the Account and Settings dialog box; then choose Settings ⇒ All Lists ⇒ Classes to create new classes, and click Locations to create new locations.Product categories, which don’t need to be enabled, replace subitems and are available to users of QBO Plus and Advanced to help organize item information for reporting purposes; see Chapter 4for details. Turning on multicurrency prevents you from changing your home currency, and you can’t turn multicurrency off after you turn it on. Think twice, or maybe even three times, before you enable this feature.
In the Other Preferences group, you can change a variety of settings, such as date and number formats; whether QBO warns you if you reuse a check number, bill number, or journal entry number you used previously; and how long QBO should wait before signing you out because you haven’t done any work. Also, if you prefer to call your customers something other than Customer (such as Client, Patron, or Shopper), you can change the label you use to refer to them.
Customizing Sales Forms
As you’ll see in a moment, the Sales section of the Account and Settings page (see Figure 3-18) allows you to change the look and feel of certain sales forms, including the following things:
The Sales Form Content section allows you to define the fields that appear on invoices, sales receipts, and other sales forms.
The Products and Services section enables you to modify the product- and service-related fields that appear on sales forms. QBO Plus and Advanced users can turn on inventory tracking and try out price rules. You can read more about inventory and price rules in Chapter 4.
The Messages section is where you set the default email message sent to customers with sales forms, as well the default message that appears in the body of your sales forms.
Use the Reminders section to set the default email message that will accompany reminder notifications.
Unfortunately, the Online Delivery section doesn’t allow you order a pizza, but you can use it to control email delivery options for sales forms. Those options include attaching the sales form as a PDF document, displaying a summary or details of the sales form in the email, and specifying formatting for invoices.
Finally, the Statements section lets you choose decide whether to show an aging table at the bottom of the statement.
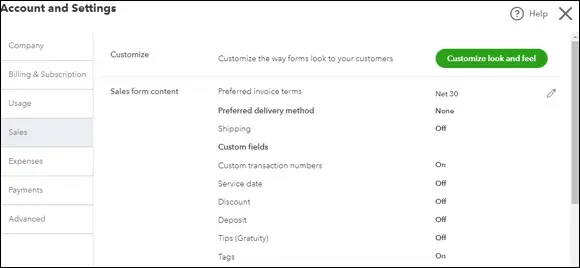
FIGURE 3-18:The Sales page of the Account and Settings dialog box.
To change a sales form, click Settings ⇒ Account and Settings ⇒ Sales. Click the Customize Look and Feel button in the Customize section at the top of the page. The Custom Form Styles page displays (see Figure 3-19).
The Custom Form Styles page lists any form styles you have already created. By default, QBO creates one Standard form style for you when you sign up; this style is used by default for invoices, estimates, and sales receipts.
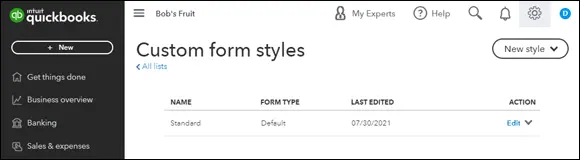
FIGURE 3-19:Use this page to edit an existing form style or set up a new form style.
If you’re satisfied with the appearance of the majority of the form style, you can edit it instead of creating a form style. Alternatively, you can create separate customized forms for invoices, estimates, and sales receipts. To do so, click New Style in the top-right corner of the Custom Form Styles page, and choose (from the drop-down menu) the type of form you want to create. For this example, when I chose Invoice, QBO displayed the page shown in Figure 3-20, which varies only slightly if you opt to edit a different form. In particular, if you opt to create a form style, the page displays a form name for the form you’re creating.
Читать дальшеИнтервал:
Закладка:
Похожие книги на «QuickBooks Online For Dummies»
Представляем Вашему вниманию похожие книги на «QuickBooks Online For Dummies» списком для выбора. Мы отобрали схожую по названию и смыслу литературу в надежде предоставить читателям больше вариантов отыскать новые, интересные, ещё непрочитанные произведения.


Обсуждение, отзывы о книге «QuickBooks Online For Dummies» и просто собственные мнения читателей. Оставьте ваши комментарии, напишите, что Вы думаете о произведении, его смысле или главных героях. Укажите что конкретно понравилось, а что нет, и почему Вы так считаете.