Paul Thurrott - Windows 8 Secrets
Здесь есть возможность читать онлайн «Paul Thurrott - Windows 8 Secrets» — ознакомительный отрывок электронной книги совершенно бесплатно, а после прочтения отрывка купить полную версию. В некоторых случаях можно слушать аудио, скачать через торрент в формате fb2 и присутствует краткое содержание. Город: Indianapolis, IN, Год выпуска: 2012, ISBN: 2012, Издательство: John Wiley & Sons, Inc., Жанр: Программы, на английском языке. Описание произведения, (предисловие) а так же отзывы посетителей доступны на портале библиотеки ЛибКат.
- Название:Windows 8 Secrets
- Автор:
- Издательство:John Wiley & Sons, Inc.
- Жанр:
- Год:2012
- Город:Indianapolis, IN
- ISBN:978-1-118-20413-9
- Рейтинг книги:5 / 5. Голосов: 1
-
Избранное:Добавить в избранное
- Отзывы:
-
Ваша оценка:
Windows 8 Secrets: краткое содержание, описание и аннотация
Предлагаем к чтению аннотацию, описание, краткое содержание или предисловие (зависит от того, что написал сам автор книги «Windows 8 Secrets»). Если вы не нашли необходимую информацию о книге — напишите в комментариях, мы постараемся отыскать её.
Amazon.com Review
Q & A with the authors of From the Back Cover Microsoft is introducing a major new release of its Windows operating system, Windows 8, and what better way for you to learn all the ins and outs than from two internationally recognized Windows experts and Microsoft insiders, authors Paul Thurrott and Rafael Rivera? They cut through the hype to get at useful information you’ll not find anywhere else, including what role this new OS plays in a mobile and tablet world.
Regardless of your level of knowledge, you’ll discover little-known facts about how things work, what’s new and different, and how you can modify Windows 8 to meet what you need.
Windows 8 Secrets
• • • • • • • • • • • • • • • Windows 8 Secrets Should consumers adopt Windows 8 or Windows RT? Windows RT offers both advantages and disadvantages compared to Windows 8, and which you choose will depend on your needs. The biggest issue with Windows RT, of course, is the lack of desktop application compatibility: Though it comes with most Windows 8 desktop utilities and a version of Microsoft Office, Windows RT is not compatible with any third party or Microsoft desktop Windows applications that are already included. That said, Windows RT should offer much better battery life and amazingly thin and light form factors when compared to similar PCs and devices designed around a traditional PC microprocessor.
What’s best way to upgrade from Windows 7 to Windows 8? Upgrade or clean install? Is an upgrade safe? Generally speaking, you will actually see better results with an upgrade with this version of Windows, which is different than our experience with previous versions. To be safe, backup everything first, perform the upgrade, and if it doesn’t go well, you can always do a clean install afterwards.
One thing to watch during an upgrade, however, is Internet Explorer: If you have configured a different browser as your default browser in Windows 7 and then upgrade to Windows 8, you will actually lose the ability to run the Metro-style version of Internet Explorer 10. You can fix this by configuring IE as your default browser after the fact.
Does Windows 8 really run faster and better than Windows 7 on the same hardware? Yes. But in real world usage, you won’t notice much of a difference in usage. That said, Windows 8 boots, resumes from sleep, and performs other power management functions much, much faster than does Windows 7. You can also use Push Button Reset to refresh or reset a Windows 8 PC in just minutes.
Will all of my Windows 7 apps and drivers work with Windows 8? For the most part, yes. Microsoft claims that if it works with Windows 7, it should work with Windows 8. And in our experience, that has definitely been the case. Even the now-ancient game “Halo: Combat Evolved,” from 2003 installs and runs just fine. That said, you may need to uninstall some applications if you’re upgrading from Windows 7 to Windows 8, and then reinstall them after the fact. And of course there will always be some exceptions.
What are the most important keyboard combinations we should memorize? If you remember just one keyboard shortcut, it should be WINKEY + C, which enables the Charms and access to several key system functions, including Search, Share, Start, Devices, and Settings. Some other useful keyboard shortcuts include WINKEY + D (to navigate directly to the desktop), WINKEY + I (for Settings), and WINKEY + L for lock. And let’s not forget our favorite keyboard combination: WINKEY + X, which displays a power user menu of sorts containing lots of useful shortcuts.
In their introduction, the authors of this book say that “with Windows 8, suddenly, everything is different.” And they are right—with a completely new interface presenting users with a completely new experience, Windows 8 and its device-based cousin Windows RT are arguably the biggest change in Windows ever. But bestselling authors Paul Thurrott and Rafael Rivera have you covered with Windows 8 Secrets, a completely new, written-from-scratch guide to the ins and outs of this new Windows experience. Covering topics both large and small, ranging from how the new immersive experiences and familiar Windows desktop interface coexist to the subtle differences in interacting with Windows 8 via touch, keyboard, or mouse, this book digs in to reveal helpful and advanced insight in all major Windows areas: application management, data backup and security, networking, and much more.
The Insider’s Guide to:
• • • • • • • • • The Secrets series reveals:
• • • • • [Contain tables. Best viewed with CoolReader.]
Windows 8 Secrets — читать онлайн ознакомительный отрывок
Ниже представлен текст книги, разбитый по страницам. Система сохранения места последней прочитанной страницы, позволяет с удобством читать онлайн бесплатно книгу «Windows 8 Secrets», без необходимости каждый раз заново искать на чём Вы остановились. Поставьте закладку, и сможете в любой момент перейти на страницу, на которой закончили чтение.
Интервал:
Закладка:
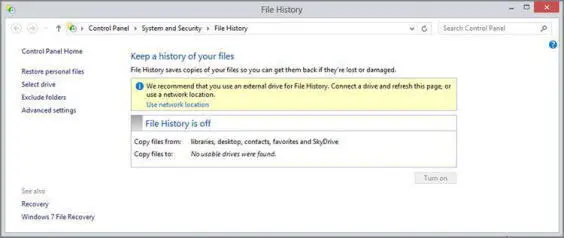
The File History control panel is shown in Figure 11-14. As you can see, it’s disabled by default.
File History actually caches a subset of your file backups to your system disk. So this feature will often work just fine even when you’re away from home with a portable computer.
On a single disk PC or device, like your typical portable computer, File History will recommend using a network location.
Figure 11-14:File History is disabled by default and will recommend a network location on a single disk system.
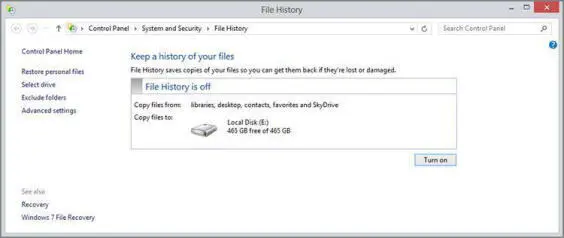
Alternatively, you can use any other disk, including a removable, USB-based hard drive. If you have such a disk attached to the PC, File History will resemble Figure 11-15, where the other disk is preselected.
Figure 11-15:You can use secondary disks for File History as well.
To enable File History, simply click the Turn on button. However, some configuration options are available and should be considered first:
• Change drive: If you’re not happy with the drive that File History selected, click this link to select a new one. The resulting page will help you select a new disk, if one is available, or a network location.
Exclude folders: If you would like to exclude certain folder locations from being backed up, you can do so here. Remember that everything in your libraries, desktop, Favorites, and Contacts is backed up, so be sure to pick a folder inside one of those locations, since other locations are already omitted.
You can also manually run a File History backup at any time by revisiting the control panel and selecting Run now.
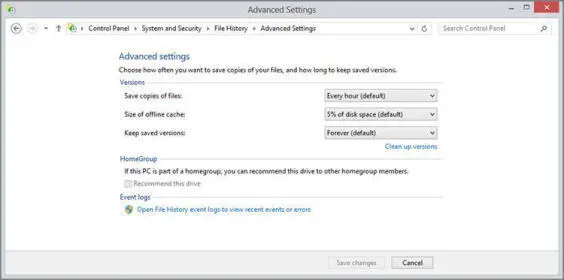
• Advanced settings: This important interface, shown in Figure 11-16, provides some fine-grained control over key File History functionality. You can change how often files are backed up, the size of the offline cache (which is the size of the File History backups replicated on your system disk), and the length of time to save backups. You can also use this interface to clean up (that is, delete) older backups and advertise your backup location to others on the homegroup.
Figure 11-16:Be sure to spend some time examining these options.
Once you’ve configured File History to your liking, click Save changes to return to the main File History screen and then click Turn on. File History will indicate that it is saving copies of your files for the first time, but you are free to close the window, get back to work, and do other things. You can pretty much forget about File History until you need it.
Recovering Documents and Other Data Files with File History
When the time comes to recover a lost or previous version of a file, you have two basic ways to access the new File History restore functionality. You can relaunch the File History control panel and click the Restore personal files link. Or, you can use the far more discoverable method that’s available right in File Explorer. This latter option makes more sense for two reasons. Oftentimes when you’re looking for the previous version of a file, you’re staring at that folder anyway. And when you trigger File History restore from File Explorer, it will navigate automatically to that location for you. So you won’t need to hunt around for the file.
Since the Explorer ribbon is minimized by default, you may need to expand it before you will see the History command.
Since the second method makes so much more sense, we’ll examine that. Navigating in File Explorer to the scene of the crime—a folder in which a file was deleted or overwritten, perhaps—you will find a History command in the Home tab, as shown in Figure 11-17.
Figure 11-17:The History command opens File History restore for the current folder.

Click History to display the File History restore interface shown in Figure 11-18.
Figure 11-18:File History’s restore interface
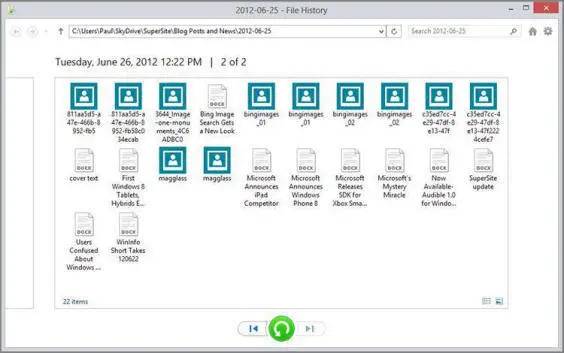
This window includes some interesting features. First, the current view shows the most recent file revisions, typically from the same day, and generally from a fairly recent time period. (If you left File History’s Save copies of files feature on the default setting, these versions will be less than one-hour old.) There are navigational elements similar to those in File Explorer that allow you to go Back and Forward, and up one level, and you can type an arbitrary Explorer location into the address bar if you’d like.
The Options icon (which resembles a gear) in the top right provides numerous options related to icon view styles as well as some restore links. And the Windows Media Player-like control at the bottom of the window will let you restore any selected files and folders, or all of them. Or you can click the Rewind button to see earlier versions of the backed-up files. In fact, if you keep clicking this button, you’ll travel back in time (not literally), seeing multiple revisions of frequently-accessed documents as you go.
If you find something you’d like to recover, you have two options: You can recover them directly to the same folder, overwriting whatever’s there now; or you can recover them to a different location.
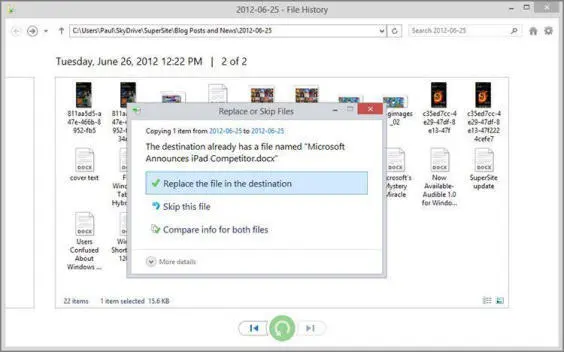
To recover files and folders to the same location, just select what you want and then click the big blue Recover button. The wizard will ask you if you’d like to replace the current files, skip any duplications, or choose which files to keep in the current folder; this interface, shown in Figure 11-19, is identical to the normal file remediation window one sees when copying files with Explorer.
Figure 11-19:File History will ask you what to do with recovered files.
If you’d rather restore files to a new location so you can compare them side-by-side with the current version, click Options and then Restore to instead. A standard Save As dialog will appear, letting you pick the location you prefer.
Yes, File History looks a lot like the Time Machine feature in Mac OS X, minus the ridiculous animations and graphics. To be fair, however, Microsoft implemented the underlying technologies behind File History several years before Apple copied them with Time Machine.
Better Together? Storage Spaces + File History
File History is an excellent way to ensure that your most valuable documents and other files are backed up regularly and available in different historical versions. Likewise, Storage Spaces is an amazing Windows 8 feature that provides redundant storage for your most valuable data, protecting them from a potential hard drive failure. Since File History works with secondary (or network-based) disks by default, you may be thinking that there’s no benefit to using these two features together. That’s crazy talk.
For the ultimate in data protection, consider creating a storage space with two or more disks in a two-way mirror configuration. Then, you can configure File History to back up your files to the space, instead of to a normal disk. In fact, you might want to advertise this location to other PCs in your homegroup so they can back up over the network to this new, super-reliable disk mirror. This will enhance the resiliency of all of your backups, no matter which PC you use on the home network.
Читать дальшеИнтервал:
Закладка:
Похожие книги на «Windows 8 Secrets»
Представляем Вашему вниманию похожие книги на «Windows 8 Secrets» списком для выбора. Мы отобрали схожую по названию и смыслу литературу в надежде предоставить читателям больше вариантов отыскать новые, интересные, ещё непрочитанные произведения.


Обсуждение, отзывы о книге «Windows 8 Secrets» и просто собственные мнения читателей. Оставьте ваши комментарии, напишите, что Вы думаете о произведении, его смысле или главных героях. Укажите что конкретно понравилось, а что нет, и почему Вы так считаете.