Paul Thurrott - Windows 8 Secrets
Здесь есть возможность читать онлайн «Paul Thurrott - Windows 8 Secrets» — ознакомительный отрывок электронной книги совершенно бесплатно, а после прочтения отрывка купить полную версию. В некоторых случаях можно слушать аудио, скачать через торрент в формате fb2 и присутствует краткое содержание. Город: Indianapolis, IN, Год выпуска: 2012, ISBN: 2012, Издательство: John Wiley & Sons, Inc., Жанр: Программы, на английском языке. Описание произведения, (предисловие) а так же отзывы посетителей доступны на портале библиотеки ЛибКат.
- Название:Windows 8 Secrets
- Автор:
- Издательство:John Wiley & Sons, Inc.
- Жанр:
- Год:2012
- Город:Indianapolis, IN
- ISBN:978-1-118-20413-9
- Рейтинг книги:5 / 5. Голосов: 1
-
Избранное:Добавить в избранное
- Отзывы:
-
Ваша оценка:
Windows 8 Secrets: краткое содержание, описание и аннотация
Предлагаем к чтению аннотацию, описание, краткое содержание или предисловие (зависит от того, что написал сам автор книги «Windows 8 Secrets»). Если вы не нашли необходимую информацию о книге — напишите в комментариях, мы постараемся отыскать её.
Amazon.com Review
Q & A with the authors of From the Back Cover Microsoft is introducing a major new release of its Windows operating system, Windows 8, and what better way for you to learn all the ins and outs than from two internationally recognized Windows experts and Microsoft insiders, authors Paul Thurrott and Rafael Rivera? They cut through the hype to get at useful information you’ll not find anywhere else, including what role this new OS plays in a mobile and tablet world.
Regardless of your level of knowledge, you’ll discover little-known facts about how things work, what’s new and different, and how you can modify Windows 8 to meet what you need.
Windows 8 Secrets
• • • • • • • • • • • • • • • Windows 8 Secrets Should consumers adopt Windows 8 or Windows RT? Windows RT offers both advantages and disadvantages compared to Windows 8, and which you choose will depend on your needs. The biggest issue with Windows RT, of course, is the lack of desktop application compatibility: Though it comes with most Windows 8 desktop utilities and a version of Microsoft Office, Windows RT is not compatible with any third party or Microsoft desktop Windows applications that are already included. That said, Windows RT should offer much better battery life and amazingly thin and light form factors when compared to similar PCs and devices designed around a traditional PC microprocessor.
What’s best way to upgrade from Windows 7 to Windows 8? Upgrade or clean install? Is an upgrade safe? Generally speaking, you will actually see better results with an upgrade with this version of Windows, which is different than our experience with previous versions. To be safe, backup everything first, perform the upgrade, and if it doesn’t go well, you can always do a clean install afterwards.
One thing to watch during an upgrade, however, is Internet Explorer: If you have configured a different browser as your default browser in Windows 7 and then upgrade to Windows 8, you will actually lose the ability to run the Metro-style version of Internet Explorer 10. You can fix this by configuring IE as your default browser after the fact.
Does Windows 8 really run faster and better than Windows 7 on the same hardware? Yes. But in real world usage, you won’t notice much of a difference in usage. That said, Windows 8 boots, resumes from sleep, and performs other power management functions much, much faster than does Windows 7. You can also use Push Button Reset to refresh or reset a Windows 8 PC in just minutes.
Will all of my Windows 7 apps and drivers work with Windows 8? For the most part, yes. Microsoft claims that if it works with Windows 7, it should work with Windows 8. And in our experience, that has definitely been the case. Even the now-ancient game “Halo: Combat Evolved,” from 2003 installs and runs just fine. That said, you may need to uninstall some applications if you’re upgrading from Windows 7 to Windows 8, and then reinstall them after the fact. And of course there will always be some exceptions.
What are the most important keyboard combinations we should memorize? If you remember just one keyboard shortcut, it should be WINKEY + C, which enables the Charms and access to several key system functions, including Search, Share, Start, Devices, and Settings. Some other useful keyboard shortcuts include WINKEY + D (to navigate directly to the desktop), WINKEY + I (for Settings), and WINKEY + L for lock. And let’s not forget our favorite keyboard combination: WINKEY + X, which displays a power user menu of sorts containing lots of useful shortcuts.
In their introduction, the authors of this book say that “with Windows 8, suddenly, everything is different.” And they are right—with a completely new interface presenting users with a completely new experience, Windows 8 and its device-based cousin Windows RT are arguably the biggest change in Windows ever. But bestselling authors Paul Thurrott and Rafael Rivera have you covered with Windows 8 Secrets, a completely new, written-from-scratch guide to the ins and outs of this new Windows experience. Covering topics both large and small, ranging from how the new immersive experiences and familiar Windows desktop interface coexist to the subtle differences in interacting with Windows 8 via touch, keyboard, or mouse, this book digs in to reveal helpful and advanced insight in all major Windows areas: application management, data backup and security, networking, and much more.
The Insider’s Guide to:
• • • • • • • • • The Secrets series reveals:
• • • • • [Contain tables. Best viewed with CoolReader.]
Windows 8 Secrets — читать онлайн ознакомительный отрывок
Ниже представлен текст книги, разбитый по страницам. Система сохранения места последней прочитанной страницы, позволяет с удобством читать онлайн бесплатно книгу «Windows 8 Secrets», без необходимости каждый раз заново искать на чём Вы остановились. Поставьте закладку, и сможете в любой момент перейти на страницу, на которой закончили чтение.
Интервал:
Закладка:
Yes, we’re sure this name is an allusion to the Aero Snap window docking feature that debuted in Windows 7 and is still available on the Windows 8 desktop.
Sadly, side-by-side display sharing is not particularly customizable. You can have just two apps, and the one that is considered the primary app takes up about two-thirds of the available on-screen real estate. Meanwhile, the secondary app is stuck with just one-third, roughly, of the available space. Apps that are side by side in this fashion are said to snap into place.
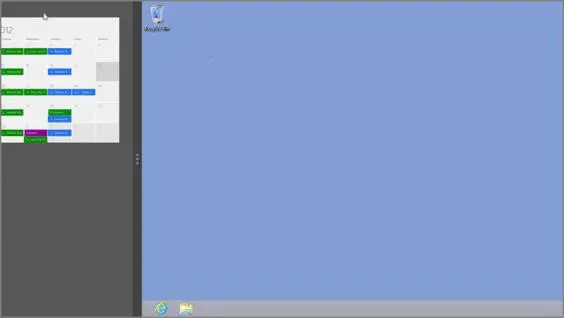
Confused? A picture will make things clearer. Consider Figure 4-10, in which Microsoft’s Calendar (Metro-style) app is snapped next to the Windows desktop.
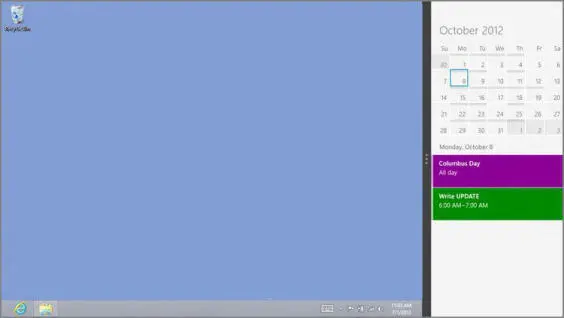
That configuration in the previous figure is one of two possible ways in which a snapped, or secondary, app can be snapped in place next to another app. The other, of course, has the snapped app placed on the right side of the screen, as shown in Figure 4-11. Which side you use is a matter of taste.
Figure 4-10:You can snap Metro-style apps next to the desktop.
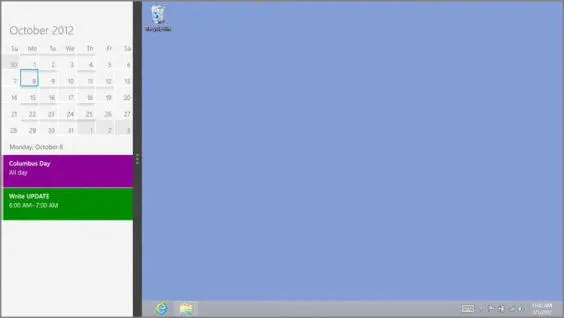
Figure 4-11:You can also snap Metro-style apps to the right of the desktop.
So why would you ever want to snap the desktop? The best reason we’ve seen is to monitor a download that’s occurring in a desktop-based web browser. But frankly, it’s not very useful otherwise.
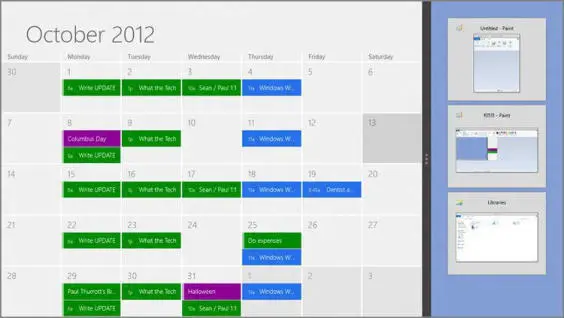
Conversely, it’s also possible for the Windows desktop to be the snapped, or secondary, app. However, when you enable this view, as in Figure 4-12, you’ll notice that the snapped desktop only displays thumbnails of the available open windows and isn’t too useful.
Figure 4-12:You can even snap the desktop.
One interface you can’t snap is the Start screen. And to be honest, such a capability would be truly useful, since it could provide a snapped list of tiles with live updates. Maybe in Windows 9.
The new side-by-side app mode can be enabled in various ways, but here are some instructions for the common input types. In each case, it’s best to launch the app you intend to use in the secondary, or snapped, mode first and then launch the app you intend to use as the primary app. Then you can use one of the following techniques to enable the snap mode:
• Mouse:Move the mouse cursor to the upper-left corner of the screen to display the Back thumbnail. Then, while holding down the mouse button, drag the thumbnail downward. It will turn into a larger, floating thumbnail, as shown in Figure 4-13, and the side-by-side Snap bar will appear.
Release the mouse button to snap the app into the Snap area on the left.
While there is no keyboard-based shortcut for enabling side-by-side mode, as you’ll discover next, there are keyboard shortcuts for modifying the presentation of side-by-side apps.
• Touch:Swipe in from the left edge of the screen. As you do so, the previous app in the Back stack will appear as a thumbnail image under your finger. Stop moving your finger and the side-by-side Snap bar will appear. When it does, release your hold on the screen and the secondary app will snap in place.
Figure 4-13:You can drag a previous app off Back or Switcher and then snap it in place alongside the desktop or another primary app.
Once you’ve got two apps snapped into position in side-by-side mode, you can further customize the display, albeit in fairly limited ways. Here are the options available at your disposal:
• Snap to the right instead:While many are happy to snap a secondary app to the left side of the screen, some will prefer the snapped app to appear on the right. While performing the snap operation, simply drag the app thumbnail to the right side of the screen instead of down and to the left.
If you’ve already snapped an app to the left side of the screen and would like it to appear on the right side instead, the easiest way to do so is via a mouse: Just move the mouse cursor to the top edge of the snapped app, and when the cursor changes into a small hand, grab the app and then drag it to the right side of the screen. With a keyboard, you may find it easier to simply close the snapped app, as described shortly, and just redo the snap action and place it on the right instead. But the convoluted way in which you can do this goes like so: Press Winkey + . (period) three times to snap the secondary app to the right. Then press Alt + Tab (or Winkey + D) to return the desktop to the primary display area.
• Swap the snapped and primary apps:Press Winkey + J to swap the snapped (secondary) and primary apps on-screen. Or via touch or mouse, simply drag the Snap bar toward the other side of the screen, letting go before you hit the screen edge.
• Close the snapped app:If a secondary app is snapped on the left, press Winkey + Shift + . (period) to close the snapped app. Otherwise, press Winkey + . (period). You can close the snapped app via touch or mouse by dragging the Snap bar to the closest screen edge.
Side-by-side screen sharing is more interesting for those who wish to stick with Metro-style apps, and we cover this feature in Chapter 3 as well as a result. But it’s worth mentioning here, because the desktop is considered an app, too, and can participate in this task management solution. Certainly, some apps will work well in this snapped mode, even when used in tandem with the desktop.
Charms
In Windows 8, Microsoft exposes many system-level services through a new user experience called Charms. These Charms are accessible via a bar that appears on the right edge of the screen in a manner that is consistent across every user experience in Windows 8, including the Start screen, all Metro-style apps, and the desktop. This can be seen in Figure 4-14.
Charms are central to using and understanding Windows 8, so we cover them as needed throughout this book. The main discussion about this experience, however, can be found in Chapter 3.
You can access the Charms bar in a variety of ways, and as a top-level interface in Windows 8, it has simple triggers for all the major input types:
• Mouse:Move the mouse cursor into the lower-right corner of the screen. As the cursor hits against the natural edge of the screen, a transparent preview of the Charms bar appears, as shown in Figure 4-15.
Figure 4-14:The Charms bar is a system-wide user experience that works in the Start screen, Metro-style apps, and the desktop. When the Charms bar displays, an overlay for the time and date also appears.
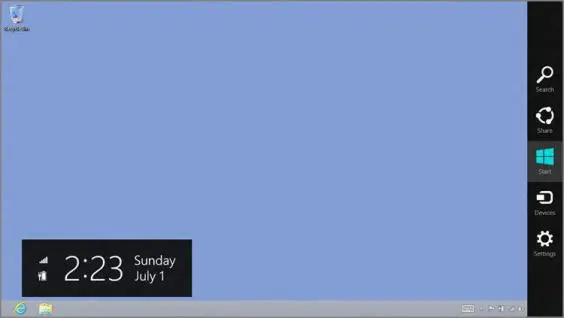
Figure 4-15:A preview of the Charms bar appears when you mouse into one of the screen’s rightmost corners.
Читать дальшеИнтервал:
Закладка:
Похожие книги на «Windows 8 Secrets»
Представляем Вашему вниманию похожие книги на «Windows 8 Secrets» списком для выбора. Мы отобрали схожую по названию и смыслу литературу в надежде предоставить читателям больше вариантов отыскать новые, интересные, ещё непрочитанные произведения.


Обсуждение, отзывы о книге «Windows 8 Secrets» и просто собственные мнения читателей. Оставьте ваши комментарии, напишите, что Вы думаете о произведении, его смысле или главных героях. Укажите что конкретно понравилось, а что нет, и почему Вы так считаете.