А. Легалов - Применение Windows API
Здесь есть возможность читать онлайн «А. Легалов - Применение Windows API» весь текст электронной книги совершенно бесплатно (целиком полную версию без сокращений). В некоторых случаях можно слушать аудио, скачать через торрент в формате fb2 и присутствует краткое содержание. Город: Красноярск, Год выпуска: 2002, Жанр: Программирование, на русском языке. Описание произведения, (предисловие) а так же отзывы посетителей доступны на портале библиотеки ЛибКат.
- Название:Применение Windows API
- Автор:
- Жанр:
- Год:2002
- Город:Красноярск
- ISBN:нет данных
- Рейтинг книги:4 / 5. Голосов: 1
-
Избранное:Добавить в избранное
- Отзывы:
-
Ваша оценка:
Применение Windows API: краткое содержание, описание и аннотация
Предлагаем к чтению аннотацию, описание, краткое содержание или предисловие (зависит от того, что написал сам автор книги «Применение Windows API»). Если вы не нашли необходимую информацию о книге — напишите в комментариях, мы постараемся отыскать её.
Применение Windows API — читать онлайн бесплатно полную книгу (весь текст) целиком
Ниже представлен текст книги, разбитый по страницам. Система сохранения места последней прочитанной страницы, позволяет с удобством читать онлайн бесплатно книгу «Применение Windows API», без необходимости каждый раз заново искать на чём Вы остановились. Поставьте закладку, и сможете в любой момент перейти на страницу, на которой закончили чтение.
Интервал:
Закладка:
A blitter transfers a rectangular area of the bitmap into a rectangular area of the screen. The meaning of various parameters is the following:
• Source position: pixel coordinates of the upper left corner of the bitmap area, to be transferred. The default is the upper left corner of the bitmap.
• Destination position: pixel coordinates within the target window of the upper left corner of the transferred area. The default is upper left corner of the window.
• Area dimensions: the dimensions of the rectangular area to be transferred. The default is the dimensions of the bitmap.
• Transfer mode. The way bitmap pixels are combined with existing window pixels. The default, SRCCOPY, copies the pixels over existing pixels. You may also specify more involved logical operations, like SRCAND (Boolean AND), SRCPAINT (Boolean OR), etc. (see your compiler's help on BitBlt).
class Blitter{
public:
Blitter(Bitmap& bmp) : _bmp (bmp), _mode (SRCCOPY), _xDst (0), _yDst (0), _xSrc (0), _ySrc (0) {
bmp.GetSize(_width, _height);
}
void SetMode(DWORD mode) {
_mode = mode;
}
void SetDest(int x, int y) {
_xDst = x;
_yDst = y;
}
void SetSrc(int x, int y) {
_xSrc = x;
_ySrc = y;
}
void SetArea(int width, int height) {
_width = width;
_height = height;
}
// transfer bitmap to canvas
void BlitTo(Canvas & canvas);
private:
Bitmap& _bmp;
int _xDst, _yDst;
int _xSrc, _ySrc;
int _width, _height;
DWORD _mode;
};
The BlitTo method performs the transfer from the bitmap to the window (or printer) as described by its Canvas.
void Blitter::BlitTo(Canvas& canvas) {
// Create canvas in memory using target canvas as template
MemCanvas memCanvas (canvas);
// Convert bitmap to the format appropriate for this canvas
memCanvas.SelectObject(_bmp);
// Transfer bitmap from memory canvas to target canvas
:: BitBlt(canvas, _xDst, _yDst, _width, _height, memCanvas, _xSrc, _ySrc, _mode);
}
The API, BitBlt, transfers bits from one device to another. That's why we have to set up a fake source device. This "memory canvas" is based on the actual canvas--in this case we use target canvas as a template. So, for instance, if the target canvas describes a True Color device, our MemCanvas will also behave like a True Color device. In particular, when our bitmap is selected into it, it will be converted to True Color, even if initially it was a monochrome or a 256-color bitmap.
The simplest program that loads and displays a bitmap might look something like this: There is a View object that contains a bitmap (I assume that the file "picture.bmp" is located in the current directory). It blits it to screen in the Paint method.
class View{
public:
View() {
_background.Load("picture.bmp");
}
void Paint(Canvas& canvas) {
Blitter blitter(_background);
blitter.BlitTo(canvas);
}
private:
Bitmap _background;
};
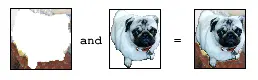
A spriteis an animated bitmap that moves over some background. We already know how to display bitmaps — we could blit the background first and then blit the sprite bitmap over it. This will work as long as the sprite is rectangular. If you want to be more sophisticated and use a non-rectangular sprite, you need a mask.
The two pictures below are that of a sprite (my personal pug, Fanny) and its mask. The mask is a monochrome bitmap that has black areas where we want the sprite to be transparent. The sprite, on the other hand, must be white in these areas. What we want is to be able to see the background through these areas.


The trick is to first blit the background, then blit the mask using logical OR, and then blit the sprite over it using logical AND.
ORing a black mask pixel (all zero bits) with a background pixel will give back the background pixel. ORing a white mask pixel (all one bits) with a background will give a white pixel. So after blitting the mask, we'll have a white ghost in the shape of our sprite floating over the background.
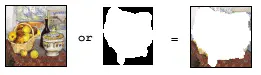
ANDing a white sprite pixel (all ones) with a background pixel will give back the background pixel. ANDing a non-white sprite pixel with the white (all ones) background (the ghost from previous step) will give the sprite pixel. We'll end up with the sprite superimposed on the background.
What remains is to implement the animation. The naive implementation would be to keep re-drawing the image: background, mask and sprite, changing the position of the mask and the sprite in each frame. The problem with this approach is that it results in unacceptable flutter. The trick with good animation is to prepare the whole picture off-line, as a single bitmap, and then blit it to screen in one quick step. This technique is called double buffering — the first buffer being the screen buffer, the second one — our bitmap.
We'll also use Windows timer to time the display of frames.
class WinTimer{
public:
WinTimer(HWND hwnd = 0, int id = -1) : _hwnd (hwnd), _id (id) {}
void Create(HWND hwnd, int id) {
_hwnd = hwnd;
_id = id;
}
void Set(int milliSec) {
:: SetTimer(_hwnd, _id, milliSec, 0);
}
void Kill() {
:: KillTimer(_hwnd, _id);
}
int GetId() const {
return _id;
}
private:
HWND _hwnd;
int _id;
};
We'll put the timer in our Controller object and initialize it there.
class Controller{
Интервал:
Закладка:
Похожие книги на «Применение Windows API»
Представляем Вашему вниманию похожие книги на «Применение Windows API» списком для выбора. Мы отобрали схожую по названию и смыслу литературу в надежде предоставить читателям больше вариантов отыскать новые, интересные, ещё непрочитанные произведения.


Обсуждение, отзывы о книге «Применение Windows API» и просто собственные мнения читателей. Оставьте ваши комментарии, напишите, что Вы думаете о произведении, его смысле или главных героях. Укажите что конкретно понравилось, а что нет, и почему Вы так считаете.