Wei-Meng Lee - C# 2008 Programmer's Reference
Здесь есть возможность читать онлайн «Wei-Meng Lee - C# 2008 Programmer's Reference» весь текст электронной книги совершенно бесплатно (целиком полную версию без сокращений). В некоторых случаях можно слушать аудио, скачать через торрент в формате fb2 и присутствует краткое содержание. Город: Indianapolis, Год выпуска: 2009, ISBN: 2009, Издательство: Wiley Publishing, Inc., Жанр: Программирование, на английском языке. Описание произведения, (предисловие) а так же отзывы посетителей доступны на портале библиотеки ЛибКат.
- Название:C# 2008 Programmer's Reference
- Автор:
- Издательство:Wiley Publishing, Inc.
- Жанр:
- Год:2009
- Город:Indianapolis
- ISBN:978-0-470-28581-7
- Рейтинг книги:4 / 5. Голосов: 1
-
Избранное:Добавить в избранное
- Отзывы:
-
Ваша оценка:
C# 2008 Programmer's Reference: краткое содержание, описание и аннотация
Предлагаем к чтению аннотацию, описание, краткое содержание или предисловие (зависит от того, что написал сам автор книги «C# 2008 Programmer's Reference»). Если вы не нашли необходимую информацию о книге — напишите в комментариях, мы постараемся отыскать её.
C# 2008 Programmer's Reference — читать онлайн бесплатно полную книгу (весь текст) целиком
Ниже представлен текст книги, разбитый по страницам. Система сохранения места последней прочитанной страницы, позволяет с удобством читать онлайн бесплатно книгу «C# 2008 Programmer's Reference», без необходимости каждый раз заново искать на чём Вы остановились. Поставьте закладку, и сможете в любой момент перейти на страницу, на которой закончили чтение.
Интервал:
Закладка:
□ How to define a class
□ How to create an object from a class
□ The different types of members in a class
□ The root of all objects — System.Object
Classes
Everything you encounter in .NET in based on classes. For example, you have a Windows Forms application containing a default form called Form1. Form1itself is a class that inherits from the base class System.Windows.Forms.Form, which defines the basic behaviors that a Windows Form should exhibit:
using System.Data;
using System.Drawing;
using System.Linq;
using System.Text;
using System.Windows.Forms;
namespace Project1 {
public partial class Form1 : Form {
public Form1() {
InitializeComponent();
}
}
}
Within the Form1class, you code in your methods. For example, to display a " Hello World" message when the form is loaded, add the following statement in the Form1_Load() method:
public partial class Form1 : Form {
public Form1() {
InitializeComponent();
}
protected override void OnLoad(EventArgs e) {
MessageBox.Show("Hello World!");
}
}
The following sections walk you through the basics of defining your own class and the various members you can have in the class.
Defining a Class
You use the classkeyword to define a class. The following example is the definition of a class called Contact:
public class Contact {
public int ID;
public string FirstName;
public string LastName;
public string Email;
}
This Contact class has four public members — ID, FirstName, LastName, and Email. The syntax of a class definition is:
class Class_Name{
//---Fields, properties, methods, and events---
}
Using Partial Classes
Instead of defining an entire class by using the classkeyword, you can split the definition into multiple classes by using the partialkeyword. For example, the Contactclass defined in the previous section can be split into two partial classes like this:
public partial class Contact {
public int ID;
public string Email;
}
public partial class Contact {
public string FirstName;
public string LastName;
}
When the application is compiled, the C# compiler will group all the partial classes together and treat them as a single class.
There are a couple of very good reasons to use partial classes. First, using partial classes enables the programmers on your team to work on different parts of a class without needing to share the same physical file. While this is useful for projects that involve big class files, be wary: a huge class file may signal a design fault, and refactoring may be required.
Second, and most compelling, you can use partial classes to separate your application business logic from the designer-generated code. For example, the code generated by Visual Studio 2008 for a Windows Form is kept separate from your business logic. This prevents developers from messing with the code that is used for the user interface. At the same time, it prevents you from losing your changes to the designer-generated code when you change the user interface.
Creating an Instance of a Class (Object Instantiation)
A class works like a template. To do anything useful, you need to use the template to create an actual object so that you can work with it. The process of creating an object from a class is known as instantiation.
To instantiate the Contactclass defined earlier, you first create a variable of type Contact:
Contact contact1;
At this stage, contact1is of type Contact, but it does not actually contain the object data yet. For it to contain the object data, you need to use the new keyword to create a new instance of the Contactclass, a process is known as object instantiation:
contact1 = new Contact();
Alternatively, you can combine those two steps into one, like this:
Contact contact1 = new Contact();
Once an object is instantiated, you can set the various members of the object. Here's an example:
contact1.ID = 12;
contact1.FirstName = "Wei-Meng";
contact1.LastName = "Lee";
contact1.Email = "weimenglee@learn2develop.net";
You can also assign an object to an object, like the following:
Contact contact1 = new Contact();
Contact contact2 = contact1;
In these statements, contact2and contact1are now both pointing to the same object. Any changes made to one object will be reflected in the other object, as the following example shows:
Contact contact1 = new Contact();
Contact contact2 = contact1;
contact1.FirstName = "Wei-Meng";
contact2.FirstName = "Jackson";
//---prints out "Jackson"---
Console.WriteLine(contact1.FirstName);
It prints out "Jackson" because both contact1and contact2are pointing to the same object, and when you assign "Jackson" to the FirstNameproperty of contact2, contact1's FirstNameproperty also sees "Jackson".
Anonymous Types (C# 3.0)
C# 3.0 introduces a new feature known as anonymous types. Anonymous types enable you to define data types without having to formally define a class. Consider the following example:
var book1 = new {
ISBN = "978-0-470-17661-0",
Title="Professional Windows Vista Gadgets Programming",
Author = "Wei-Meng Lee",
Publisher="Wrox"
};
Chapter 3 discusses the new C# 3.0 keyword var.
Here, book1 is an object with 4 properties: ISBN, Title, Author, and Publisher(see Figure 4-1).
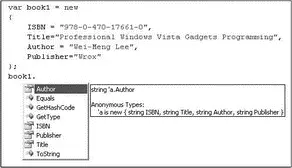
Figure 4-1
In this example, there's no need for you to define a class containing the four properties. Instead, the object is created and its properties initialized with their respective values.
C# anonymous types are immutable, which means all the properties are read-only — their values cannot be changed once they are initialized.
You can use variable names when assigning values to properties in an anonymous type; for example:
var Title = "Professional Windows Vista Gadgets Programming";
var Author = "Wei-Meng Lee";
var Publisher = "Wrox";
var book1 = new {
ISBN = "978-0-470-17661-0",
Интервал:
Закладка:
Похожие книги на «C# 2008 Programmer's Reference»
Представляем Вашему вниманию похожие книги на «C# 2008 Programmer's Reference» списком для выбора. Мы отобрали схожую по названию и смыслу литературу в надежде предоставить читателям больше вариантов отыскать новые, интересные, ещё непрочитанные произведения.


Обсуждение, отзывы о книге «C# 2008 Programmer's Reference» и просто собственные мнения читателей. Оставьте ваши комментарии, напишите, что Вы думаете о произведении, его смысле или главных героях. Укажите что конкретно понравилось, а что нет, и почему Вы так считаете.