Wei-Meng Lee - C# 2008 Programmer's Reference
Здесь есть возможность читать онлайн «Wei-Meng Lee - C# 2008 Programmer's Reference» весь текст электронной книги совершенно бесплатно (целиком полную версию без сокращений). В некоторых случаях можно слушать аудио, скачать через торрент в формате fb2 и присутствует краткое содержание. Город: Indianapolis, Год выпуска: 2009, ISBN: 2009, Издательство: Wiley Publishing, Inc., Жанр: Программирование, на английском языке. Описание произведения, (предисловие) а так же отзывы посетителей доступны на портале библиотеки ЛибКат.

- Название:C# 2008 Programmer's Reference
- Автор:
- Издательство:Wiley Publishing, Inc.
- Жанр:
- Год:2009
- Город:Indianapolis
- ISBN:978-0-470-28581-7
- Рейтинг книги:4 / 5. Голосов: 1
-
Избранное:Добавить в избранное
- Отзывы:
-
Ваша оценка:
C# 2008 Programmer's Reference: краткое содержание, описание и аннотация
Предлагаем к чтению аннотацию, описание, краткое содержание или предисловие (зависит от того, что написал сам автор книги «C# 2008 Programmer's Reference»). Если вы не нашли необходимую информацию о книге — напишите в комментариях, мы постараемся отыскать её.
C# 2008 Programmer's Reference — читать онлайн бесплатно полную книгу (весь текст) целиком
Ниже представлен текст книги, разбитый по страницам. Система сохранения места последней прочитанной страницы, позволяет с удобством читать онлайн бесплатно книгу «C# 2008 Programmer's Reference», без необходимости каждый раз заново искать на чём Вы остановились. Поставьте закладку, и сможете в любой момент перейти на страницу, на которой закончили чтение.
Интервал:
Закладка:
Testing your Windows Mobile application on real devices could not be easier. All you need is to:
1. Connect your device to your development machine using ActiveSync.
2. Select Windows Mobile 6 Standard Device (see Figure 18-20) in Visual Studio 2008.

Figure 18-20
3. Press F5. The application is now deployed onto the device.
Deploying the Application
Once the testing and debugging process is over, you need to package the application nicely so that you have a way to get it installed on your users' devices.
The following sections show how to create a CAB (cabinet) file — a library of compressed files stored as a single file — so that you can easily distribute your application. Subsequent sections explain how to create an MSI (Microsoft Installer) file to automate the installation process.
Creating a CAB File
An easy way to package your Windows Mobile application is to create a CAB file so that you can transfer it onto the end user's device (using emails, web browser, memory card, and so on). The following steps show you how:
1. Add a new project to the current solution in Visual Studio 2008 (see Figure 18-21).
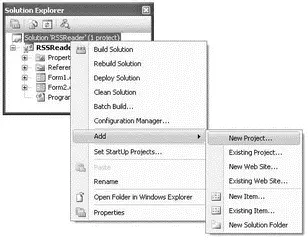
Figure 18-21
2. Choose the Setup and Deployment project type, and select the Smart Device CAB Project template (see Figure 18-22). Use the default name of SmartDeviceCab1, and click OK.
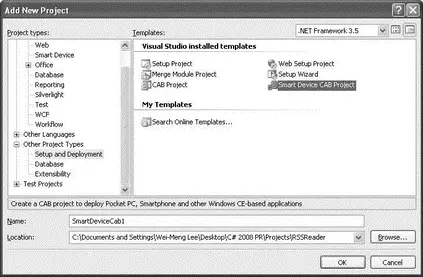
Figure 18-22
3. In the File System tab, right-click on Application Folder, and select Add→Project Output (see Figure 18-23).
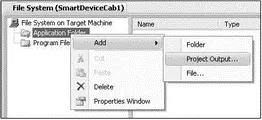
Figure 18-23
4 . Select the RSSReaderproject, and click Primary output (see Figure 18-24). Click OK. This adds the output of the RSSReader project (which is your executable application) to the current project.
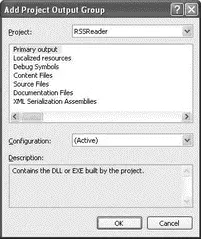
Figure 18-24
5. Right-click on the output item shown on the right-side of the File System tab, and create a shortcut to it (see Figure 18-25). Name the shortcut RSSReader.
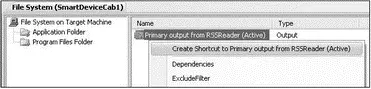
Figure 18-25
6 . Right-click the File System on Target Machine item, and select Add Special Folder→Start Menu Folder (see Figure 18-26).
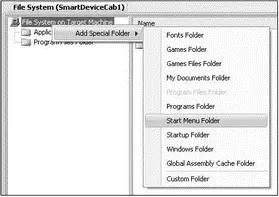
Figure 18-26
7. Drag and drop the RSSReader shortcut onto the newly added Start Menu Folder (see Figure 18-27). This ensures that when the CAB file is installed on the device, a shortcut named RSS Reader appears in the Start menu.
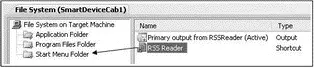
Figure 18-27
8. Right-click on the SmartDeviceCab1 project name in Solution Explorer, and select Properties. Change the Configuration from Debugto Release. Also, name the output file Release\RSSReader.cab (see Figure 18-28).
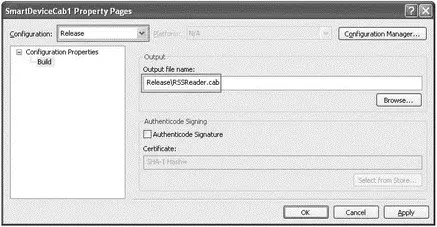
Figure 18-28
9. In Visual Studio 2008, change the configuration from Debug to Release (see Figure 18-29).
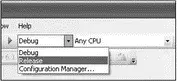
Figure 18-29
10. Finally, set the properties of the SmartDeviceCab1project as shown in the following table (see Figure 18-30).
| Property | Value |
|---|---|
| Manufacturer | Developer Learning Solutions |
| ProductName | RSS Reader v1.0 |
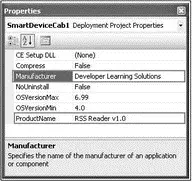
Figure 18-30
That's it! Right-click on the SmartDeviceCab1project name in Solution Explorer and select Build. You can find the CAB file located in the \Releasefolder of the SmartDeviceCab1project (see Figure 18-31).
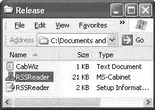
Figure 18-31
Now you can distribute the CAB file to your customers using various media such as FTP, web hosting, email, and so on. When the user clicks on the RSSReader CAB file in File Explorer (on the device; see Figure 18-32), the application will ask if he wants to install it onto the device, or onto the storage card (if available).
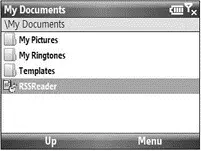
Figure 18-32
When the application is installed, the RSS Reader shortcut is in the Start menu (see Figure 18-33).
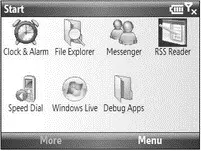
Figure 18-33
Creating a Setup Application
Although you can deploy CAB files directly to your users, you might want to use a more user-friendly way using the traditional setup application that most Windows users are familiar with — users simply connect their devices to their computers and then run a setup application, which then installs the application automatically on their devices through ActiveSync.
Creating a setup application for a Windows Mobile application is more involved than for a conventional Windows application because you have to activate ActiveSync to install it. Figure 18-34 shows the steps in the installation process.
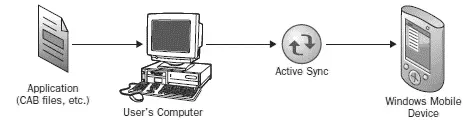
Figure 18-34
First, the application containing the CAB files (and other relevant files) must be installed on the user's computer. Then ActiveSync needs to install the application onto the user's device.
The following sections detail how to create an MSI file to install the application onto the user's computer and then onto the device.
The first component you will build is the custom installer that will invoke ActiveSync to install the application onto the user's device. For this, you will use a Class Library project.
Add a new project to your current solution by going to File→Add→New Project. Select the Windows project type and select the Class Library template. Name the project RSSReaderInstaller (see Figure 18-35). Click OK.
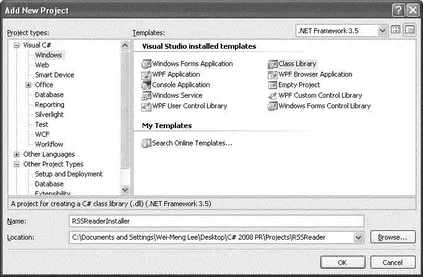
Figure 18-35
Delete the default Class1.csfile and add a new item to the project. In the Add New Item dialog, select the Installer Class template, and name the file RSSReaderInstaller.cs(see Figure 18-36).
Интервал:
Закладка:
Похожие книги на «C# 2008 Programmer's Reference»
Представляем Вашему вниманию похожие книги на «C# 2008 Programmer's Reference» списком для выбора. Мы отобрали схожую по названию и смыслу литературу в надежде предоставить читателям больше вариантов отыскать новые, интересные, ещё непрочитанные произведения.


Обсуждение, отзывы о книге «C# 2008 Programmer's Reference» и просто собственные мнения читателей. Оставьте ваши комментарии, напишите, что Вы думаете о произведении, его смысле или главных героях. Укажите что конкретно понравилось, а что нет, и почему Вы так считаете.