Christopher Hallinan - Embedded Linux Primer - A Practical, Real-World Approach
Здесь есть возможность читать онлайн «Christopher Hallinan - Embedded Linux Primer - A Practical, Real-World Approach» весь текст электронной книги совершенно бесплатно (целиком полную версию без сокращений). В некоторых случаях можно слушать аудио, скачать через торрент в формате fb2 и присутствует краткое содержание. Год выпуска: 2006, ISBN: 2006, Издательство: Prentice Hall, Жанр: ОС и Сети, на английском языке. Описание произведения, (предисловие) а так же отзывы посетителей доступны на портале библиотеки ЛибКат.

- Название:Embedded Linux Primer: A Practical, Real-World Approach
- Автор:
- Издательство:Prentice Hall
- Жанр:
- Год:2006
- ISBN:978-0-13-167984-9
- Рейтинг книги:4 / 5. Голосов: 1
-
Избранное:Добавить в избранное
- Отзывы:
-
Ваша оценка:
Embedded Linux Primer: A Practical, Real-World Approach: краткое содержание, описание и аннотация
Предлагаем к чтению аннотацию, описание, краткое содержание или предисловие (зависит от того, что написал сам автор книги «Embedded Linux Primer: A Practical, Real-World Approach»). Если вы не нашли необходимую информацию о книге — напишите в комментариях, мы постараемся отыскать её.
This book brings together indispensable knowledge for building efficient, high-value, Linux-based embedded products: information that has never been assembled in one place before. Drawing on years of experience as an embedded Linux consultant and field application engineer, Christopher Hallinan offers solutions for the specific technical issues you're most likely to face, demonstrates how to build an effective embedded Linux environment, and shows how to use it as productively as possible.
Hallinan begins by touring a typical Linux-based embedded system, introducing key concepts and components, and calling attention to differences between Linux and traditional embedded environments. Writing from the embedded developer's viewpoint, he thoroughly addresses issues ranging from kernel building and initialization to bootloaders, device drivers to file systems.
Hallinan thoroughly covers the increasingly popular BusyBox utilities; presents a step-by-step walkthrough of porting Linux to custom boards; and introduces real-time configuration via CONFIG_RT--one of today's most exciting developments in embedded Linux. You'll find especially detailed coverage of using development tools to analyze and debug embedded systems--including the art of kernel debugging.
• Compare leading embedded Linux processors
• Understand the details of the Linux kernel initialization process
• Learn about the special role of bootloaders in embedded Linux systems, with specific emphasis on U-Boot
• Use embedded Linux file systems, including JFFS2--with detailed guidelines for building Flash-resident file system images
• Understand the Memory Technology Devices subsystem for flash (and other) memory devices
• Master gdb, KGDB, and hardware JTAG debugging
• Learn many tips and techniques for debugging within the Linux kernel
• Maximize your productivity in cross-development environments
• Prepare your entire development environment, including TFTP, DHCP, and NFS target servers
• Configure, build, and initialize BusyBox to support your unique requirements
Embedded Linux Primer: A Practical, Real-World Approach — читать онлайн бесплатно полную книгу (весь текст) целиком
Ниже представлен текст книги, разбитый по страницам. Система сохранения места последней прочитанной страницы, позволяет с удобством читать онлайн бесплатно книгу «Embedded Linux Primer: A Practical, Real-World Approach», без необходимости каждый раз заново искать на чём Вы остановились. Поставьте закладку, и сможете в любой момент перейти на страницу, на которой закончили чтение.
Интервал:
Закладка:
}
}
This is a simple example, meant only to show the kind of information you can pass to your target system. There is a one-to-one mapping of the target MAC address to its assigned IP address. In addition to its fixed IP address, you can pass other information to your target. In this example, the default router and DNS server addresses are passed to your target, along with the filename of a file of your choice, and a root path for your kernel to mount an NFS root mount from. The filename might be used by your bootloader to load a kernel image from your TFTP server. You can also configure your DHCP server to hand out IP addresses from a predefined range, but it is very convenient to use a fixed address such as that shown in Listing 12-6.
You must enable the DHCP server on your Linux development workstation. This is typically done through your main menu or via the command line. Consult the documentation for your own Linux distribution for details suitable for your environment. For example, to enable the DHCP server on a Fedora Core 2 Linux distribution, simply type the following command from a root command prompt:
$ /etc/init.d/dhcpd start(or restart)
You must do this each time you start your development workstation, unless you configure it to start automatically.
Many nuances are involved with installing a DHCP server, so unless your server is on a private network, it is advisable to check with your system administrator before going live with your own. If you coexist with a corporate LAN, it is very possible that you will interfere with its own DHCP service.
12.3.3. NFS Server
Using an NFS root mount for your target board is a very powerful development tool. Some of the advantages of this configuration for development are:
• Your root file system is not size-restricted by your board's own limited resources, such as Flash memory.
• Changes made to your application files during development are immediately available to your target system.
• You can debug and boot your kernel before developing and debugging your root file system.
Setting up an NFS server varies depending on the desktop Linux distribution you are using. As with the other services described in this chapter, you must consult the documentation for your own Linux distribution for the details appropriate to your configuration. The NFS service must be started from either your startup scripts, a graphical menu, or the command line. For example, the command to start NFS services from a root command prompt for a Fedora Core 2 Linux desktop is as follows:
$ /etc/init.d/nfs start(or restart)
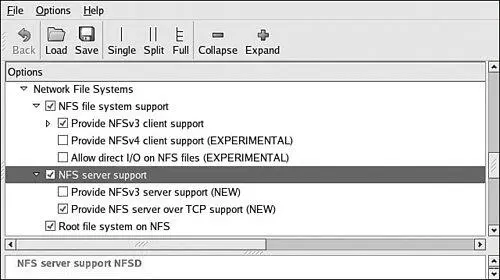
You must do this each time you start your desktop Linux workstation. (This and other services can be started automatically on bootingconsult the documentation for your desktop Linux distribution.) In addition to enabling the service, your kernel must be compiled with support for NFS. Although DHCP and TFTP are both user space utilities, NFS requires kernel support. This is true on both your development workstation and your target board. Figure 12-2 illustrates the configuration options for NFS in the kernel. Notice that there are configuration options for both NFS server and client support. Note also the option for root file system on NFS. Your target kernel must have this option configured for NFS root mount operation.
Figure 12-2. NFS kernel configuration
The NFS server gets its instructions from an exports file located on your server. It is commonly found in /etc/exports. Listing 12-7 is an example of a simple exports entry.
Listing 12-7. Simple NFS exports File
$ cat /etc/exports
# /etc/exports
/home/chris/sandbox/coyote-target *(rw,sync,no_root_squash)
/home/chris/sandbox/pdna-target *(rw,sync,no_root_squash)
/home/chris/workspace *(rw,sync,no_root_squash)
These entries on my workstation allow a client to remotely mount any of the three directories shown. The attributes following the directory specification instruct the NFS server to allow connections from any IP address (*) and to mount the respective directories with the given attributes (read/write with no_root_squash). The latter attribute enables a client with root privileges to exercise those privileges on the given directory. It is usually required when working with embedded systems because they often have only root accounts.
You can test your NFS configuration right from your workstation. Assuming that you have NFS services enabled (requires both NFS server and client components enabled), you can mount a local NFS export as you would mount any other file system:
# mount -t nfs localhost:/home/chris/workspace /mnt/remote
If this command succeeds and the files in .../workspace are available on /mnt/remote, your NFS server configuration is working.
12.3.4. Target NFS Root Mount
Mounting your target via NFS root mount is not difficult, and, as mentioned elsewhere, it is a very useful development configuration. However, a set of details must be correct before it will work. The steps required are as follows:
1. Configure your NFS server and export a proper target file system for your architecture.
2. Configure your target kernel with NFS client services and root file system on NFS.
3. Enable kernel-level autoconfiguration of your target's Ethernet interface.
4. Provide your target Ethernet IP configuration via the kernel command line or static kernel configuration option.
5. Provide a kernel command line enabled for NFS.
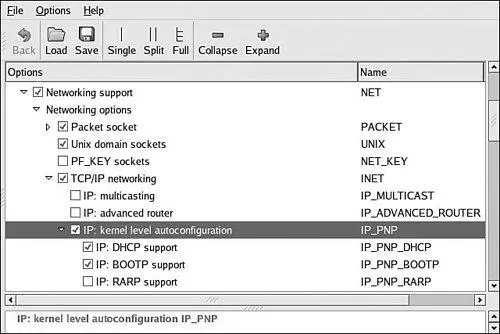
We presented the kernel configuration in Figure 12-2 when we explained the NFS server configuration. You must make sure that your target kernel configuration has NFS client services enabled, and, in particular, you must enable the option for Root file system on NFS. Specifically, make sure that your kernel has CONFIG_NFS_FS=y and CONFIG_ROOT_NFS=y. Obviously, you cannot configure NFS as loadable modules if you intend to boot NFS root mount.
Kernel-level autoconfiguration is a TCP/IP configuration option found under the Networking tab in the kernel configuration utility. Enable CONFIG_IP_PNP on your target kernel. When selected, you are presented with several options for automatic configuration. Select either BOOTP or DHCP, as described earlier. Figure 12-3 illustrates the kernel configuration for kernel-level autoconfiguration.
Figure 12-3. Kernel-level autoconfiguration
When your server and target kernel are configured, you need to provide your target Ethernet configuration via one of the methods described earlier. If your bootloader supports a kernel command line, that is the easiest method. Here is what a kernel command line might look like to support NFS root mount:
console=ttyS0,115200 root=/dev/nfs rw ip=dhcp \
nfsroot=192.168.1.9:/home/chris/sandbox/pdna-target
12.3.5. U-Boot NFS Root Mount Example
U-Boot is a good example of a bootloader that supports a configurable kernel command line. Using U-Boot's nonvolatile environment feature, we can store our kernel command line in a parameter specially named for this purpose. To enable the NFS command line in U-Boot, we do the following (all on one line in our serial terminal):
Читать дальшеИнтервал:
Закладка:
Похожие книги на «Embedded Linux Primer: A Practical, Real-World Approach»
Представляем Вашему вниманию похожие книги на «Embedded Linux Primer: A Practical, Real-World Approach» списком для выбора. Мы отобрали схожую по названию и смыслу литературу в надежде предоставить читателям больше вариантов отыскать новые, интересные, ещё непрочитанные произведения.


Обсуждение, отзывы о книге «Embedded Linux Primer: A Practical, Real-World Approach» и просто собственные мнения читателей. Оставьте ваши комментарии, напишите, что Вы думаете о произведении, его смысле или главных героях. Укажите что конкретно понравилось, а что нет, и почему Вы так считаете.