Andrew Hudson - Fedora™ Unleashed, 2008 edition
Здесь есть возможность читать онлайн «Andrew Hudson - Fedora™ Unleashed, 2008 edition» весь текст электронной книги совершенно бесплатно (целиком полную версию без сокращений). В некоторых случаях можно слушать аудио, скачать через торрент в формате fb2 и присутствует краткое содержание. Город: Indianapolis, Год выпуска: 2008, ISBN: 2008, Издательство: Sams Publishing, Жанр: ОС и Сети, на английском языке. Описание произведения, (предисловие) а так же отзывы посетителей доступны на портале библиотеки ЛибКат.

- Название:Fedora™ Unleashed, 2008 edition
- Автор:
- Издательство:Sams Publishing
- Жанр:
- Год:2008
- Город:Indianapolis
- ISBN:978-0-672-32977-7
- Рейтинг книги:5 / 5. Голосов: 1
-
Избранное:Добавить в избранное
- Отзывы:
-
Ваша оценка:
Fedora™ Unleashed, 2008 edition: краткое содержание, описание и аннотация
Предлагаем к чтению аннотацию, описание, краткое содержание или предисловие (зависит от того, что написал сам автор книги «Fedora™ Unleashed, 2008 edition»). Если вы не нашли необходимую информацию о книге — напишите в комментариях, мы постараемся отыскать её.
Finding information you need is not always easy. This short index provides a list of common tasks discussed inside this book. Browse the table of contents or index for detailed listings and consult the specified chapter for in-depth discussions about each subject.
left How Do I…?
See…
How Do I…?
See…
left Back up my system?
Chapter 13
Partition a hard drive?
Appendix B, Chapters 1, 35
left Build a new Linux kernel?
Chapter 36
Play MP3s and other music?
Chapter 7
left Burn a CD?
Chapter 7
Print a file?
Chapter 8
left Change a password?
Chapter 4
Read a text file?
Chapter 4
left Change the date and time?
Chapter 32
Read or send email?
Chapter 21
left Compress a file?
Chapter 13
Read or post to newsgroups?
Chapter 5
left Configure a modem?
Chapter 2
Reboot Fedora?
Chapter 1
left Configure a printer?
Chapter 8
Rescue my system?
Chapter 13
left Configure a scanner?
Chapter 7
Set up a DNS server?
Chapter 23
left Configure a sound card?
Chapter 7
Set up a firewall?
Chapter 14
left Configure my desktop settings?
Chapter 3
Set up a web server?
Chapter 15
left Connect to the Internet?
Chapter 5
Set up an FTP server?
Chapter 20
left Control a network interface?
Chapter 14
Set up Samba with SWAT?
Chapter 19
left Copy files or directories?
Chapters 13, 32
Set up wireless networking?
Chapter 14
left Create a boot disk to boot Fedora?
Chapter 1
Shut down Fedora?
Chapter 1
left Create a database?
Chapter 16
Use a spreadsheet?
Chapter 6
left Create a user?
Chapter 4
Use Instant Messaging?
Chapter 5
left Delete a file or directory?
Chapter 32
Watch television on my computer?
Chapter 7
left Get images from a digital camera?
Chapter 7
Edit a text file?
Chapter 4
left Install Fedora?
Chapter 1
Make Fedora more secure?
Chapter 14
left Log in to Fedora?
Chapter 1
Mount a CD-ROM or hard drive?
Chapter 35
Fedora™ Unleashed, 2008 edition — читать онлайн бесплатно полную книгу (весь текст) целиком
Ниже представлен текст книги, разбитый по страницам. Система сохранения места последней прочитанной страницы, позволяет с удобством читать онлайн бесплатно книгу «Fedora™ Unleashed, 2008 edition», без необходимости каждый раз заново искать на чём Вы остановились. Поставьте закладку, и сможете в любой момент перейти на страницу, на которой закончили чтение.
Интервал:
Закладка:
As part of your configuration for using NFS, you might need to enable the port on your firewall. Go to System, Administration, Firewall to open the Firewall configuration utility. Check the box next to NFS4 and click Apply to apply the new firewall policy.
NFS Client Configuration
To configure your host as an NFS client (to acquire remote files or directories), edit the /etc/fstabfile as you would to mount any local file system. However, rather than use a device name to be mounted (such as /dev/sda1), enter the remote hostname and the desired file system to be imported. For example, one entry might look like this:
# Device Mount Point Type Options Freq Pass
yourhost:/usr/local /usr/local nfs nfsvers=4,ro 0 0
If you use autofson your system, you need to use proper autofsentries for your remote NFS mounts. See the section 5man page for autofs.
The options column uses the same options as standard fstabfile entries with some additional entries, such as nfsvers=4, which specifies the fourth version of NFS. You can also use the mountcommand, as root, to quickly attach a remote directory to a local file system by using a remote host's name and exported directory. For example:
# mount -t nfs 192.168.0.11:/home/andrew \
/home/andrew/test/foo
After you press Enter, the entire remote directory appears on your file system. You can verify the imported file system by using the dfcommand, like so:
# df
Filesystem 1K-blocks Used Available Use% Mounted on
/dev/mapper/VolGroup00-LogVol00
73575592 58627032 11150752 85% /
/dev/sda1 101086 18697 77170 20% /boot
tmpfs 512724 0 512724 0% /dev/shm
192.168.0.11:/home/andrew
35740416 5554304 28341248 17% /home/andrew/test/foo
Make sure that the desired mount point exists before using the mountcommand. When you finish using the directory (perhaps for copying backups), you can use the umountcommand to remove the remote file system. Note that if you specify the root directory ( /) as a mount point, you cannot unmount the NFS directory until you reboot (because Linux complains that the file system is in use).
Putting Samba to Work
Samba uses the Session Message Block (SMB) protocol to enable the Windows operating system (or any operating system) to access Linux files. Using Samba, you can make your Fedora machine look just like a Windows computer to other Windows computers on your network. You do not need to install Windows on your PC.
Samba is a very complex program — so much so that the book Samba Unleashed (Sams Publishing, 2000, ISBN 0-672-31862-8) is more than 1,200 pages long. The Samba man page (when converted to text) for just the configuration file is 330KB and 7,013 lines long. Although Samba is complex, setting it up and using it does not have to be difficult. There are many options, which account for some of Samba's complexity. Depending on what you want, Samba's use can be as easy or as difficult as you would like it to be.
Fortunately, Fedora includes two tools: a simplified Samba management tool called system-config-samba, and a much more advanced tool known as SWAT (Samba Web Administration Tool) , which can be used to configure Samba with a web browser. SWAT provides an easy way to start and stop the Samba server; set up printing services; define remote access permissions; and create Samba usernames, passwords, and shared directories. This section delves into the basics of configuring Samba, and you should first read how to manually configure Samba to get an understanding of how the software works. At the end of this section, you will see how to enable, start, and use SWAT to set up simple file sharing.
Like most of the software that comes with Fedora, Samba is licensed under the GPL and is free. It comes as both an RPM and as source code. In both cases, installation is straightforward and the software can be installed when you install Fedora or use RPM software packages. The Samba RPMs should be on one of your Fedora install disks, or the latest version can be downloaded from the Internet, preferably from the Fedora Project (at http://fedoraproject.org/) or an authorized mirror site.
Installing from source code can be more time-consuming. If you do not want to install from Fedora's default locations, however, installing from the source code is a more configurable method. Just download the source from http://www.samba.org/ and unpack the files. Change into the source directory and, as root, run the command ./configurealong with any changes from the defaults. Then run make, maketest (if you want), followed by make installto install Samba in the specified locations.
If you install Samba from your Fedora DVD, you can find a large amount of documentation in the directory tree, starting at /usr/share/doc/samba*/doc/in several formats, including PDF, HTML, and text, among others. Altogether, almost 3MB of documentation is included with the source code.
After Samba is installed, you can either create the file /etc/smb.confor use the smb.conffile supplied with Samba, which is located by default under the /etc/sambadirectory with Fedora. Nearly a dozen sample configuration files can be found under the /usr/share/doc/samba*/examplesdirectory.
Depending on your needs, smb.confcan be a simple file of fewer than 20 lines or a huge file spanning many pages of text. If your needs are complex, I suggest picking up a copy of Using Samba, 3rd Edition by Carter, Ts, and Eckstein (O'Reilly, 2007).
Configuring Samba with system-config-samba
Fedora benefits from a slew of utilities that were developed as part of the original Red Hat Linux. Fortunately, work has carried on after Red Hat Linux was discontinued and the Samba configuration tool has lived on. And although it hasn't undergone major enhancements since Fedora Core 1, it is still a very useful tool to have to hand when configuring basic Samba services.
You can access it under System, Administration, Samba, and the opening screen is shown in Figure 19.2.
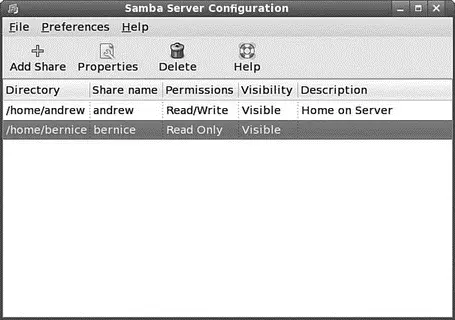
FIGURE 19.2 system-config-samba, a great way to get up and running quickly with Samba.
To get started, just click the Add Share icon in the toolbar, or select Add Share from the File menu. Either way takes you to the basic settings screen shown in Figure 19.3.
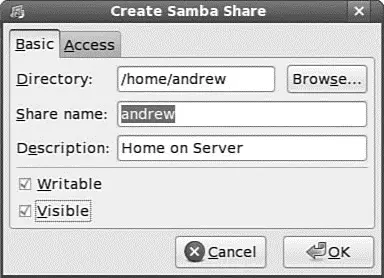
FIGURE 19.3 Click the Browse button to locate the folder you want to share.
In the basic settings, you need to provide the path to the folder that you want to share via Samba. You also need to give it a share name, and an optional description. If you plan on setting up a number of shares, you might want to consider filling out the description to help you distinguish between them all.
Next up you need to select one or both of the check boxes to allow users to view (visible) and or write (writable) to the folder. Subdirectories underneath the specified directory inherit the permissions stated here.
Читать дальшеИнтервал:
Закладка:
Похожие книги на «Fedora™ Unleashed, 2008 edition»
Представляем Вашему вниманию похожие книги на «Fedora™ Unleashed, 2008 edition» списком для выбора. Мы отобрали схожую по названию и смыслу литературу в надежде предоставить читателям больше вариантов отыскать новые, интересные, ещё непрочитанные произведения.


![Andrew Radford - Linguistics An Introduction [Second Edition]](/books/397851/andrew-radford-linguistics-an-introduction-second-thumb.webp)


Обсуждение, отзывы о книге «Fedora™ Unleashed, 2008 edition» и просто собственные мнения читателей. Оставьте ваши комментарии, напишите, что Вы думаете о произведении, его смысле или главных героях. Укажите что конкретно понравилось, а что нет, и почему Вы так считаете.