Andrew Hudson - Fedora™ Unleashed, 2008 edition
Здесь есть возможность читать онлайн «Andrew Hudson - Fedora™ Unleashed, 2008 edition» весь текст электронной книги совершенно бесплатно (целиком полную версию без сокращений). В некоторых случаях можно слушать аудио, скачать через торрент в формате fb2 и присутствует краткое содержание. Город: Indianapolis, Год выпуска: 2008, ISBN: 2008, Издательство: Sams Publishing, Жанр: ОС и Сети, на английском языке. Описание произведения, (предисловие) а так же отзывы посетителей доступны на портале библиотеки ЛибКат.

- Название:Fedora™ Unleashed, 2008 edition
- Автор:
- Издательство:Sams Publishing
- Жанр:
- Год:2008
- Город:Indianapolis
- ISBN:978-0-672-32977-7
- Рейтинг книги:5 / 5. Голосов: 1
-
Избранное:Добавить в избранное
- Отзывы:
-
Ваша оценка:
Fedora™ Unleashed, 2008 edition: краткое содержание, описание и аннотация
Предлагаем к чтению аннотацию, описание, краткое содержание или предисловие (зависит от того, что написал сам автор книги «Fedora™ Unleashed, 2008 edition»). Если вы не нашли необходимую информацию о книге — напишите в комментариях, мы постараемся отыскать её.
Finding information you need is not always easy. This short index provides a list of common tasks discussed inside this book. Browse the table of contents or index for detailed listings and consult the specified chapter for in-depth discussions about each subject.
left How Do I…?
See…
How Do I…?
See…
left Back up my system?
Chapter 13
Partition a hard drive?
Appendix B, Chapters 1, 35
left Build a new Linux kernel?
Chapter 36
Play MP3s and other music?
Chapter 7
left Burn a CD?
Chapter 7
Print a file?
Chapter 8
left Change a password?
Chapter 4
Read a text file?
Chapter 4
left Change the date and time?
Chapter 32
Read or send email?
Chapter 21
left Compress a file?
Chapter 13
Read or post to newsgroups?
Chapter 5
left Configure a modem?
Chapter 2
Reboot Fedora?
Chapter 1
left Configure a printer?
Chapter 8
Rescue my system?
Chapter 13
left Configure a scanner?
Chapter 7
Set up a DNS server?
Chapter 23
left Configure a sound card?
Chapter 7
Set up a firewall?
Chapter 14
left Configure my desktop settings?
Chapter 3
Set up a web server?
Chapter 15
left Connect to the Internet?
Chapter 5
Set up an FTP server?
Chapter 20
left Control a network interface?
Chapter 14
Set up Samba with SWAT?
Chapter 19
left Copy files or directories?
Chapters 13, 32
Set up wireless networking?
Chapter 14
left Create a boot disk to boot Fedora?
Chapter 1
Shut down Fedora?
Chapter 1
left Create a database?
Chapter 16
Use a spreadsheet?
Chapter 6
left Create a user?
Chapter 4
Use Instant Messaging?
Chapter 5
left Delete a file or directory?
Chapter 32
Watch television on my computer?
Chapter 7
left Get images from a digital camera?
Chapter 7
Edit a text file?
Chapter 4
left Install Fedora?
Chapter 1
Make Fedora more secure?
Chapter 14
left Log in to Fedora?
Chapter 1
Mount a CD-ROM or hard drive?
Chapter 35
Fedora™ Unleashed, 2008 edition — читать онлайн бесплатно полную книгу (весь текст) целиком
Ниже представлен текст книги, разбитый по страницам. Система сохранения места последней прочитанной страницы, позволяет с удобством читать онлайн бесплатно книгу «Fedora™ Unleashed, 2008 edition», без необходимости каждый раз заново искать на чём Вы остановились. Поставьте закладку, и сможете в любой момент перейти на страницу, на которой закончили чтение.
Интервал:
Закладка:
► pg_ctl — Controls a PostgreSQL server or queries its status
► psql — Accesses PostgreSQL via an interactive terminal
Reference
► http://www.mysql.com/— This is the official website of the MySQL database server. Here you can find the latest versions as well as up-to-date information and online documentation for MySQL. You can also purchase support contracts here. You might want to look into this if you will be using MySQL in a corporate setting. (Many corporations balk at the idea of using software for which the company has no support contract in place.)
► http://www.postgresql.org/— This is the official website of the PostgreSQL database server. You are asked to select a mirror when you arrive at this site. After you select a mirror, you are taken to the main site. From there, you can find information on the latest versions of PostgreSQL and read the online documentation.
► http://www.postgresql.org/docs/8.1/interactive/tutorial-start.html— This interactive HTML documentation tree is a great place to get started with learning how to use PostgreSQL.
► http://www.pgsql.com/— This is a commercial company that provides fee-based support contracts for the PostgreSQL database.
CHAPTER 19
File and Print
In the early days of computing, file and printer sharing was pretty much impossible because of the lack of good networking standards and interoperability. If you wanted to use a printer connected to another computer, you had to save the file to a floppy disk and walk over.
Nowadays, both file and printer sharing have become second nature in a world where it is not unusual for someone to own more than one computer. Whether it be for sharing photographs among various computers, or having a central repository available for collaboration, file sharing is an important part of our information age. Alongside this is the need to be able to share printers; after all, no one wants to have to plug and unplug a computer to a printer just to print out a quick letter.
Whatever your reasons for needing to share files and printers across a network, you will find out how to do both in this chapter. It looks at how you can share files using the popular UNIX Network File System (NFS) protocol, as well as the more Windows-friendly Samba system. You will also find out how to configure network attached printers with interfaces such as JetDirect. The chapter covers both graphical and command-line tools, so you should find some thing to suit the way you work.
Using the Network File System
NFS is the protocol developed by Sun Microsystems that allows computers to use a remote file system as if it were a real part of the local machine. A common use of NFS is to allow users' home directories to appear on every local machine they use, thus eliminating the need to have physical home directories. This opens up hot-desking and other flexible working arrangements, especially because no matter where the user is, his home directory follows him around.
Another popular use for NFS is to share binary files between similar computers. If you have a new version of a package that you want all machines to have, you have to do the upgrade only on the NFS server, and all hosts running the same version of Fedora will have the same upgraded package.
NFS Server Configuration
You configure the NFS server by editing the /etc/exportsfile. This file is similar to the /etc/fstabfile in that it is used to set the permissions for the file systems being exported. The entries look like this:
/file/system yourhost( options ) *.yourdomain.com( options ) 192.168.2.0/24( options )
This shows three common clients to which to share /file/system. The first, yourhost, shares /file/systemto just one host. The second, . yourdomain.com, uses the asterisk ( *) as a wildcard to enable all hosts in yourdomain.comto access /file/system. The third share enables all hosts of the Class C network, 192.168.0.0, to access /file/share. For security, it is best not to use shares like the last two across the Internet because all data will be readable by any network the data passes by. Some common options are shown in Table 19.1.
TABLE 19.1 /etc/fstab Options
| Option | Purpose |
|---|---|
rw |
Gives read and write access |
ro |
Gives read-only access |
async |
Writes data when the server, not the client, feels the need |
sync |
Writes data as it is received |
The following is an example of an /etc/exportsfile:
# etc/exports file for myhost.mydomain.com
/usr/local yourhost(ro,show)
/home/ahudson *.yourdomain.com(rw,hide,sync)
This file exports (makes available) /usr/localto yourhost. The mount is read-only (which is good for a directory of binary files that don't get written to). It also allows users on yourhostto see the contents of file systems that might be mounted on /usr/local. The second export mounts /home/ahudsonto any host in yourdomain.com. It doesn't allow subsidiary file systems to be viewed, but you can read and write to the file system.
After you have finished with the /etc/exportsfile, you will check to see whether the NFS service is started by using the command:
# service nfs status
If you see a message saying that services are stopped, issue the following command:
# service nfs start
and watch as the related NFS services are started. When the services are started, you can enter the command
# /usr/sbin/exportfs -r
to export all the file systems in the /etc/exportsfile to a list named xtabunder the /var/lib/nfsdirectory, which is used as a guide for mounting when a remote computer asks for a directory to be exported. The -roption to the command reads the entire /etc/exportsfile and mounts all the entries. The exportfscommand can also be used to export specific files temporarily. Here's an example of using exportfsto export a file system:
# /usr/sbin/exportfs -o async yourhost:/usr/tmp
This command exports /usr/tmpto yourhostwith the asyncoption.
Be sure to restart the NFS server after making any changes to /etc/exports. If you prefer, you can use Fedora's system-config-nfsgraphical client to set up NFS while using X. Start the client by going to System, Administration, Server Settings, NFS.
After you press Enter, you are prompted for the root password. Type in the password and click OK, and you see the main window. Click the Add button, and you see the Add NFS Share dialog box, as shown in Figure 19.1.
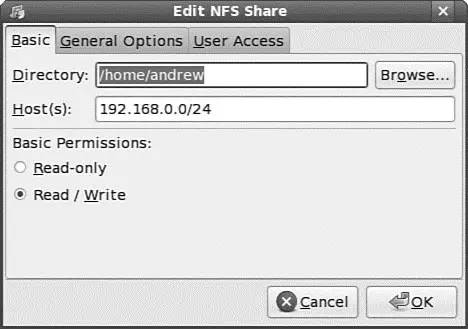
FIGURE 19.1 Fedora's system-config-nfsclient can be used to quickly set up local directories for export via NFS.
In the Directory text box, type a name of a directory to be exported; in the Host(s) text box, type a hostname or the IP address of a remote host that is to be allowed access to the directory. By default, a directory is exported as read-only, but you can choose read and write access by clicking either option in the Basic Permissions area of the dialog box. When finished, click the OK button, click the Apply button, and then use the File menu to quit.
Читать дальшеИнтервал:
Закладка:
Похожие книги на «Fedora™ Unleashed, 2008 edition»
Представляем Вашему вниманию похожие книги на «Fedora™ Unleashed, 2008 edition» списком для выбора. Мы отобрали схожую по названию и смыслу литературу в надежде предоставить читателям больше вариантов отыскать новые, интересные, ещё непрочитанные произведения.


![Andrew Radford - Linguistics An Introduction [Second Edition]](/books/397851/andrew-radford-linguistics-an-introduction-second-thumb.webp)


Обсуждение, отзывы о книге «Fedora™ Unleashed, 2008 edition» и просто собственные мнения читателей. Оставьте ваши комментарии, напишите, что Вы думаете о произведении, его смысле или главных героях. Укажите что конкретно понравилось, а что нет, и почему Вы так считаете.