William Stanek - Windows Server 2012 R2 Storage, Security, & Networking Pocket Consultant
Здесь есть возможность читать онлайн «William Stanek - Windows Server 2012 R2 Storage, Security, & Networking Pocket Consultant» весь текст электронной книги совершенно бесплатно (целиком полную версию без сокращений). В некоторых случаях можно слушать аудио, скачать через торрент в формате fb2 и присутствует краткое содержание. Жанр: ОС и Сети, на английском языке. Описание произведения, (предисловие) а так же отзывы посетителей доступны на портале библиотеки ЛибКат.
- Название:Windows Server 2012 R2 Storage, Security, & Networking Pocket Consultant
- Автор:
- Жанр:
- Год:неизвестен
- ISBN:нет данных
- Рейтинг книги:3 / 5. Голосов: 1
-
Избранное:Добавить в избранное
- Отзывы:
-
Ваша оценка:
Windows Server 2012 R2 Storage, Security, & Networking Pocket Consultant: краткое содержание, описание и аннотация
Предлагаем к чтению аннотацию, описание, краткое содержание или предисловие (зависит от того, что написал сам автор книги «Windows Server 2012 R2 Storage, Security, & Networking Pocket Consultant»). Если вы не нашли необходимую информацию о книге — напишите в комментариях, мы постараемся отыскать её.
Windows Server 2012 R2 Storage, Security, & Networking Pocket Consultant — читать онлайн бесплатно полную книгу (весь текст) целиком
Ниже представлен текст книги, разбитый по страницам. Система сохранения места последней прочитанной страницы, позволяет с удобством читать онлайн бесплатно книгу «Windows Server 2012 R2 Storage, Security, & Networking Pocket Consultant», без необходимости каждый раз заново искать на чём Вы остановились. Поставьте закладку, и сможете в любой момент перейти на страницу, на которой закончили чтение.
Интервал:
Закладка:
NOTE Only servers running Windows Server 2012 R2 and that have been added for management in Server Manager are listed.
4.On the Server Roles page, select DNS Server. If additional features are required to install a role, you’ll get an additional dialog box. Tap or click Add Features to close the dialog box, and add the required features to the server installation. When you are ready to continue, tap or click Next three times.
5.If the server on which you want to install the DNS Server role doesn’t have all the required binary source files, the server gets the files via Windows Update by default or from a location specified in Group Policy.
NOTE You also can specify an alternate path for the required source files. To do this, click the Specify An Alternate Source Path link, enter that alternate path in the box provided, and then tap or click OK. For network shares, enter the UNC path to the share, such as \\CorpServer82\WinServer2012\. For mounted Windows images, enter the Windows Imaging (WIM) path prefixed with WIM: and including the index of the image to use, such as WIM: \\CorpServer82\WinServer2012\install.wim:4.
6.Tap or click Install to begin the installation process. The Installation Progress page tracks the progress of the installation. If you close the wizard, tap or click the Notifications icon in Server Manager, and then tap or click the link provided to reopen the wizard.
7.When Setup finishes installing the DNS Server role, the Installation Progress page will be updated to reflect this. Review the installation details to ensure that the installation was successful.
8.From now on, the DNS Server service should start automatically each time you restart the server. If it doesn’t start, you need to start it manually. (See “Starting and stopping a DNS server” later in this chapter.)
9.After you install a DNS server, you use the DNS console to configure and manage DNS. In Server Manager, tap or click Tools, and then tap or click DNS to open the DNS Manager console, shown in Figure 9–1.
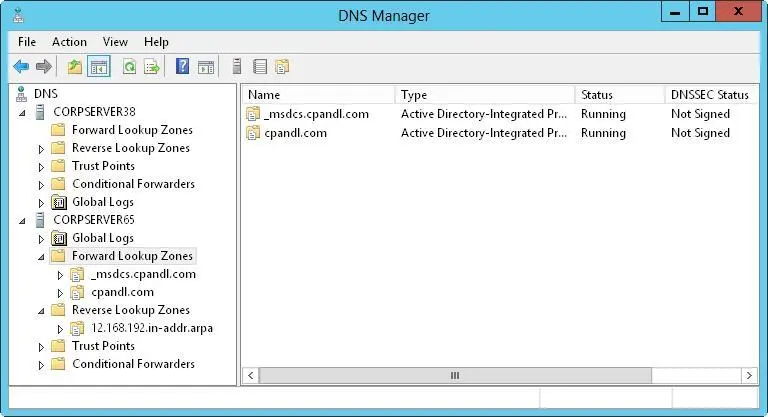
FIGURE 9–1Use the DNS Manager console to manage DNS servers on the network.
10.If the server you want to configure isn’t listed in the tree view, you need to connect to the server. Press and hold or right-click DNS in the tree view, and then tap or click Connect To DNS Server. Now do one of the following:
If you’re trying to connect to a local server, select This Computer, and then tap or click OK.
If you’re trying to connect to a remote server, select The Following Computer, enter the server’s name or IP address, and then tap or click OK.
11.An entry for the DNS server should be listed in the tree view pane of the DNS Manager console. Press and hold or right-click the server entry, and then tap or click Configure A DNS Server to start the Configure A DNS Server Wizard. Tap or click Next.
12.On the Select Configuration Action page, shown in Figure 9–2, select Configure Root Hints Only to specify that only the base DNS structures should be created at this time.
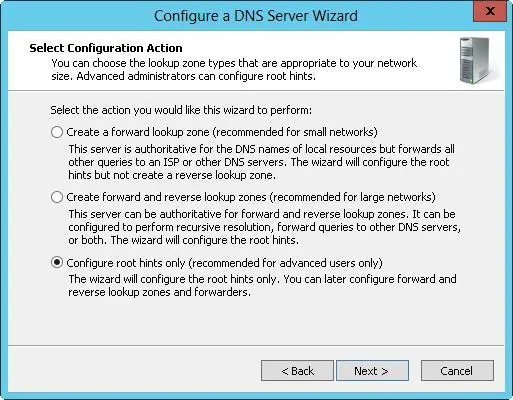
FIGURE 9–2Configure the root hints only to install the base DNS structures.
13.Tap or click Next. The wizard searches for existing DNS structures and modifies them as necessary.
14.Tap or click Finish to complete the process.
REAL WORLD If the wizard wasn’t able to configure the root hints, you might need to configure them manually or copy them from another server. However, a default set of root hints is included with DNS Server, and these root hints should be added automatically. To confirm, press and hold or right-click the server entry in the DNS console, and then select Properties. In the Properties dialog box, the currently configured root hints are shown on the Root Hints tab.
Configuring a primary DNS server
Every domain should have a primary DNS server. You can integrate this server with Active Directory, or it can act as a standard primary server. Primary servers should have forward lookup zones and reverse lookup zones. You use forward lookups to resolve domain names to IP addresses. You need reverse lookups to authenticate DNS requests by resolving IP addresses to domain names or hosts.
After you install the DNS Server service on the server, you can configure a primary server by following these steps:
1.Start the DNS Manager console. If the server you want to configure isn’t listed, connect to it as described previously in “Installing and configuring the DNS Server service.”
2.An entry for the DNS server should be listed in the tree view pane of the DNS Manager console. Press and hold or right-click the server entry, and then tap or click New Zone to start the New Zone Wizard. Tap or click Next.
3.As Figure 9–3 shows, you can now select the zone type. If you’re configuring a primary server integrated with Active Directory (on a domain controller), select Primary Zone and be sure the Store The Zone In Active Directory check box is selected. If you don’t want to integrate DNS with Active Directory, select Primary Zone, and then clear the Store The Zone In Active Directory check box. Tap or click Next.
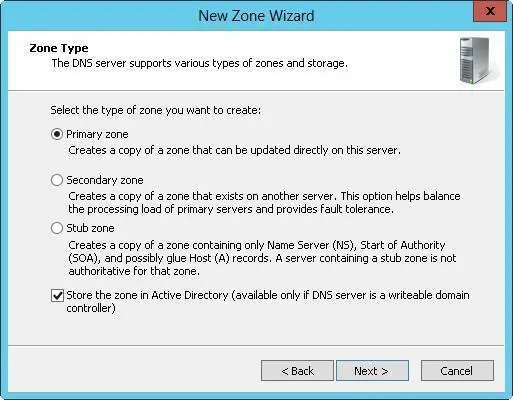
FIGURE 9–3In the New Zone Wizard, select the zone type.
4.If you’re integrating the zone with Active Directory, choose one of the following replication strategies; otherwise, proceed to step 6.
■ To All DNS Servers Running On Domain Controllers In This ForestChoose this strategy if you want the widest replication strategy. Remember, the Active Directory forest includes all domain trees that share the directory data with the current domain.
■ To All DNS Servers Running On Domain Controllers In This DomainChoose this strategy if you want to replicate DNS information within the current domain.
■ To All Domain Controllers In This Domain (For Windows 200 °Compatibility)Choose this strategy if you want to replicate DNS information to all domain controllers within the current domain, as needed for Windows 2000 compatibility. Although this strategy gives wider replication for DNS information within the domain and supports compatibility with Windows 2000, not every domain controller is a DNS server as well (nor do you need to configure every domain controller as a DNS server).
5.Tap or click Next. Select Forward Lookup Zone, and then tap or click Next.
6.Enter the full DNS name for the zone. The zone name should help determine how the server or zone fits into the DNS domain hierarchy. For example, if you’re creating the primary server for the microsoft.com domain, you would enter microsoft.comas the zone name. Tap or click Next.
7.If you’re configuring a primary zone that isn’t integrated with Active Directory, you need to set the zone file name. A default name for the zone’s DNS database file should be filled in for you. You can use this name or enter a new file name. Tap or click Next.
Читать дальшеИнтервал:
Закладка:
Похожие книги на «Windows Server 2012 R2 Storage, Security, & Networking Pocket Consultant»
Представляем Вашему вниманию похожие книги на «Windows Server 2012 R2 Storage, Security, & Networking Pocket Consultant» списком для выбора. Мы отобрали схожую по названию и смыслу литературу в надежде предоставить читателям больше вариантов отыскать новые, интересные, ещё непрочитанные произведения.


Обсуждение, отзывы о книге «Windows Server 2012 R2 Storage, Security, & Networking Pocket Consultant» и просто собственные мнения читателей. Оставьте ваши комментарии, напишите, что Вы думаете о произведении, его смысле или главных героях. Укажите что конкретно понравилось, а что нет, и почему Вы так считаете.