William Stanek - Windows Server 2012 R2 Storage, Security, & Networking Pocket Consultant
Здесь есть возможность читать онлайн «William Stanek - Windows Server 2012 R2 Storage, Security, & Networking Pocket Consultant» весь текст электронной книги совершенно бесплатно (целиком полную версию без сокращений). В некоторых случаях можно слушать аудио, скачать через торрент в формате fb2 и присутствует краткое содержание. Жанр: ОС и Сети, на английском языке. Описание произведения, (предисловие) а так же отзывы посетителей доступны на портале библиотеки ЛибКат.
- Название:Windows Server 2012 R2 Storage, Security, & Networking Pocket Consultant
- Автор:
- Жанр:
- Год:неизвестен
- ISBN:нет данных
- Рейтинг книги:3 / 5. Голосов: 1
-
Избранное:Добавить в избранное
- Отзывы:
-
Ваша оценка:
Windows Server 2012 R2 Storage, Security, & Networking Pocket Consultant: краткое содержание, описание и аннотация
Предлагаем к чтению аннотацию, описание, краткое содержание или предисловие (зависит от того, что написал сам автор книги «Windows Server 2012 R2 Storage, Security, & Networking Pocket Consultant»). Если вы не нашли необходимую информацию о книге — напишите в комментариях, мы постараемся отыскать её.
Windows Server 2012 R2 Storage, Security, & Networking Pocket Consultant — читать онлайн бесплатно полную книгу (весь текст) целиком
Ниже представлен текст книги, разбитый по страницам. Система сохранения места последней прочитанной страницы, позволяет с удобством читать онлайн бесплатно книгу «Windows Server 2012 R2 Storage, Security, & Networking Pocket Consultant», без необходимости каждый раз заново искать на чём Вы остановились. Поставьте закладку, и сможете в любой момент перейти на страницу, на которой закончили чтение.
Интервал:
Закладка:
NOTE Windows Installer Packages (.msi) is selected by default in the Files Of Type list. If you are performing a user publishing deployment, you can also choose ZAW Down-Level Application Packages (.zap) as the file type.
5.In the Deploy Software dialog box, shown in Figure 6–5, select one of the following deployment methods, and then tap or click OK:
■ PublishedTo publish the application without modifications
■ AssignedTo assign the application without modifications
■ AdvancedTo deploy the application by using advanced configuration options
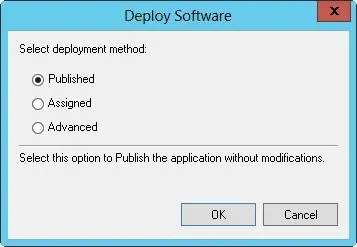
FIGURE 6–5Select the deployment method.
Configuring software deployment options
You can view and set general options for a software package by following these steps:
1.In the GPMC, press and hold or right-click the GPO you want to use for the deployment, and then tap or click Edit.
2.In the policy editor, access Computer Configuration\Policies\Software Settings\Software Installation or User Configuration\Policies\Software Settings\Software Installation as appropriate for the type of software deployment.
3.Double-tap or double-click the Software Installation package. In the Properties dialog box, review or modify software deployment options.
4.On the Deployment tab, shown in Figure 6–6, you can change the deployment type and configure the following deployment and installation options:
■ Auto-Install This Application By File Extension ActivationAdvertises any file extensions associated with this package for install-on-firstuse deployment. This option is selected by default.
■ Uninstall This Application When It Falls Out Of The Scope Of ManagementRemoves the application if it no longer applies to the user.
■ Do Not Display This Package In The Add/Remove Programs Control PanelPrevents the application from appearing in Add/Remove Programs, which prevents a user from uninstalling an application.
■ Install This Application At LogonConfigures full installation-rather than advertisement-of an application when the user logs on. This option cannot be set when you publish a package for users.
■ Installation User Interface OptionsControls how the installation is performed. With the default setting, Maximum, the user gets all setup screens and messages during installation. With the Basic option, the user gets only error and completion messages during installation.
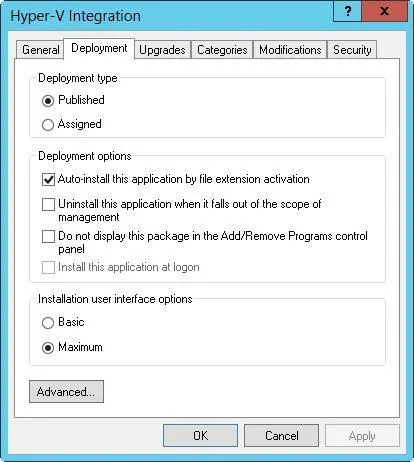
FIGURE 6–6Review and modify the deployment options as necessary.
5.Tap or click OK.
Updating deployed software
When an application uses a Windows Installer package, you can apply an update or service pack to a deployed application by following these steps:
1.After you obtain an .msi file or .msp (security update) file containing the update or service pack to be applied, copy the .msi or .msp file and any new installation files to the folder containing the original .msi file. Overwrite any duplicate files as necessary.
2.In the GPMC, press and hold or right-click the GPO you want to use for the deployment, and then tap or click Edit.
3.In the policy editor, access Computer Configuration\Policies\Software Settings\Software Installation or User Configuration\Policies\Software Settings\Software Installation as appropriate for the type of software deployment.
4.Press and hold or right-click the package with which you want to work. On the shortcut menu, tap or click All Tasks, and then tap or click Redeploy Application.
5.When prompted to confirm the action, tap or click Yes. The application is then redeployed to all users and computers as appropriate for the GPO with which you are working.
When an application uses an Installer package that is not Windows-based, you can update a deployed application or apply a service pack by following these steps:
1.In the GPMC, press and hold or right-click the GPO you want to use for the deployment, and then tap or click Edit.
2.In the policy editor, access Computer Configuration\Policies\Software Settings\Software Installation or User Configuration\Policies\Software Settings\Software Installation as appropriate for the type of software deployment.
3.Press and hold or right-click the package. On the shortcut menu, tap or click All Tasks, and then tap or click Remove. Tap or click OK to accept the default option of immediate removal.
4.Copy the new.zap file and all related files to a network share, and redeploy the application.
Upgrading deployed software
You can upgrade a previously deployed application to a new version by following these steps:
1.Obtain a Windows Installer file for the new software version, and copy it along with all required files to a network share. Alternatively, you can perform an administrative installation to the network share.
2.In the GPMC, press and hold or right-click the GPO you want to use for the deployment, and then tap or click Edit.
3.In the policy editor, access Computer Configuration\Policies\Software Settings\Software Installation or User Configuration\Policies\Software Settings\Software Installation as appropriate for the type of software deployment.
4.Press and hold or right-click Software Installation. On the shortcut menu, tap or click New, and then tap or click Package. Create an assigned or published application by using the Windows Installer file for the new software version.
5.Press and hold or right-click the upgrade package, and then tap or click Properties. On the Upgrades tab, tap or click Add. In the Add Upgrade Package dialog box, do one of the following:
■If the original application and the upgrade are in the current GPO, select Current Group Policy Object, and then select the previously deployed application in the Package To Upgrade list.
■If the original application and the upgrade are in different GPOs, select A Specific GPO, tap or click Browse, and then select the GPO from the Browse For A Group Policy Object dialog box. Select the previously deployed application in the Package To Upgrade list.
6.Choose an upgrade option. If you want to replace the application with the new version, select Uninstall The Existing Package, Then Install The Upgrade Package. If you want to perform an in-place upgrade over the existing installation, select Package Can Upgrade Over The Existing Package.
7.Tap or click OK to close the Add Upgrade Package dialog box. If you want to make this a required upgrade, select the Required Upgrade For Existing Packages check box, and then tap or click OK to close the upgrade package’s Properties dialog box.
Automatically configuring Work Folders

Computers that are members of a workplace can access internal network resources, such as internal websites and business applications. Work Folders enable users to synchronize their corporate data to their devices and vice versa. Those devices can be joined to the corporate domain or a workplace. Devices access Work Folders via a remote web gateway running on Microsoft Internet Information Services (IIS).
Читать дальшеИнтервал:
Закладка:
Похожие книги на «Windows Server 2012 R2 Storage, Security, & Networking Pocket Consultant»
Представляем Вашему вниманию похожие книги на «Windows Server 2012 R2 Storage, Security, & Networking Pocket Consultant» списком для выбора. Мы отобрали схожую по названию и смыслу литературу в надежде предоставить читателям больше вариантов отыскать новые, интересные, ещё непрочитанные произведения.


Обсуждение, отзывы о книге «Windows Server 2012 R2 Storage, Security, & Networking Pocket Consultant» и просто собственные мнения читателей. Оставьте ваши комментарии, напишите, что Вы думаете о произведении, его смысле или главных героях. Укажите что конкретно понравилось, а что нет, и почему Вы так считаете.