Darren Levine - Krav Maga for Beginners
Здесь есть возможность читать онлайн «Darren Levine - Krav Maga for Beginners» весь текст электронной книги совершенно бесплатно (целиком полную версию без сокращений). В некоторых случаях можно слушать аудио, скачать через торрент в формате fb2 и присутствует краткое содержание. Город: Berkeley, CA, Год выпуска: 2008, ISBN: 2008, Издательство: Ulysses Press, Жанр: Спорт, military_arts, на английском языке. Описание произведения, (предисловие) а так же отзывы посетителей доступны на портале библиотеки ЛибКат.
- Название:Krav Maga for Beginners
- Автор:
- Издательство:Ulysses Press
- Жанр:
- Год:2008
- Город:Berkeley, CA
- ISBN:978-1-569-75537-2
- Рейтинг книги:4 / 5. Голосов: 1
-
Избранное:Добавить в избранное
- Отзывы:
-
Ваша оценка:
Krav Maga for Beginners: краткое содержание, описание и аннотация
Предлагаем к чтению аннотацию, описание, краткое содержание или предисловие (зависит от того, что написал сам автор книги «Krav Maga for Beginners»). Если вы не нашли необходимую информацию о книге — напишите в комментариях, мы постараемся отыскать её.
Krav Maga for Beginners
Krav Maga or Beginners
With over 360 step-by-step photos,
makes it easy to learn the world’s most effective self-defense and fighting system:
• Escape Danger • Counterattack
• Neutralize & Defeat
Krav Maga for Beginners — читать онлайн бесплатно полную книгу (весь текст) целиком
Ниже представлен текст книги, разбитый по страницам. Система сохранения места последней прочитанной страницы, позволяет с удобством читать онлайн бесплатно книгу «Krav Maga for Beginners», без необходимости каждый раз заново искать на чём Вы остановились. Поставьте закладку, и сможете в любой момент перейти на страницу, на которой закончили чтение.
Интервал:
Закладка:
For these reasons, we do NOT want to go to the ground if we can help it, and we want to GET UP as soon as possible.
Many advocates of reality-based self-defense and streetfighting say that “dirty” tactics such as biting, eye-gouging, and scratching are effective counterattacks to experienced groundfighters. They are right, but only to a point. A grappler tries to maintain contact with you so he can control you. Biting him is a great way to discourage that contact. But many grapplers are clever, and he may use his superior knowledge to position himself so that he can’t be bitten or scratched. Also, remember that he can bite and scratch you, too! In the end, you should consider these “dirty” tactics as valuable tools in your tool box… but they are NOT a substitute for a solid working knowledge of ground skills.
However, our desire to avoid a groundfight doesn’t mean we ignore this area of training. In fact, it means the opposite. We must train ourselves to be competent in groundfighting so that we can deal with the situation decisively and effectively, and then get to our feet.
In this section, you’ll learn how to deal with the full mount, side mount, and guard both defensively and offensively. However, in keeping with our goal to avoid the groundfight if possible, we begin with a basic defense against a takedown.
Takedown
As we said at the outset, Krav Maga for Beginners focuses mostly on yellow and orange belt levels. We usually teach proper takedowns later in the system, simply because we don’t want our students going to the ground if they don’t know what to do when they get there. However, since this book covers sprawls, we do want you to learn a basic takedown so that, at the very least, you can train to sprawl against a partner who is attacking you effectively.
The takedown we teach here is very basic. In Complete Krav Maga , it’s referred to as a “Simple Takedown” and is essentially a tackle.
Starting position:Face your partner in a left-leg-forward fighting stance.
1Drop low and lunge forward, catching your partner around the legs with your head and/or shoulder in his stomach. Your arms may be clasped, or you can hook one hand around each leg.
2Pull the attacker’s legs in toward you and lift slightly. At the same time, use your legs to drive your weight into his stomach.
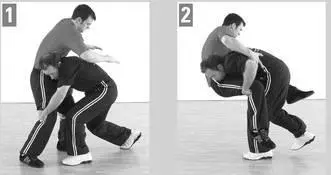
Training Tips:More effective versions of the Simple Takedown involve getting your hips in close (underneath your chest) so that the defender cannot simply push your head downward. However, this is a good, simple takedown that helps us to train our sprawling technique.
Sprawl to Avoid a Takedown
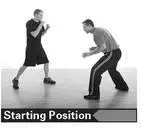
ATTACK→ In this attack, the attacker lunges in (“shoots,” in grappling parlance) to grab the defender’s legs and take him down.
IMMEDIATE DANGER→ None (impact with the ground). Similar to bearhugs, the takedown itself doesn’t represent much danger, although some takedowns involve slamming the defender to the ground, so we should consider this.
SECONDARY DANGERS→ Takedown, multiple attackers. The takedown isn’t a “hold” by the same definition as a bearhug. In this attack, the assailant has no intention of staying in that position. His goal is to put you on the ground immediately.
SOLUTION & INITIAL COUNTERATTACK→ Sprawl, Counterattack
1Kick your feet back immediately, with your feet splayed wide. Drive your hips down and forward while keep ing your chest up and eyes forward in the fight. This position makes it difficult for the attacker to continue driving underneath to catch your legs. As you sprawl, brace your forearms along one side of the attacker’s neck and shoulders.
2Once you feel that you’ve stopped his initial movement and regained your balance, deliver knee strikes.
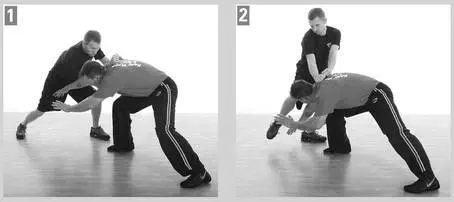
NEUTRALIZING THE ATTACKER→ Continue with knee strike and/or push the attacker’s head to the ground, disengage, and create distance.
• sprawl by kicking your feet explosively backward
• drive your hips down, but keep your chest forward
• brace your forearms against the attacker’s shoulder/neck area
• when you feel stable, deliver knees
• disengage when deemed safe
Why is it important to kick your feet back first?
Attackers who know how to “shoot” this way do so very quickly and with great determination. You must get your feet and legs far from them. If you have a tendency to move your hips back first and then your feet, you will get caught.
Why is it important to drive your hips downward?
Determined attackers will continue to drive forward, even when you think you’re safe. Driving your hips forward and downward “blocks” them from reaching your legs. Also, if the attacker has a partial hold of your legs, this will help to break their hold.
When I brace my forearms against the attacker, should I have one arm on each side of his head, or both arms on one side?
It’s better to have both arms on one side. This prevents accidental head butts and allows for easier disengagement. However, your primary goal is to stop his forward progress, so having one arm on each side of his head is better than nothing.
Training Tips:Many groundfighting experts advocate different arm positions, such as having one or both arms extended straight down to help control the attacker after the sprawl. There are both advantages and disadvantages to these variations. For our purposes, we’ll simply state that we choose this position (elbows down, hands up) because it’s close to the body’s reflexive reaction to someone lunging at us.
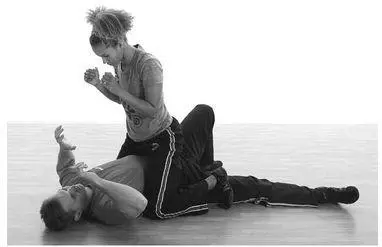
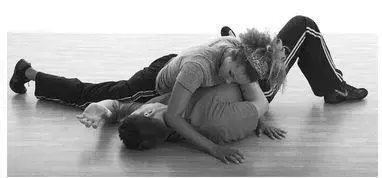
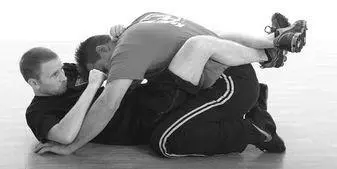
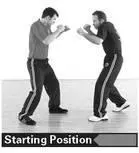
Maintaining the Full Mount
A “full mount” is a position in which the attacker is on top, straddling the defender. Because the full mount is a dominant position, we want to maintain it as long as it’s tactically desirable for us. To maintain the full mount, you must be prepared to base out whenever necessary.
1When the attacker tries to buck you off the top position, drop your weight back into your hips, drop your chest down to your opponent’s chest, and splay your hands forward and to the side.
Читать дальшеИнтервал:
Закладка:
Похожие книги на «Krav Maga for Beginners»
Представляем Вашему вниманию похожие книги на «Krav Maga for Beginners» списком для выбора. Мы отобрали схожую по названию и смыслу литературу в надежде предоставить читателям больше вариантов отыскать новые, интересные, ещё непрочитанные произведения.


Обсуждение, отзывы о книге «Krav Maga for Beginners» и просто собственные мнения читателей. Оставьте ваши комментарии, напишите, что Вы думаете о произведении, его смысле или главных героях. Укажите что конкретно понравилось, а что нет, и почему Вы так считаете.