Darren Levine - Krav Maga for Beginners
Здесь есть возможность читать онлайн «Darren Levine - Krav Maga for Beginners» весь текст электронной книги совершенно бесплатно (целиком полную версию без сокращений). В некоторых случаях можно слушать аудио, скачать через торрент в формате fb2 и присутствует краткое содержание. Город: Berkeley, CA, Год выпуска: 2008, ISBN: 2008, Издательство: Ulysses Press, Жанр: Спорт, military_arts, на английском языке. Описание произведения, (предисловие) а так же отзывы посетителей доступны на портале библиотеки ЛибКат.
- Название:Krav Maga for Beginners
- Автор:
- Издательство:Ulysses Press
- Жанр:
- Год:2008
- Город:Berkeley, CA
- ISBN:978-1-569-75537-2
- Рейтинг книги:4 / 5. Голосов: 1
-
Избранное:Добавить в избранное
- Отзывы:
-
Ваша оценка:
Krav Maga for Beginners: краткое содержание, описание и аннотация
Предлагаем к чтению аннотацию, описание, краткое содержание или предисловие (зависит от того, что написал сам автор книги «Krav Maga for Beginners»). Если вы не нашли необходимую информацию о книге — напишите в комментариях, мы постараемся отыскать её.
Krav Maga for Beginners
Krav Maga or Beginners
With over 360 step-by-step photos,
makes it easy to learn the world’s most effective self-defense and fighting system:
• Escape Danger • Counterattack
• Neutralize & Defeat
Krav Maga for Beginners — читать онлайн бесплатно полную книгу (весь текст) целиком
Ниже представлен текст книги, разбитый по страницам. Система сохранения места последней прочитанной страницы, позволяет с удобством читать онлайн бесплатно книгу «Krav Maga for Beginners», без необходимости каждый раз заново искать на чём Вы остановились. Поставьте закладку, и сможете в любой момент перейти на страницу, на которой закончили чтение.
Интервал:
Закладка:
2Deliver knees to the groin and midsection immediately.
NEUTRALIZING THE ATTACKER→ As soon as you can safely do so, release the attacker’s hips and continue attacking. Disengage when safely possible.
• base and space and send counterattacks immediately
• control the hips to maintain space
• transition away from the attacker’s hips as soon as appropriate
• attack aggressively with knees, kicks, and other combatives
• disengage when deemed safe
What if I can’t reach around the attacker’s arms to the hips?
This may be a problem if the attacker is rather large, but since there is space, you should be able to use knee strikes to aid in maintaining space and doing damage to the attacker.
Training Tips:Because of the nature of this attack, the defender is very susceptible to takedowns. It’s important to send the hips and feet back explosively and counterattack with knees immediately.
For another option, see the next technique, which will also work against larger attackers who have eliminated space.
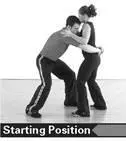
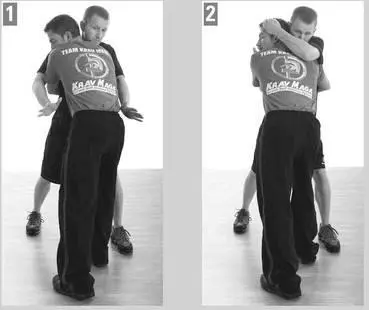
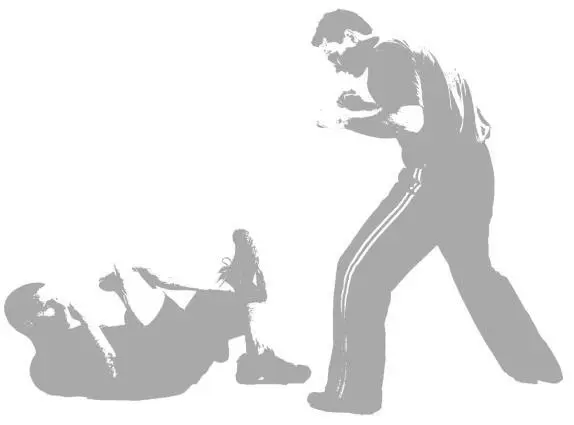
Bearhug from the Front with Arms Free (Leverage on the Neck)
ATTACK→ In this attack, the defender has been grabbed around the body, from the front, with the defender’s arms free to move.
IMMEDIATE DANGER→ None. Unlike most other attacks, the bearhug itself does not cause damage. The actual hold presents no immediate danger.
SECONDARY DANGERS→ Location change, takedown, multiple attackers. As a hold, the danger lies in the attacker’s motivation: picking up the defender to change locations, taking the defender to the ground, holding the defender in place for another attacker, etc.
SOLUTION & INITIAL COUNTERATTACK→ Base and Space, Counterattack by applying leverage on the attacker’s neck
1In order to make it more difficult for the attacker to lift you, drop your weight immediately by sending your hips and feet as far back as possible. Note that because there is no space between you, your back may be arched, making it difficult to fully “base out.” It may also be difficult to strike his groin. Establish as much of a base as you can, while attacking as follows:
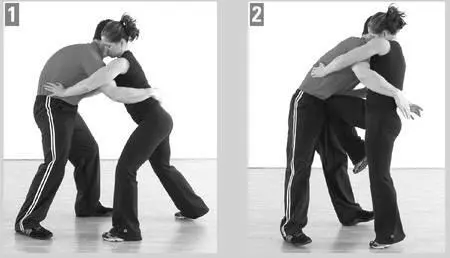
2As the attacker squeezes you in, his head will generally turn to one side or the other against your chest. With your opposite side arm, reach around the attacker’s head, grabbing the hair at the temple. If the attacker has no hair, reach slightly farther and grab along the nose ridge while pressing into his eyes.
3Twist the attacker’s face away. His chin should rotate away from your body. You may aid this motion by plac ing the heel of your other palm against his chin and pushing.
4As the attacker is peeled away, step out with your foot, allowing him to drop down. Counterattack with straight punches or hammerfist punches.
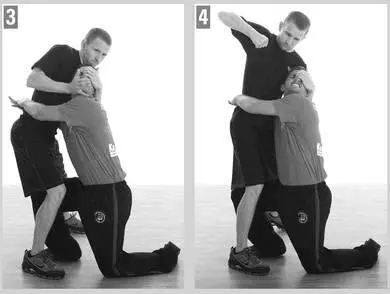
NEUTRALIZING THE ATTACKER→ Continue with strikes, including additional punches or hammerfists, elbows, and knees, until it’s safe to disengage, then create distance.
• base and space as much as possible, although this may be difficult in this position
• reach around his head to catch at the bridge of his nose and in his eyes
• twist his chin away, “peeling” it along your body to create leverage and take him down and to the side
• attack aggressively with hammerfists, straight punches, etc.
• disengage when deemed safe
When should I use this technique rather than the simpler “space and base” technique?
This technique should be employed any time you cannot adequately create a base and deliver simple knee strikes.
Can I try this technique before the simpler “space and base” technique?
Yes, but as the question implies, the other technique is simpler. This technique takes slightly longer, and if the attacker intended to take you down, you are at risk.
Why should I step out with the other foot?
Stepping out allows you to take him down without having him fall on your body or leg. The body motion also adds to the power of your movement.
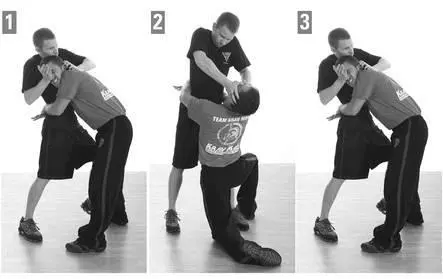
What if I cannot reach around his head to grab his face?
Excellent question. Remember that Krav Maga is principle based. The principle is to create leverage on his neck, which prevents the opponent from completing a takedown. There are a variety of ways to create that leverage, as seen in the following additional photos:
Photo 1:If the opponent’s head is buried low against your body, drive the webbing of your same-side hand up under his nose, then use the other hand to help.
Photo 2:If his head is buried straight against your chest, use your fingers in his eyes.
Photo 3:If his head is turned inward toward your chest, use the same-side hand to create the leverage.
There are other examples, but it’s most important to remember that you want to grab his face and tilt his chin, creating leverage on his neck to take him down.
Training Tips:The defender is very vulnerable to takedowns in this position. We’re not teaching reality-based self-defense unless we acknowledge that, if the attacker closes the space this much before we react and intended to take us down, we are probably on the ground by now. That’s why we train in groundfighting. However, if we’re able to base out just a little, we can delay the takedown long enough to apply leverage on the neck.
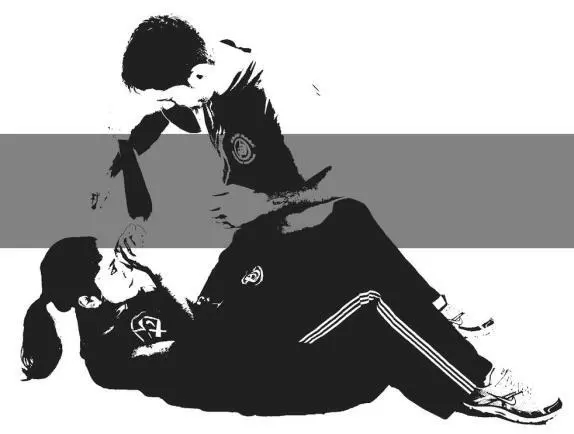
GROUND-FIGHTING
Groundfighting Overview
Groundfighting represents a significant change in any self-defense situation for a number of reasons. First, when you’re on the ground, your options become limited. You cannot simply disengage and run away—you must get up first. Second, your ability to strike becomes much more limited, especially if you’re on your back. Third, your opponent’s weight and strength, which are factors even in a standup situation, become even more of an issue if he is on top of you. Fourth, the popularity of groundfighting, as seen in competitions such as the Ultimate Fighting Championship, increases the likelihood that your opponent may have some knowledge of these techniques. Fifth, and finally, if you’re dealing with multiple assailants, some of whom may be standing, you’re at an extreme disadvantage on the ground.
Читать дальшеИнтервал:
Закладка:
Похожие книги на «Krav Maga for Beginners»
Представляем Вашему вниманию похожие книги на «Krav Maga for Beginners» списком для выбора. Мы отобрали схожую по названию и смыслу литературу в надежде предоставить читателям больше вариантов отыскать новые, интересные, ещё непрочитанные произведения.


Обсуждение, отзывы о книге «Krav Maga for Beginners» и просто собственные мнения читателей. Оставьте ваши комментарии, напишите, что Вы думаете о произведении, его смысле или главных героях. Укажите что конкретно понравилось, а что нет, и почему Вы так считаете.