Bruce Mesquita - Prediction - How to See and Shape the Future with Game Theory
Здесь есть возможность читать онлайн «Bruce Mesquita - Prediction - How to See and Shape the Future with Game Theory» весь текст электронной книги совершенно бесплатно (целиком полную версию без сокращений). В некоторых случаях можно слушать аудио, скачать через торрент в формате fb2 и присутствует краткое содержание. Год выпуска: 2011, Издательство: Random House, Жанр: Старинная литература, на английском языке. Описание произведения, (предисловие) а так же отзывы посетителей доступны на портале библиотеки ЛибКат.
- Название:Prediction: How to See and Shape the Future with Game Theory
- Автор:
- Издательство:Random House
- Жанр:
- Год:2011
- ISBN:нет данных
- Рейтинг книги:5 / 5. Голосов: 1
-
Избранное:Добавить в избранное
- Отзывы:
-
Ваша оценка:
Prediction: How to See and Shape the Future with Game Theory: краткое содержание, описание и аннотация
Предлагаем к чтению аннотацию, описание, краткое содержание или предисловие (зависит от того, что написал сам автор книги «Prediction: How to See and Shape the Future with Game Theory»). Если вы не нашли необходимую информацию о книге — напишите в комментариях, мы постараемся отыскать её.
From international terrorism to corporate fraud, from climate change to the Israeli-Palestinian conflict, Bruce Bueno de Mesquita has been predicting the future for decades. Using Game Theory (a theory based on the rationale that everyone acts in their own self-interest) he can foretell and even engineer events. His forecasts, for everyone from the CIA to major international companies, have an extraordinary 90% success rate.
In this fascinating and immensely readable book he explains how you can use Game Theory to your own advantage - to win a legal dispute, advance your career and even get the best possible price for your car. Prediction will change your understanding of the world - both now and in the future.
Prediction: How to See and Shape the Future with Game Theory — читать онлайн бесплатно полную книгу (весь текст) целиком
Ниже представлен текст книги, разбитый по страницам. Система сохранения места последней прочитанной страницы, позволяет с удобством читать онлайн бесплатно книгу «Prediction: How to See and Shape the Future with Game Theory», без необходимости каждый раз заново искать на чём Вы остановились. Поставьте закладку, и сможете в любой момент перейти на страницу, на которой закончили чтение.
Интервал:
Закладка:
The assassination prompted Austria-Hungary’s government to issue an ultimatum to the Serbian government: give up your sovereignty, or it’s war. The Serbs were not without friends, and of course they were reluctant to give up their hard-earned independence. It seems that the Austrians were counting on this. The diplomatic records of the day, now open to us, reveal that they chose to make demands that they were confident could not be accepted. Apparently, the Austro-Hungarian leaders wanted a little reputation-building war with Serbia.
Europe’s great powers chose sides in the dispute. Russia sided with the Serbs. Under the terms of the Triple Entente—an alliance between Russia, France, and England—France and England also chose to side with the Serbs. The Russian decision triggered a response from Germany, by then Austria-Hungary’s ally. Under the terms of their alliance with Austria, Germany backed Austria-Hungary. Their broader alliance ties meant a high likelihood of additional support from Romania, Turkey, and especially Italy. The Dual Alliance of Austria-Hungary and Germany had been expanded in 1882 to include the new European power of Italy, with the expanded alliance referred to as the Triple Alliance.
Fearing an aggressive move by Germany in defense of Austria-Hungary, the Russians mobilized. They intended, in game-theory terms, to send a signal that they were committed to Serbia’s defense. This prompted a similar mobilization by Germany. Much as in the prisoner’s dilemma game we discussed earlier, each side could see that conciliation was better than war, but they also could see that trusting their adversary to pursue a settlement was risky. And so they found the result that follows from the logic of the prisoner’s dilemma: they fought instead of settling. In a few short weeks, the conflict over Serbia escalated to involve all of the great powers on the Continent. World War I had begun. The little reputation-building war between Austria-Hungary and Serbia was not to be.
Shortly, I will apply my model to inquire what might have happened if the Triple Entente of Britain, France, and Russia had been more able in 1914, or, for that matter, if the Dual Alliance of Austria-Hungary and Germany had been more skillful. First, however, let’s pretend that there was a little army for hire of people with good math skills pounding out my calculations in 1914. What would they have predicted with no advantages of hindsight?
To address the 1914 crisis—not the fighting of the war, mind you, but the diplomatic run-up to war—I constructed inputs for the computer program that measure the degree to which each of the European countries, plus important non-Europeans including the United States and Japan, favored Serbia’s or Austria-Hungary’s foreign policy in 1914. I estimate salience based on a mix of expert judgments and geographic proximity to the Austro-Serbian crisis. Potential influence is based on a standard measure of “national power” collected for every country in the world for every year from 1816 to roughly the present by the academic enterprise, introduced earlier, called the Correlates of War Project. Of course, I use the estimates for 1914. Since I am examining this case using my latest model, I include the additional variable it requires. This variable measures the extent to which each player is resolute in the position it has taken even if that means a breakdown in negotiations or, conversely, is sufficiently eager for an agreement that it will show considerable flexibility in its approach to negotiations. Put in terms of our earlier discussion of health care, this new model includes an input that calibrates how much a player’s bargaining style looks like Bill Clinton’s (100 on this variable’s scale) or like Hillary Clinton’s (0 on this variable’s scale) back in the early 1990s. This “commitment” variable’s values are based on my reading of the historical record in the run-up to World War I. Any interested decision maker in 1914 would have had access to the information used here. And if they had my equations, they could have done the exact analysis I report.
Austria-Hungary, Germany, Romania, and Italy start off at position 100, indicating a full endorsement of Austria’s position against Serbia following Franz Ferdinand’s assassination. Serbia and Greece start off at a position of 0 on the issue scale, indicating their total opposition to Austro-Hungarian demands for Serbia to surrender its sovereignty. The rest of the European states fall approximately between 33 and 45 on the scale, suggesting that they tilted toward Serbia and against Austria but not decisively.
As seen in figure 9.1, a palace full of bearded mathematicians crunching away on the numbers in 1914 would have anticipated war. They also would have realized that war could be avoided if they just crunched the numbers long enough, reflecting a prolonged diplomatic effort instead of a rush to war. The figure shows that the model anticipates war sometime in August 1914. This is the stage at which the model’s logic says diplomatic efforts to resolve the dispute without resorting to the use of force would have ended.
FIG. 9.1. The Predicted Failure of Negotiations During the 1914 Crisis
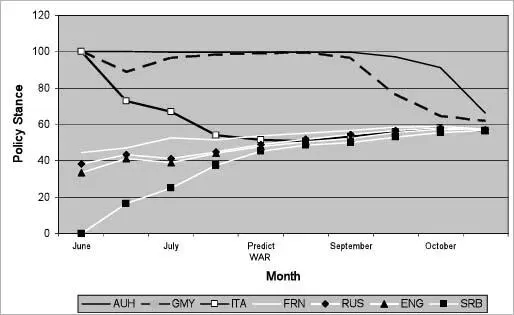
You see that the model is constantly calibrating the expected benefits from continuing to negotiate, weighing them against the model’s estimate of the expected costs from continuing to pursue diplomacy. Eventually, in the absence of an agreement, the players conclude that the prospects or value of a future agreement just isn’t worth the effort. In essence, the model’s algorithm makes a judgment about the value the players attach to extracting a concession tomorrow compared to extracting the same concession today. Getting some benefit sooner is always worth more than getting it later. In this instance, the period that corresponds approximately to early to mid-August happens to be the time the model says the game would end because too little progress was being made in closing the gap between Austrian demands and Serbian concessions. So the game predicts its own end in August. At that point there is no agreement between the main antagonists, and so, according to the model, a new game starts, with generals taking over from the diplomats.
Up to this point the Austrians (supported by their German allies) have persisted in demanding enforcement of the Austrian ultimatum. Meanwhile the Serbian government has gone a good distance toward meeting many of Austria’s demands. Still, Serbia shows no willingness to accept the Austrian ultimatum, exactly as the Austrians hoped. Instead, Serbia adopts a moderately conciliatory posture that is consistent with the concessions pushed by the British, French, and Russians. The latter three, according to the simulated crisis, were believed to be strongly committed to finding a settlement. Because of that, neither in reality nor in the simulation did the Austrians and Germans think their foes in the Triple Entente were likely to go to war on Serbia’s behalf.
What were the Italians, members of the Triple Alliance, up to during the crisis? In reality, they indicated on July 28, 1914, that they could not support the Austro-Hungarian ultimatum, delivered just five days earlier. With war imminent, the Italians declared themselves neutral. They resigned from the Triple Alliance on the grounds that Austria-Hungary was launching an aggressive, not a defensive, war.
In the model’s assessment, the Italians start out at the same position as the Germans and Austrians, befitting their membership in the Triple Alliance. As can be seen in the figure, by mid-July in model time the Italians break from the Triple Alliance and become neutral. They adopt a position hovering around 50 on the issue scale. So the model sees the Italians moving a week or two earlier than they actually did, but nevertheless it foresees their shift to a neutral position. In the model’s logic, and in reality, the Italians were not committed to standing by their Austrian and German allies once they recognized that the unfolding events were going to produce something vastly larger than a small Austrian-Serbian war.
Читать дальшеИнтервал:
Закладка:
Похожие книги на «Prediction: How to See and Shape the Future with Game Theory»
Представляем Вашему вниманию похожие книги на «Prediction: How to See and Shape the Future with Game Theory» списком для выбора. Мы отобрали схожую по названию и смыслу литературу в надежде предоставить читателям больше вариантов отыскать новые, интересные, ещё непрочитанные произведения.


Обсуждение, отзывы о книге «Prediction: How to See and Shape the Future with Game Theory» и просто собственные мнения читателей. Оставьте ваши комментарии, напишите, что Вы думаете о произведении, его смысле или главных героях. Укажите что конкретно понравилось, а что нет, и почему Вы так считаете.