Nicolas Besson - Microsoft Windows Embedded CE 6.0 Exam Preparation Kit
Здесь есть возможность читать онлайн «Nicolas Besson - Microsoft Windows Embedded CE 6.0 Exam Preparation Kit» весь текст электронной книги совершенно бесплатно (целиком полную версию без сокращений). В некоторых случаях можно слушать аудио, скачать через торрент в формате fb2 и присутствует краткое содержание. Город: Redmond, Год выпуска: 2008, Издательство: Microsoft, Жанр: Руководства, ОС и Сети, Программы, на английском языке. Описание произведения, (предисловие) а так же отзывы посетителей доступны на портале библиотеки ЛибКат.

- Название:Microsoft Windows Embedded CE 6.0 Exam Preparation Kit
- Автор:
- Издательство:Microsoft
- Жанр:
- Год:2008
- Город:Redmond
- ISBN:нет данных
- Рейтинг книги:5 / 5. Голосов: 1
-
Избранное:Добавить в избранное
- Отзывы:
-
Ваша оценка:
Microsoft Windows Embedded CE 6.0 Exam Preparation Kit: краткое содержание, описание и аннотация
Предлагаем к чтению аннотацию, описание, краткое содержание или предисловие (зависит от того, что написал сам автор книги «Microsoft Windows Embedded CE 6.0 Exam Preparation Kit»). Если вы не нашли необходимую информацию о книге — напишите в комментариях, мы постараемся отыскать её.
Microsoft Windows Embedded CE 6.0 Exam Preparation Kit — читать онлайн бесплатно полную книгу (весь текст) целиком
Ниже представлен текст книги, разбитый по страницам. Система сохранения места последней прочитанной страницы, позволяет с удобством читать онлайн бесплатно книгу «Microsoft Windows Embedded CE 6.0 Exam Preparation Kit», без необходимости каждый раз заново искать на чём Вы остановились. Поставьте закладку, и сможете в любой момент перейти на страницу, на которой закончили чтение.
Интервал:
Закладка:
2. Follow the build process in the Output window. Examine the build information to identify the SYSGEN, BUILD, BUILDREL, and MAKEIMG steps. You can press Ctrl+F to display the Find And Replace dialog box, and then search for the following text to identify the start of these phases:
a. Starting Sysgen Phase For ProjectThe SYSGEN steps start.
b. Build Started With ParametersThe BUILD steps start.
c. C:\WINCE600\Build.logThe BUILDREL steps start.
d. BLDDEMO: Calling Makeimg — Please WaitThe MAKEIMG steps starts.
3. Open the C:\Wince600 folder in Windows Explorer. Verify that Build.* files exist.
4. Open the Build.* files in a text editor, such as Notepad, and examine the content.
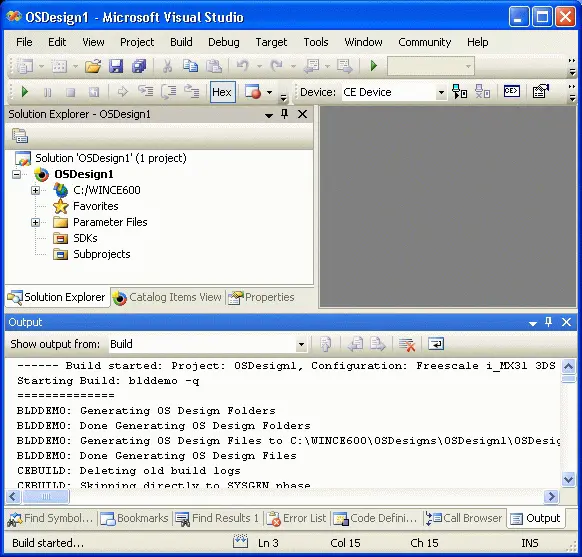
Figure 2-8Building an OS design
Configure Connectivity Options
1. In Visual Studio, open the Target menu and select Connectivity Options to display the Target Device Connectivity Options dialog box.
2. Verify that CE Device is selected in the Target Device list box.
3. Select Device Emulator (DMA) from the Download list box.
4. Select Device Emulator (DMA) from the Transport list box.
5. Select KdStub from the Debugger list box, as illustrated in Figure 2-9.
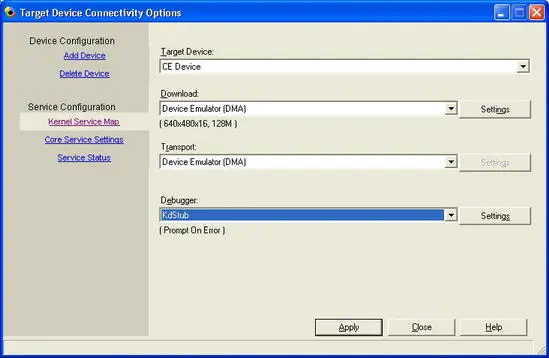
Figure 2-9Setting Target Device Connectivity Options
Change the Emulator Configuration
1. Next to the Download list box, click the Settings button.
2. In the Emulator Properties dialog box, switch to the Display tab.
3. Change the Screen Width to 640pixels and the Screen Height to 480pixels.
4. Switch to the Network tab.
5. Select the Enable NE2000 PCMCIA Network Adapter And Bind To check box, then select the Connected Network Card option from the list box, as illustrated in Figure 2-10, and then click OK.
6. Click Apply to save the new device configuration.
7. Click Close to close the Target Device Connectivity Options dialog box.
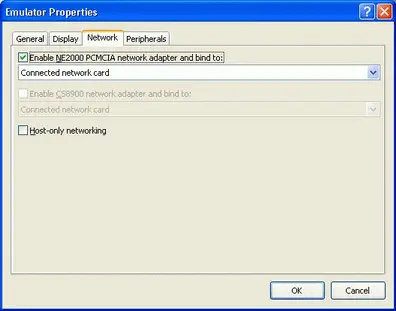
Figure 2-10Device Emulator network options
Test a Run-Time Image on the Device Emulator
1. In Visual Studio, open the Target menu, and then click Attach Device.
2. Verify that Visual Studio downloads the run-time image to the target device. The download can take several minutes to complete.
3. Follow the debug messages during the start process in the Visual Studio Output window.
4. Wait until Windows Embedded CE has completed the start process, and then interact with the Device Emulator and test the features of your OS design, as illustrated in Figure 2-11.
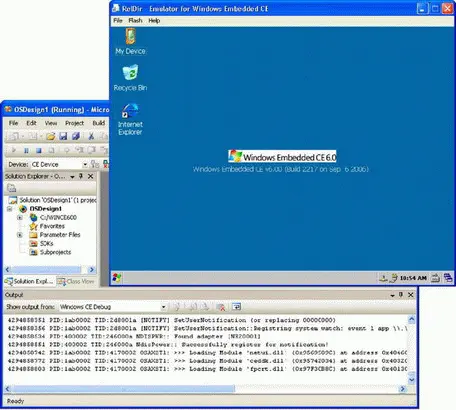
Figure 2-11Windows Embedded CE device emulator
Chapter Review
The Windows Embedded CE build process includes several phases and relies on a variety of build and run-time image configuration files to compile the source code and create the run-time image. It includes a compile phase to generate .exe files, static libraries, DLLs, and binary resource (.res) files for the BSP and subprojects; a Sysgen phase to filter and copy source code based on SYSGEN variables from the Public folder for catalog items selected in the OS design, and create a set of run-time image configuration files; a Release Copy phase to copy the files from the BSP and subprojects required to build the run-time image into the release directory; and finally a Make Run-time Image phase to create the run-time image from the content in the release directory according to the setting specified in .bib, .reg, .db, and .dat files.
You can examine the build process if you analyze the information that Platform Builder generates and tracks in Build.log, Build.wrn, and Build.err files. The Build.log file contains detailed information about every build command issued in each build phase. Build.wrn and Build.err contain the same information, but filtered for warnings and errors encountered during the build process. You do not need to open these text files directly in Notepad. It is more convenient to work with build status information and error messages in Visual Studio. The Output window and the Error List window provide convenient access.
Build errors can occur for a variety of reasons. The most common causes are compiler and linker errors. For example, running build commands in an incorrectly initialized build environment will lead to linker errors when environment variables that identify library directories in the Sources file point to invalid locations. Other important build configuration files, such as Dirs files and Makefile.def, can also rely on SYSGEN variables and environment variables in conditional statements and in directory paths.
Having successfully generated a run-time image, you can deploy Windows Embedded CE on a target device. This requires you to configure a device connection based on the Core Connectivity infrastructure. The final deployment step is simply to click the Attach Device command that you can find on the Target menu in Visual Studio with Platform Builder for Windows Embedded CE 6.0 R2.
It is important that you are familiar with the following configuration files, which control the Windows Embedded CE build process:
■ Binary image builder (.bib) filesConfigure the memory layout and determine the files included in the run-time image.
■ Registry (.reg) filesInitialize the system registry on the target device.
■ Database (.db) filesSet up the default object store.
■ File system (.dat) filesInitialize the RAM file system layout at start time.
■ Dirs filesDetermine which directories to include in the build process.
■ Sources filesDefine preprocessing directives, commands, macros, and other processing instructions for the compiler and linker. Take the place of Makefile files in the Visual Studio with Platform Builder IDE.
■ Makefile filesReference the default Makefile.def file and should not be edited.
Key Terms
Do you know what these key terms mean? You can check your answers by looking up the terms in the glossary at the end of the book.
■ Sysgen
■ Buildrel
■ Flat release directory
■ Connectivity options
■ KITL
Suggested Practice
To help you successfully master the exam objectives presented in this chapter, complete the following tasks:
Start the Build Process from the Command Line
To increase your understanding of the Windows Embedded CE build processes, perform the following steps:
■ Sysgen processRun sysgen -qfrom the command line after setting an environment variable in a catalog item.
■ Build processOpen a Command Prompt window, change into the current BSP folder (%_TARGETPLATROOT%) and run build-cwith and without setting the WINCEREL environment variable to 1 ( set WINCEREL=1). Check the content of the %_FLATRELEASEDIR% folder before and after the build.
Читать дальшеИнтервал:
Закладка:
Похожие книги на «Microsoft Windows Embedded CE 6.0 Exam Preparation Kit»
Представляем Вашему вниманию похожие книги на «Microsoft Windows Embedded CE 6.0 Exam Preparation Kit» списком для выбора. Мы отобрали схожую по названию и смыслу литературу в надежде предоставить читателям больше вариантов отыскать новые, интересные, ещё непрочитанные произведения.


Обсуждение, отзывы о книге «Microsoft Windows Embedded CE 6.0 Exam Preparation Kit» и просто собственные мнения читателей. Оставьте ваши комментарии, напишите, что Вы думаете о произведении, его смысле или главных героях. Укажите что конкретно понравилось, а что нет, и почему Вы так считаете.