Rick Curtis - Collins Complete Hiking and Camping Manual - The essential guide to comfortable walking, cooking and sleeping
Здесь есть возможность читать онлайн «Rick Curtis - Collins Complete Hiking and Camping Manual - The essential guide to comfortable walking, cooking and sleeping» — ознакомительный отрывок электронной книги совершенно бесплатно, а после прочтения отрывка купить полную версию. В некоторых случаях можно слушать аудио, скачать через торрент в формате fb2 и присутствует краткое содержание. Жанр: unrecognised, на английском языке. Описание произведения, (предисловие) а так же отзывы посетителей доступны на портале библиотеки ЛибКат.
- Название:Collins Complete Hiking and Camping Manual: The essential guide to comfortable walking, cooking and sleeping
- Автор:
- Жанр:
- Год:неизвестен
- ISBN:нет данных
- Рейтинг книги:4 / 5. Голосов: 1
-
Избранное:Добавить в избранное
- Отзывы:
-
Ваша оценка:
Collins Complete Hiking and Camping Manual: The essential guide to comfortable walking, cooking and sleeping: краткое содержание, описание и аннотация
Предлагаем к чтению аннотацию, описание, краткое содержание или предисловие (зависит от того, что написал сам автор книги «Collins Complete Hiking and Camping Manual: The essential guide to comfortable walking, cooking and sleeping»). Если вы не нашли необходимую информацию о книге — напишите в комментариях, мы постараемся отыскать её.
Collins Complete Hiking and Camping Manual: The essential guide to comfortable walking, cooking and sleeping — читать онлайн ознакомительный отрывок
Ниже представлен текст книги, разбитый по страницам. Система сохранения места последней прочитанной страницы, позволяет с удобством читать онлайн бесплатно книгу «Collins Complete Hiking and Camping Manual: The essential guide to comfortable walking, cooking and sleeping», без необходимости каждый раз заново искать на чём Вы остановились. Поставьте закладку, и сможете в любой момент перейти на страницу, на которой закончили чтение.
Интервал:
Закладка:
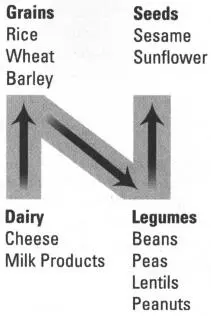
Complete Protein Combinations
Sample Complete Protein Combinations
Dairy (or eggs) and grains Macaroni and cheese; cheese and crackers; pasta with Parmesan cheese; milk and cereal.
Grains and legumes Rice and beans; refried beans and flour tortillas; peanut butter and bread; rice or bread and tofu.
Legumes and seeds Peanuts and sunflower seeds in gorp (see page).
BASIC FLUID RECOMMENDATIONS
Water is an essential part of personal nutrition on the trail. It aids digestion, regulates body temperature, keeps cells healthy, and carries waste from the body. Dehydration leads to headaches, fatigue, and irritability. Mild dehydration is often easily relieved by drinking half a quart ( 1/ 2liter) or more of water. Remember that these general recommendations are for backpacking in temperate forest conditions. You may need to increase your fluid intake based on your own metabolic needs, physical condition, medical condition, age, sex, or different weather conditions (such as high temperature and humidity), high altitude, or in specific ecosystems (such as desert climates).
TRICKS OF THE TRAIL
GorpEveryone has his or her own favorite recipes for “gorp,” which stands for Good Old Raisins and Peanuts. I start with equal parts raisins and peanuts and then add a quick sugar source. You can increase the variety of the mix by adding smaller amounts of different sugar sources. When using chocolate, consider the melting factor. Also, if you use items like sunflower seeds that are smaller than most of the other things in your mix they will eventually filter down to the bottom of the bag, so be prepared on the last day to find a bag full of sunflower seeds. Here are some items to consider: dried papaya, pineapple, apples, apricots, dates, banana chips, mango, or cranberries (Craisins); coconut; almonds; cashews; brazil nuts; peanuts; chocolate, butterscotch, or carob chips; chocolate malt balls; M&M’s; chocolate-covered raisins, peanuts, or almonds; yogurt-covered raisins, peanuts, or almonds; sunflower seeds; rice crackers; dried green peas; pretzels; sesame stix. Be inventive!
Water is always being lost by the body through the “—tions”: respiration, perspiration, urination, and defecation. Strenuous activities like back-packing result in increased water loss. Dehydration is one of the most preventable hiking problems but also one of the most ignored. I’ve seen people avoid drinking for all sorts of reasons: it was too much trouble to get the water bottle out of their pack or they didn’t want to have to urinate. The bottom line is, stay hydrated. Failure to stay adequately hydrated can lead to serious and even life-threatening conditions. (See “ Fluid Balance,” “ Heat-Related Illnesses,” “ Hypothermia,” “ Hyponatremia,”.)
Keep your water bottles handy and keep drinking all day long. Drink 16+ ounces (500 milliliters) before starting to hike and then 10 to 12 ounces (200 to 300 milliliters) every 20 to 30 minutes while hiking. It is easier on your body to handle small amounts of water spread out rather than sucking down a whole quart at once. The sensation of thirst comes after the body is already low on fluid, so don’t wait until you are thirsty to drink. If your mucus membranes are dry (lips and mouth), then you are low on fluids. The best way to tell if you are adequately hydrated is to check your urine output. It should be “copious and clear.”
Keep your daily route and the availability of water in mind when you are planning your menu. If water will be scarce, you need to plan meals that do not require lots of water for cooking or rehydrating.
| Season/Weather | Amount/day | Explanation |
| Fall and spring backpacking* | 2–3 quarts (1.8–2.8 liters) | This is what an average person will need on a daily basis in a general temperate climate. |
| Hot-weather backpacking* | 3–4 quarts (2.8–3.7 liters) | In hot and humid weather, you lose additional fluid through sweating, which must be replaced. |
| Winter backpacking* | 4+ quarts (3.7+ liters) | In the winter, you lose moisture through evaporation to the dry air and especially through respiration. Dry air entering the lungs heats up and is exhaled saturated with moisture. |
| *High-altitude, all seasons | Add 1 quart (0.9 liters) | At high altitudes the body loses more fluid. Increase your fluid intake if you are traveling at high altitudes (over 8,000 feet/2,438 meters). |
Remember that these are general recommendations only. You may have different fluid requirements based on your own metabolic needs, physical condition, medical condition, age, sex (e.g., during her menstrual period, a woman will need more fluid), or different weather conditions.
TRICKS OF THE TRAIL
Hydration gearIf your water bottle is buried in your pack there’s a good chance you won’t stop to get to it as often as you need to stay properly hydrated. There are a number of water bladders, like the Camelback and the Platypus, that use a collapsible plastic bag in a fabric liner along with a drinking tube. You can place the carrier in your pack, hang the tube on your shoulder strap, and drink as you hike. I find I stay much better hydrated with a water bladder.
MENU PLANNING
When planning food for a backpacking trip, you need to decide if cooking is a group task or a personal task. A group menu is where everyone in the group plans centralized meals and cooks and eats together versus each person cooking on his or her own. Either way there are two approaches to planning meals that can be taken. The first is a menu planned meal-by-meal (breakfast on day 1 is this, dinner is that); the second is a ration system in which you bring lots of different ingredients (pasta, rice, dried veggies, etc.) and the group creates its own menu on-the-fly. On short trips (two to six days), a meal-by-meal menu often works best. The ration approach is useful on longer trips (seven to ten+ days), as it provides room for greater flexibility and creativity. Proper menu planning means less weight to carry, less wasted food, and less food waste to pack out. Below are some important things to think about when planning your menu.
HOW LONG ARE YOU GOING TO BE OUT?
The length of your trip is essential when planning a menu. You need to bring enough food to feed everyone, but you don’t want to carry too much heavy food. For any trip, you can start with a variety of fresh fruits and vegetables, which will typically last several days.
Less than a week Carry any type of fresh food that won’t spoil. At the beginning of a trip if weight is not an issue you can freeze pre-cooked foods and take them with you.
Seven to ten days Add some dehydrated or freeze-dried foods to cut down on weight.
Greater than ten days Increase the proportion of dehydrated or freeze-dried foods, or arrange for food resupply.
On longer expeditions, the types of foods you can carry become more limited. You may need to supplement your diet with vitamins and minerals to make up for nutrients that you may not be getting.
EASE OF PREPARATION
One of the things to think about in your menu planning is how you are going to cook. Are you bringing a stove, cooking on fires, or not cooking at all? If you have a stove, is it designed for extended cooking, like the MSR Whisperlite, or just to boil a small amount of water, like the Ezbit stove or the JetBoil? If you are going ultralight and have a simple “boil a cup of water” stove, then you are limited in the types of food you can cook (more prepackaged things like instant oatmeal, ramen noodles, and good old mac ’n’ cheese). Knowing how you are going to cook is a key factor in deciding what foods you are going to bring.
Читать дальшеИнтервал:
Закладка:
Похожие книги на «Collins Complete Hiking and Camping Manual: The essential guide to comfortable walking, cooking and sleeping»
Представляем Вашему вниманию похожие книги на «Collins Complete Hiking and Camping Manual: The essential guide to comfortable walking, cooking and sleeping» списком для выбора. Мы отобрали схожую по названию и смыслу литературу в надежде предоставить читателям больше вариантов отыскать новые, интересные, ещё непрочитанные произведения.


Обсуждение, отзывы о книге «Collins Complete Hiking and Camping Manual: The essential guide to comfortable walking, cooking and sleeping» и просто собственные мнения читателей. Оставьте ваши комментарии, напишите, что Вы думаете о произведении, его смысле или главных героях. Укажите что конкретно понравилось, а что нет, и почему Вы так считаете.