Daniel Buser - Surgical Manual of Implant Dentistry
Здесь есть возможность читать онлайн «Daniel Buser - Surgical Manual of Implant Dentistry» — ознакомительный отрывок электронной книги совершенно бесплатно, а после прочтения отрывка купить полную версию. В некоторых случаях можно слушать аудио, скачать через торрент в формате fb2 и присутствует краткое содержание. Жанр: unrecognised, на английском языке. Описание произведения, (предисловие) а так же отзывы посетителей доступны на портале библиотеки ЛибКат.
- Название:Surgical Manual of Implant Dentistry
- Автор:
- Жанр:
- Год:неизвестен
- ISBN:нет данных
- Рейтинг книги:5 / 5. Голосов: 1
-
Избранное:Добавить в избранное
- Отзывы:
-
Ваша оценка:
Surgical Manual of Implant Dentistry: краткое содержание, описание и аннотация
Предлагаем к чтению аннотацию, описание, краткое содержание или предисловие (зависит от того, что написал сам автор книги «Surgical Manual of Implant Dentistry»). Если вы не нашли необходимую информацию о книге — напишите в комментариях, мы постараемся отыскать её.
Surgical Manual of Implant Dentistry — читать онлайн ознакомительный отрывок
Ниже представлен текст книги, разбитый по страницам. Система сохранения места последней прочитанной страницы, позволяет с удобством читать онлайн бесплатно книгу «Surgical Manual of Implant Dentistry», без необходимости каждый раз заново искать на чём Вы остановились. Поставьте закладку, и сможете в любой момент перейти на страницу, на которой закончили чтение.
Интервал:
Закладка:
• Preoperative mouthwash with 0.1% chlorhexidine
• Perioral skin disinfection with alcohol solution
• Antibiotic prophylaxis 2 hours prior to surgery (eg, 2 g amoxicillin intraorally)
• Low-speed drilling (between 500 and 600 rpm)
• Cooling spray during drilling with chilled sterile saline
• Intermittent drilling technique
• Use of sharp drills
It is important to perform a surgical procedure systematically, always applying the same surgical principles.
Fig 1-1Smoothing the alveolar crest following flap elevation.
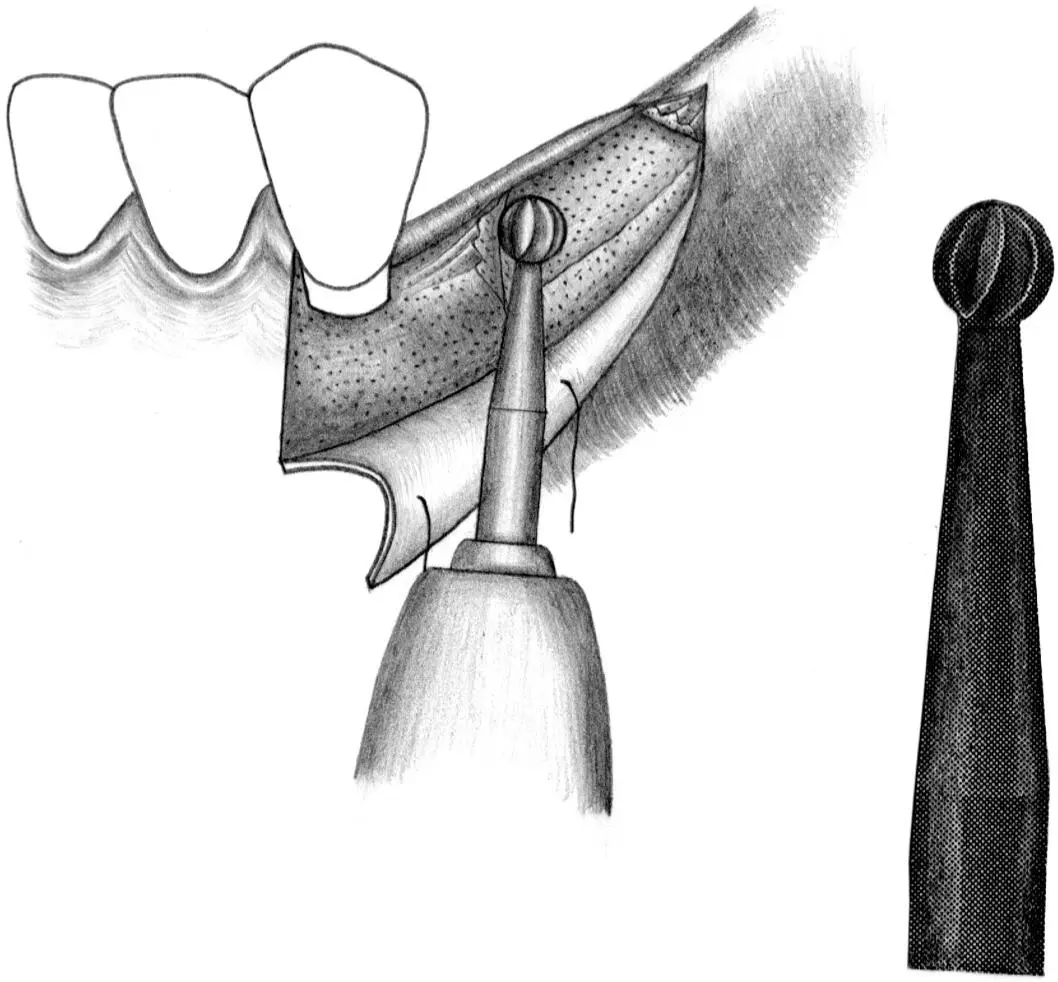
Fig 1-1a Once the implant surgical site has been exposed, a large round bur is used to smooth and level the crest of the alveolar ridge.
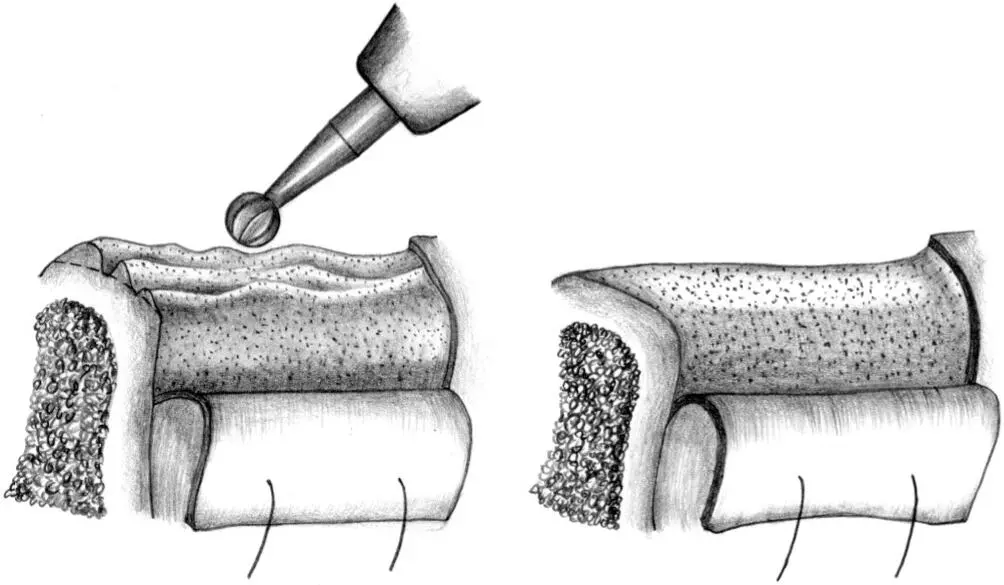
Fig 1-1b All sharp edges and irregularities are removed by running the round bur across the alveolar ridge.
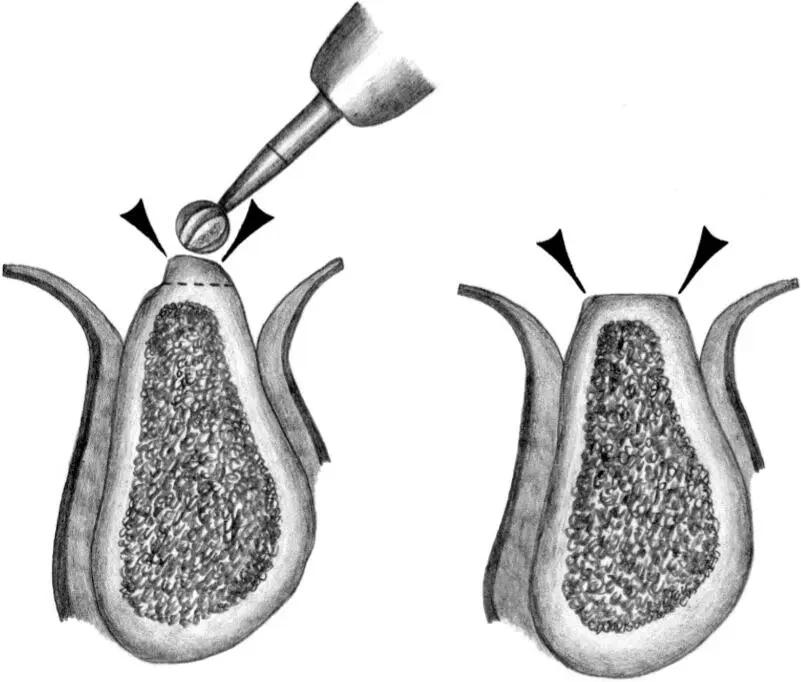
Fig 1-1c In this cross section, the irregular, narrow crest is smoothed to produce a flat, wide ridge, which is favorable for implant site preparation.
Fig 1-2Sequence of site preparation for a standard implant.

Fig 1-2a A no. 1 round bur is used to mark the position of the implant site.
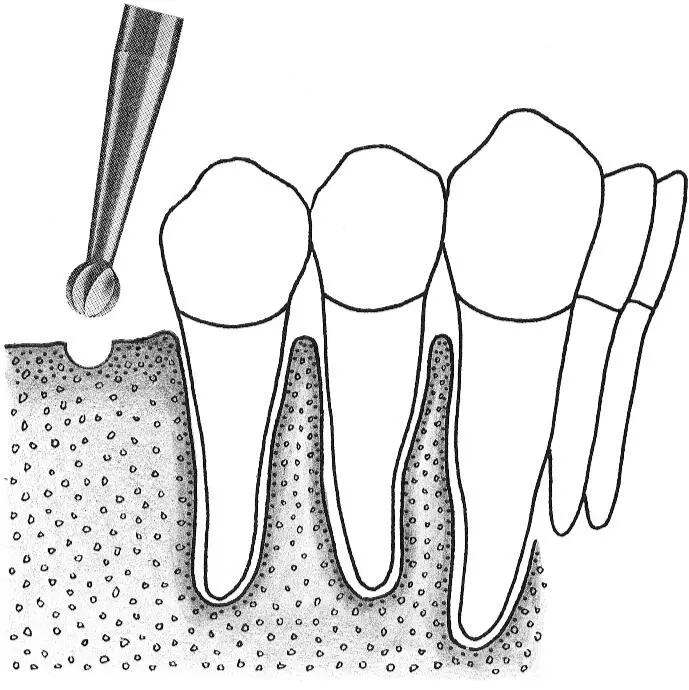
Fig 1-2b Access is widened with a no. 2 round bur. This step makes it possible to correctly position the next drill.
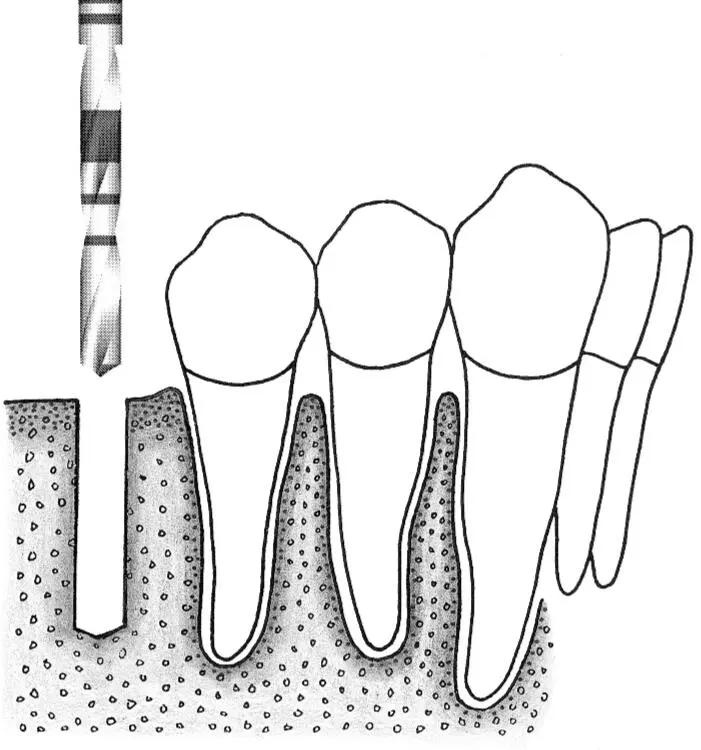
Fig 1-2c The initial implant site preparation is made with a 2.2-mm-diameter pilot drill.
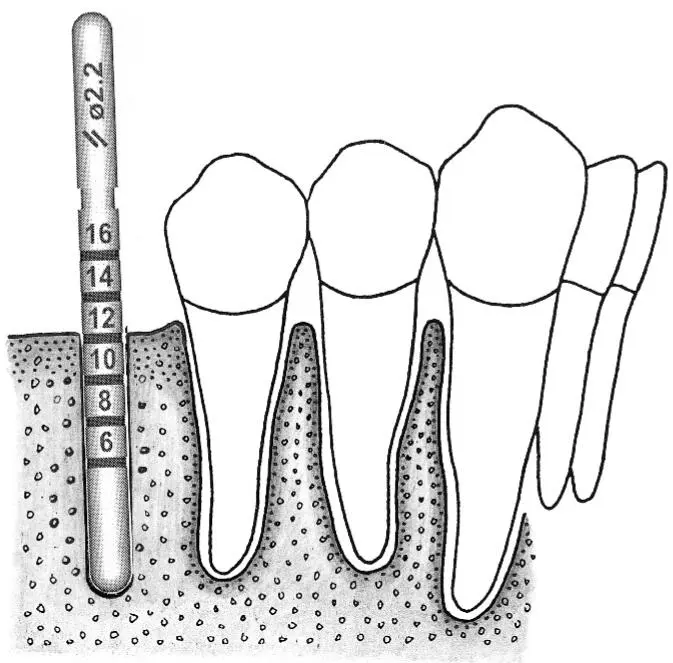
Fig 1-2d A 2.2-mm-diameter guide pin is inserted into the initial preparation to check its position and axis.
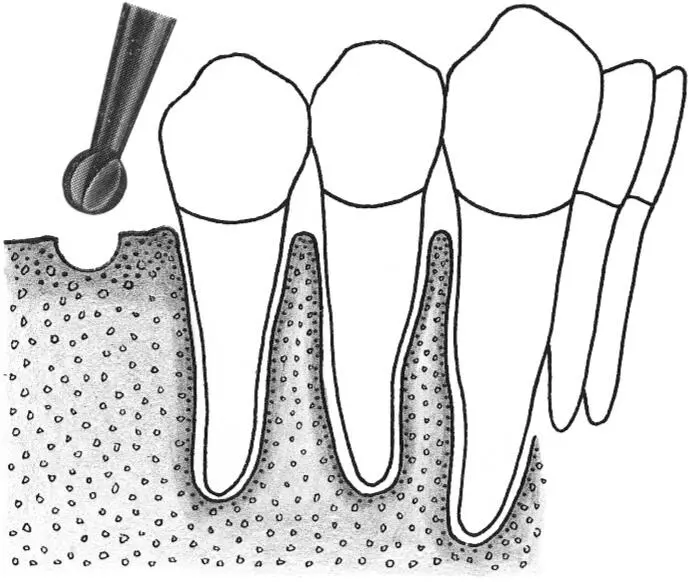
Fig 1-2e The crest of the osteotomy is enlarged with a no. 3 round bur.
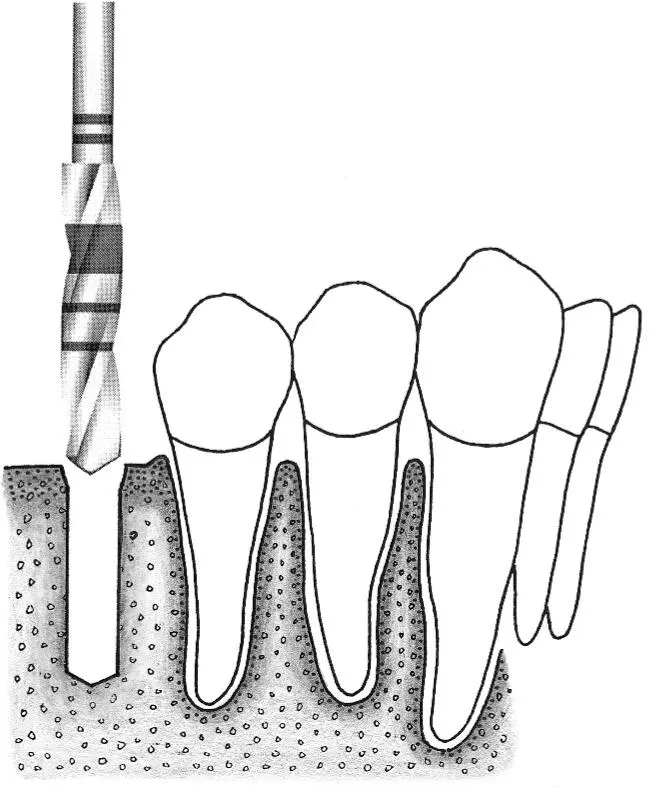
Fig 1-2f A 2.8-mm-diameter spiral drill is easily inserted for preparing the depth of the site.
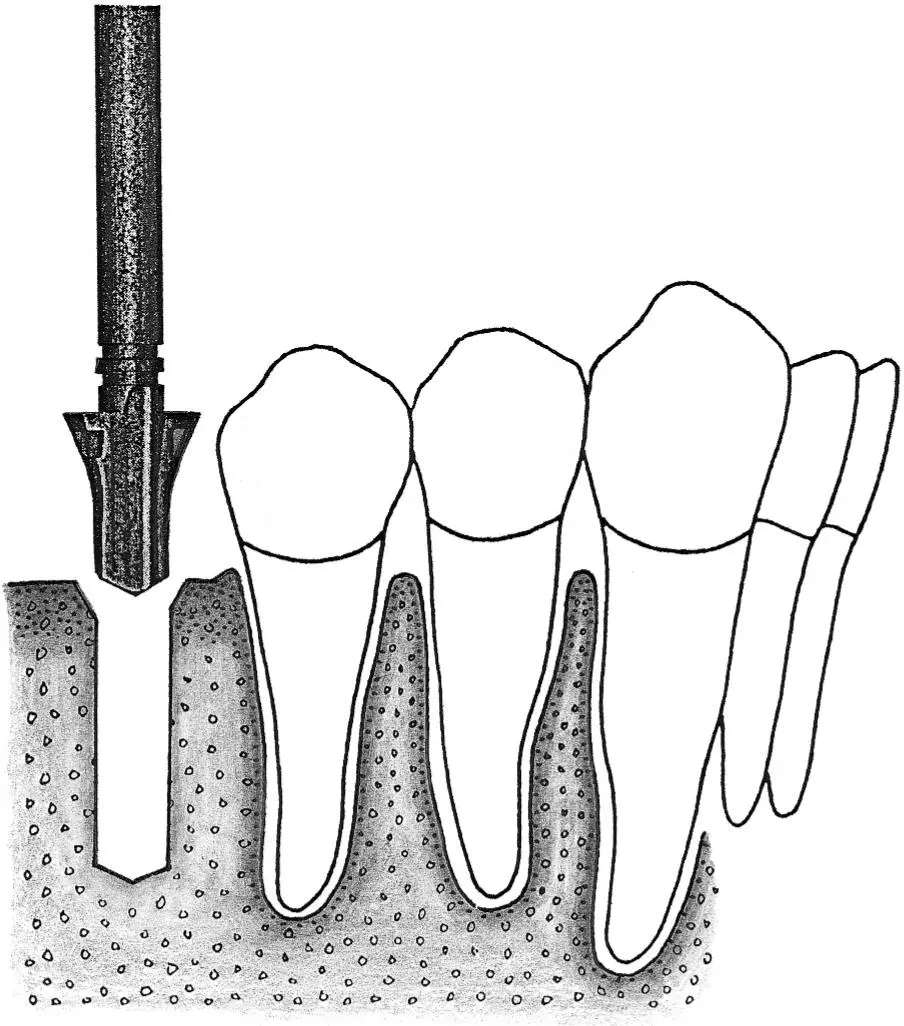
Fig 1-2g A profile drill is used to further increase the surgical access for the next, larger-size drill.
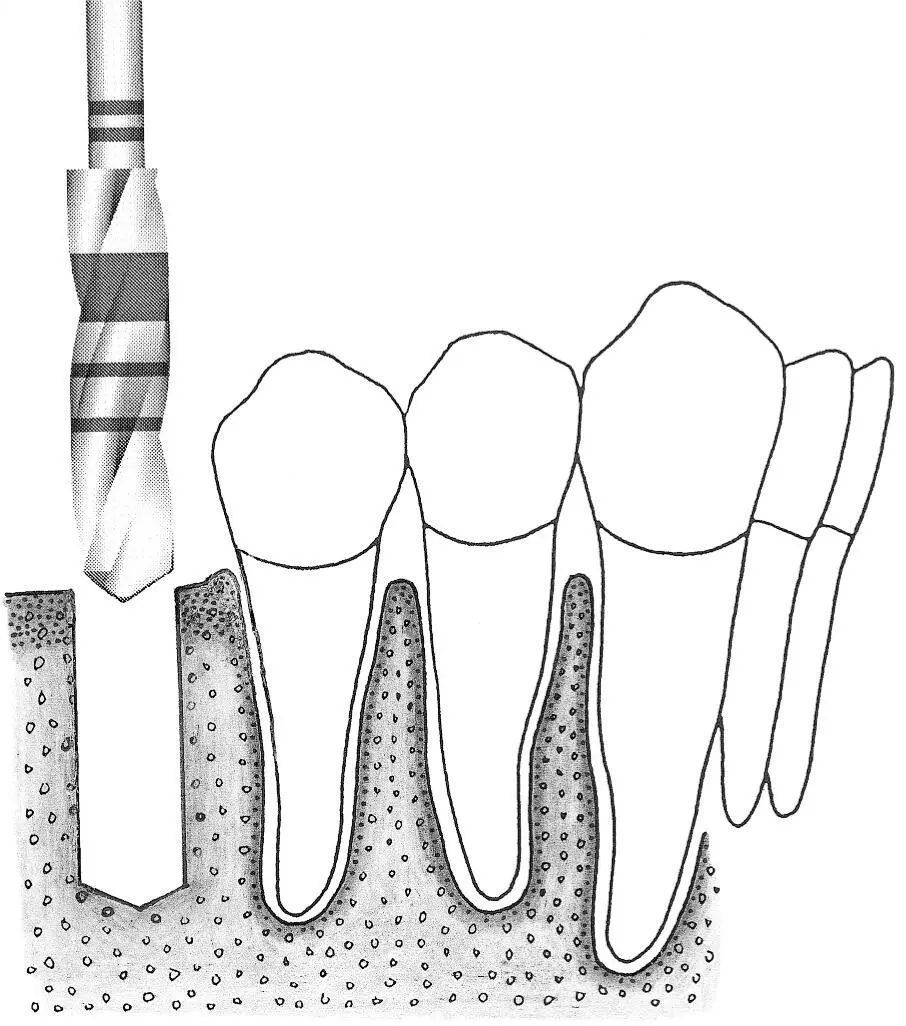
Fig 1-2h Preparation of the implant site continues with the 3.5-mm-diameter spiral drill.
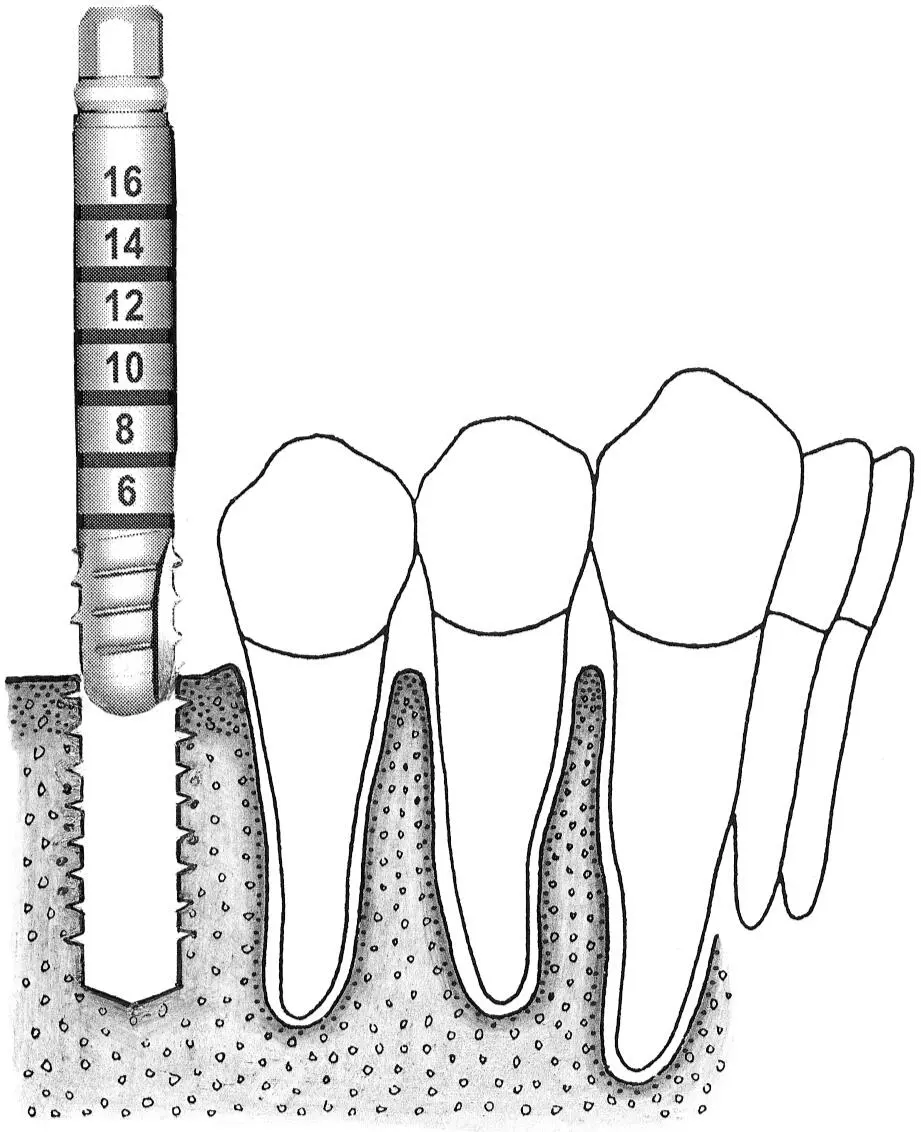
Fig 1-2i Occasionally, when the bone structure is uniformly dense, bone tapping is performed prior to implant placement.
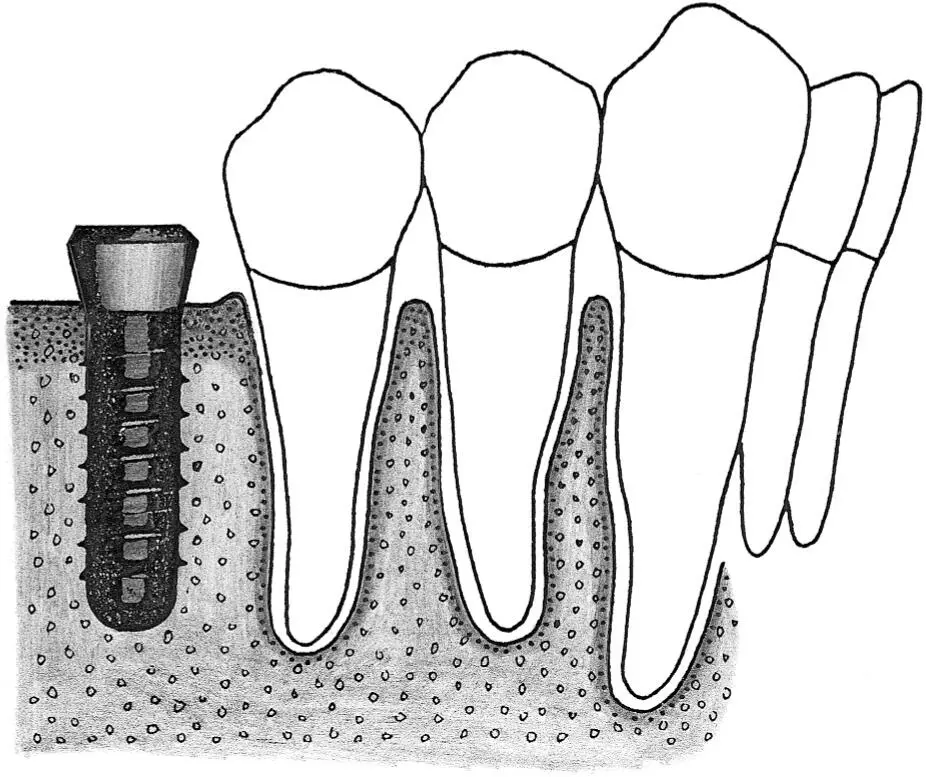
Fig 1-2j A standard implant is placed in the site, with the rough surface positioned at the level of the alveolar ridge crest. This allows the implant shoulder to be located at the gingival level.
Fig 1-3Correction of the position and axis of the implant site preparation.
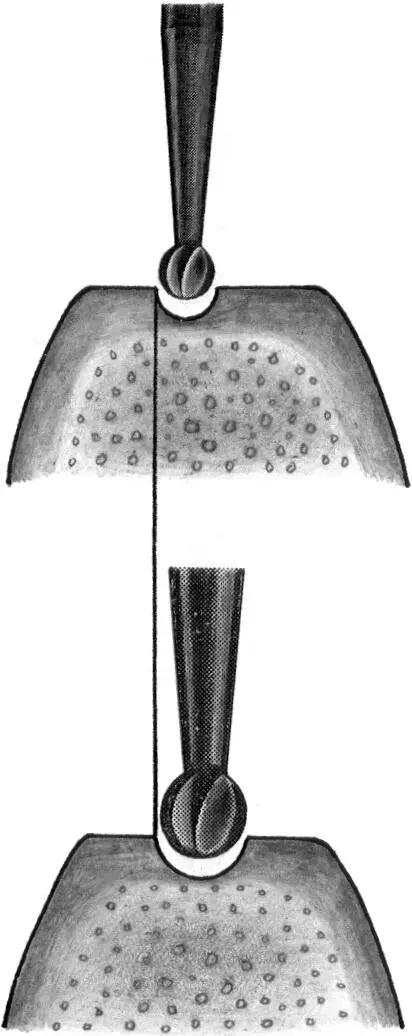
Fig 1-3a The preparation of the implant site begins with the use of the nos. 1 and 2 round burs to mark the position of the implant site.
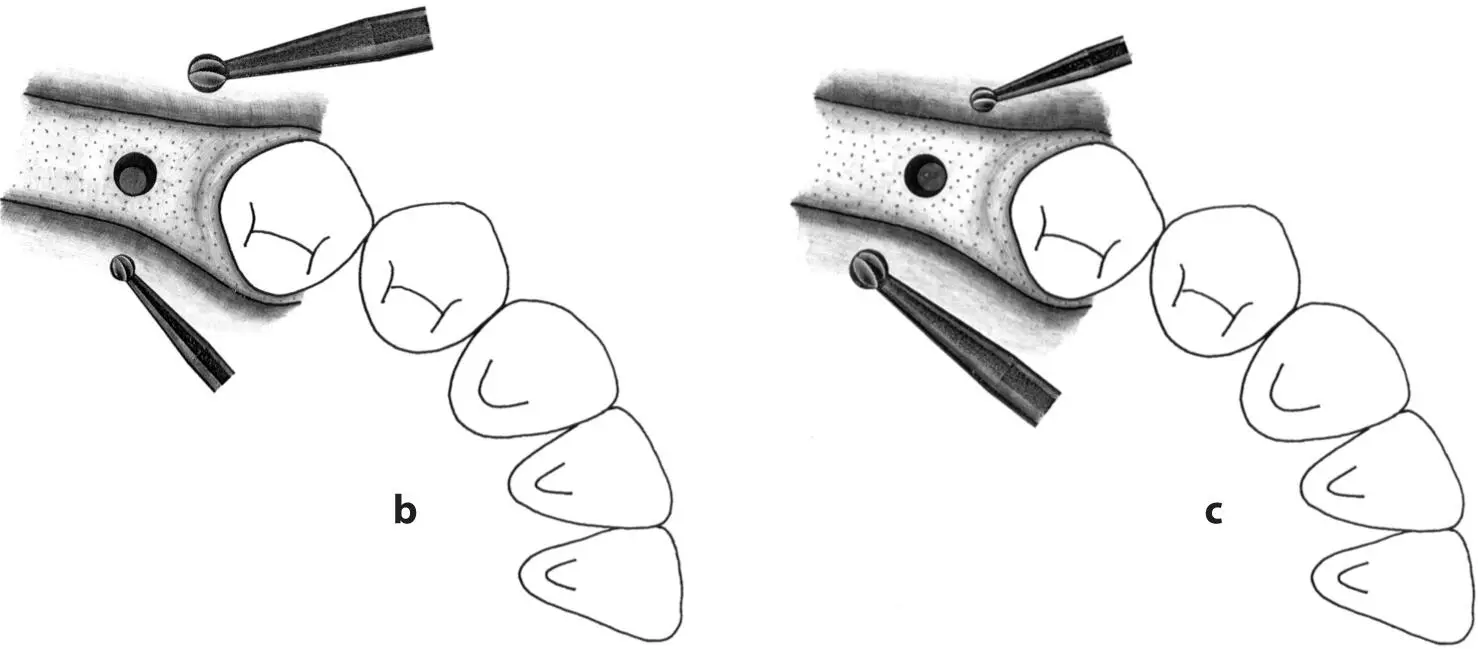
Figs 1-3b and 1-3c Any required changes to the marking made with the first round bur can be accomplished with the no. 2 round bur, as shown in this occlusal view. These initial steps for the preparation of the implant site ensure the correct implant position orofacially and mesiodistally.
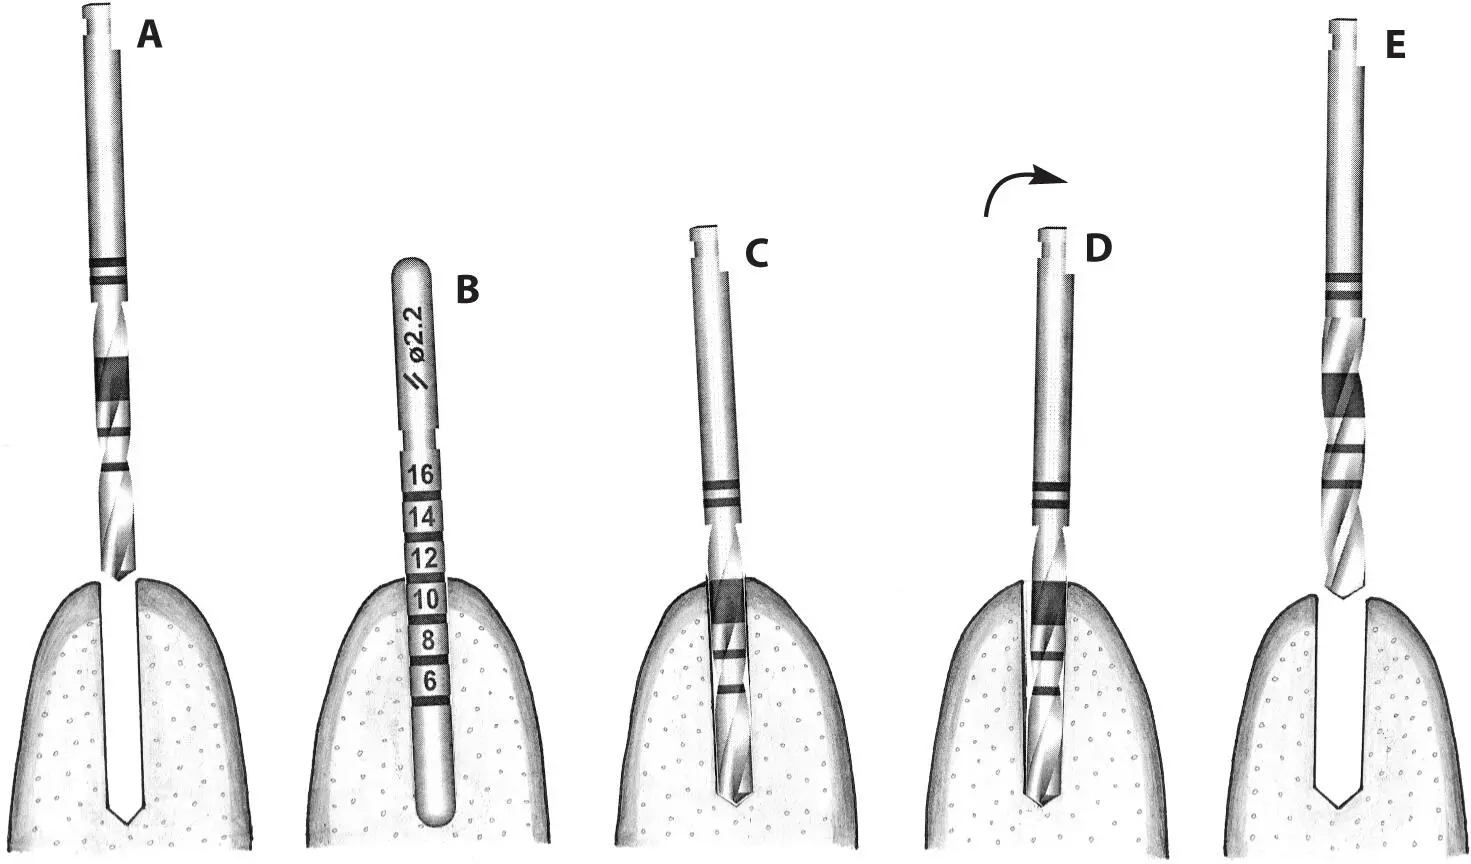
Fig 1-3d After the use of the first pilot drill (A) , a 2.2-mm-diameter guide pin is used to check the axis and depth of the implant preparation (B) . Any incorrect axis orientation can be adjusted with the same 2.2-mm-diameter pilot drill (C and D) and then followed with the 2.8-mm-diameter spiral drill (E) .
Fig 1-4 Pretapping of implant sites with bone of varying density.
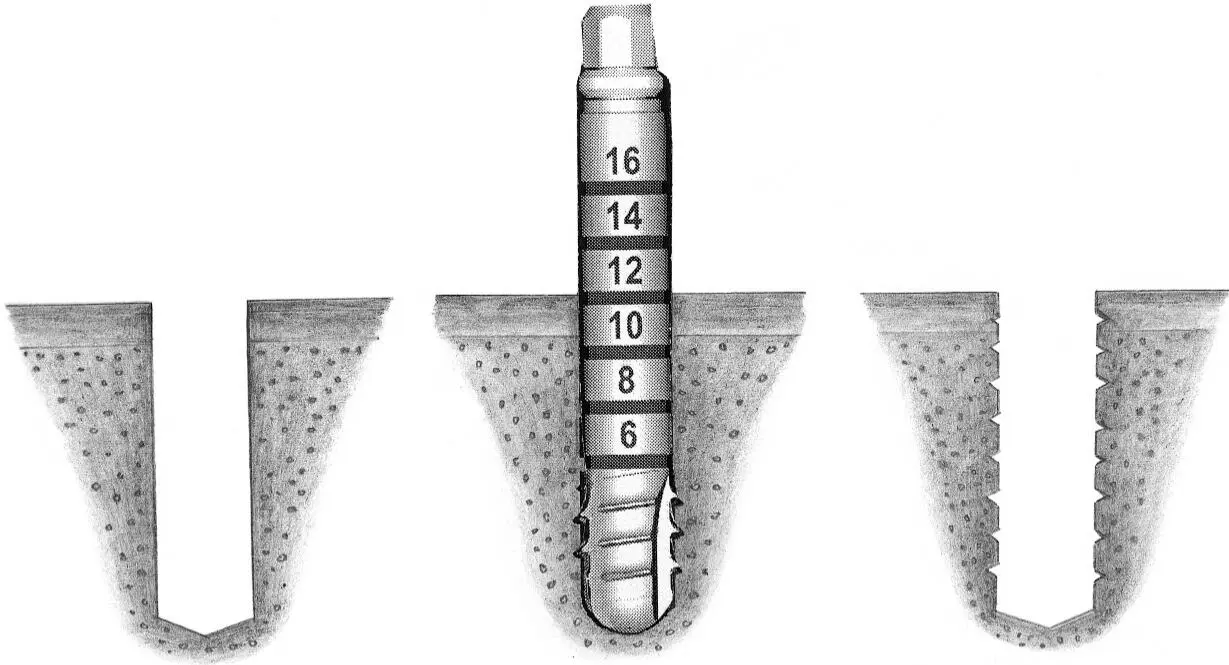
Fig 1-4a Tapping of the bone in the implant site is performed when the bone structure is uniformly dense (ie, type 1 bone). This is done through the entire depth of the implant bed.
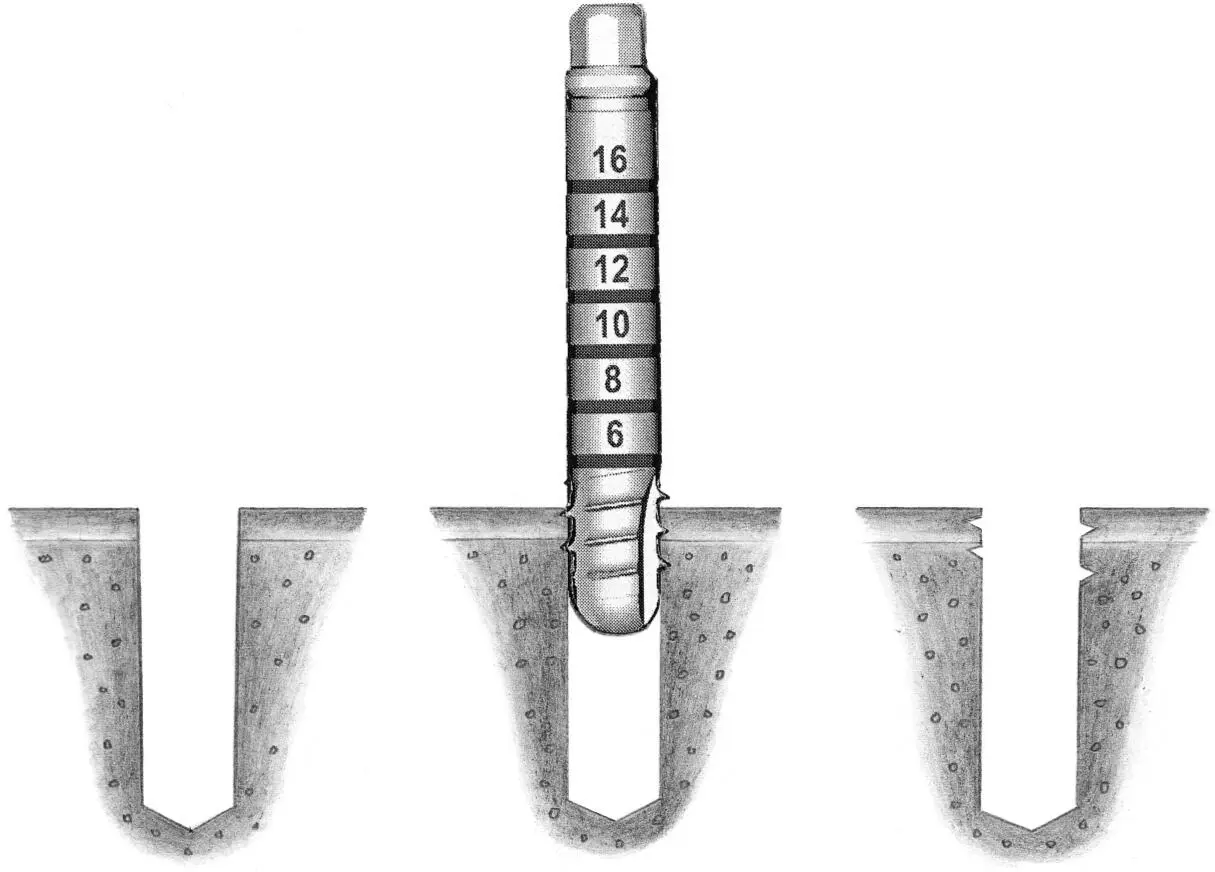
Fig 1-4b If the alveolar ridge is partially dense (ie, type 2), tapping of the implant site to one third of the predetermined depth is done within the crestal area.
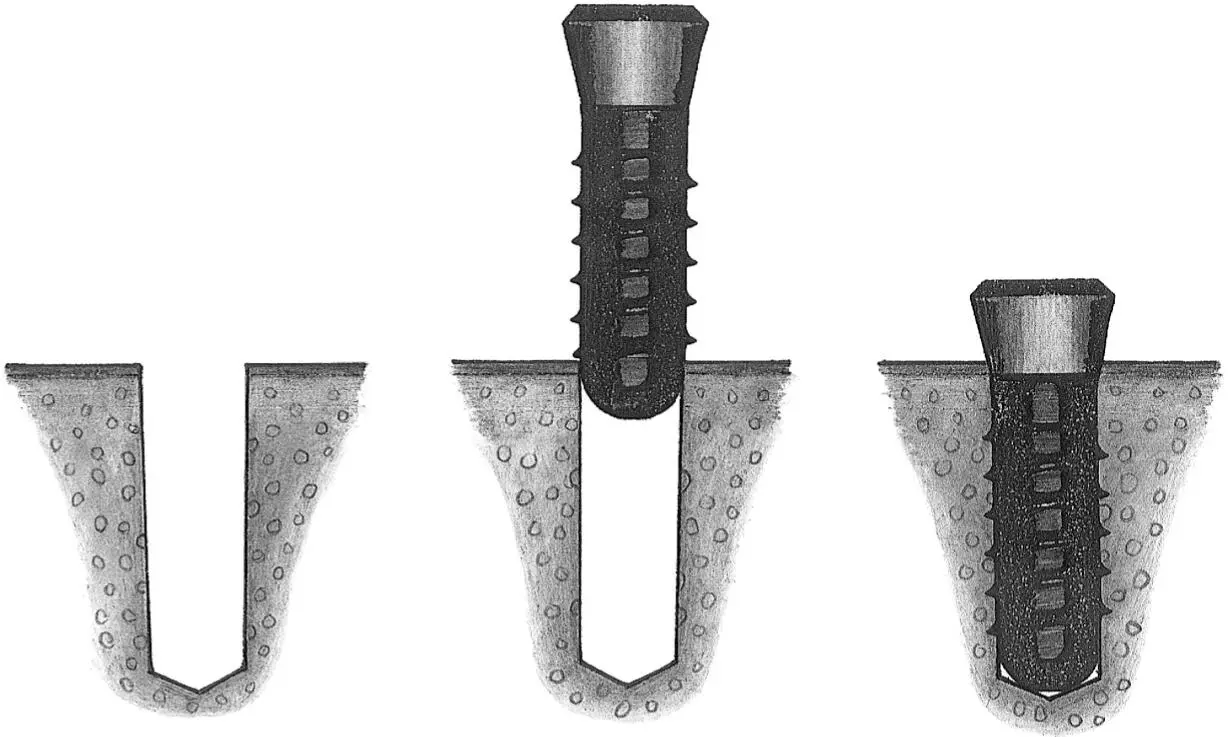
Fig 1-4c When the alveolar ridge is predominantly cancellous bone (ie, types 3 and 4), no tapping of the bone is required prior to implant placement.
Fig 1-5Varying sink depths.
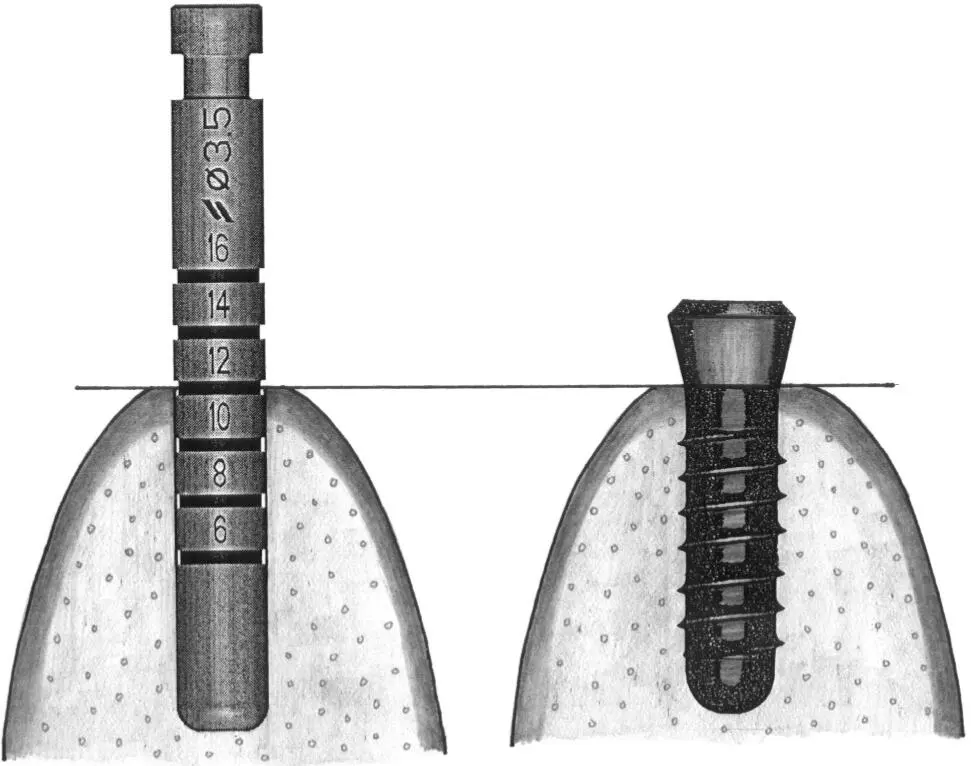
Fig 1-5a The 3.5-mm-diameter depth gauge is inserted so that the middle of the 12-mm mark is aligned with the bone crest (left) . When the standard implant is inserted, this allows the rough border to be aligned exactly at the crest (right) .
Читать дальшеИнтервал:
Закладка:
Похожие книги на «Surgical Manual of Implant Dentistry»
Представляем Вашему вниманию похожие книги на «Surgical Manual of Implant Dentistry» списком для выбора. Мы отобрали схожую по названию и смыслу литературу в надежде предоставить читателям больше вариантов отыскать новые, интересные, ещё непрочитанные произведения.


Обсуждение, отзывы о книге «Surgical Manual of Implant Dentistry» и просто собственные мнения читателей. Оставьте ваши комментарии, напишите, что Вы думаете о произведении, его смысле или главных героях. Укажите что конкретно понравилось, а что нет, и почему Вы так считаете.