Debra Cameron - Learning GNU Emacs, 3rd Edition
Здесь есть возможность читать онлайн «Debra Cameron - Learning GNU Emacs, 3rd Edition» весь текст электронной книги совершенно бесплатно (целиком полную версию без сокращений). В некоторых случаях можно слушать аудио, скачать через торрент в формате fb2 и присутствует краткое содержание. Год выпуска: 2004, ISBN: 2004, Издательство: O'Reilly Media, Жанр: Программы, Программирование, на английском языке. Описание произведения, (предисловие) а так же отзывы посетителей доступны на портале библиотеки ЛибКат.
- Название:Learning GNU Emacs, 3rd Edition
- Автор:
- Издательство:O'Reilly Media
- Жанр:
- Год:2004
- ISBN:0-596-00648-9
- Рейтинг книги:3 / 5. Голосов: 1
-
Избранное:Добавить в избранное
- Отзывы:
-
Ваша оценка:
Learning GNU Emacs, 3rd Edition: краткое содержание, описание и аннотация
Предлагаем к чтению аннотацию, описание, краткое содержание или предисловие (зависит от того, что написал сам автор книги «Learning GNU Emacs, 3rd Edition»). Если вы не нашли необходимую информацию о книге — напишите в комментариях, мы постараемся отыскать её.
, 3rd Edition tells readers how to get started with the GNU Emacs editor. It is a thorough guide that will also "grow" with you: as you become more proficient, this book will help you learn how to use Emacs more effectively. It takes you from basic Emacs usage (simple text editing) to moderately complicated customization and programming.The third edition of
describes Emacs 21.3 from the ground up, including new user interface features such as an icon-based toolbar and an interactive interface to Emacs customization. A new chapter details how to install and run Emacs on Mac OS X, Windows, and Linux, including tips for using Emacs effectively on those platforms.
, third edition, covers:
• How to edit files with Emacs
• Using the operating system shell through Emacs
• How to use multiple buffers, windows, and frames
• Customizing Emacs interactively and through startup files
• Writing macros to circumvent repetitious tasks
• Emacs as a programming environment for Java, C++, and Perl, among others
• Using Emacs as an integrated development environment (IDE)
• Integrating Emacs with CVS, Subversion and other change control systems for projects with multiple developers
• Writing HTML, XHTML, and XML with Emacs
• The basics of Emacs Lisp
The book is aimed at new Emacs users, whether or not they are programmers. Also useful for readers switching from other Emacs implementations to GNU Emacs.
Learning GNU Emacs, 3rd Edition — читать онлайн бесплатно полную книгу (весь текст) целиком
Ниже представлен текст книги, разбитый по страницам. Система сохранения места последней прочитанной страницы, позволяет с удобством читать онлайн бесплатно книгу «Learning GNU Emacs, 3rd Edition», без необходимости каждый раз заново искать на чём Вы остановились. Поставьте закладку, и сможете в любой момент перейти на страницу, на которой закончили чтение.
Интервал:
Закладка:
GNU Emacs provides excellent support for marking up TEX files. Most people today use LATEX , which is written in TEX and provides more control over formatting. As a result, we'll talk about LaTeX mode here.
Before we launch into this discussion, we assume that you have set up LATEX on your platform. On Red Hat Linux, it's set up by default. Windows and Mac OS X users must install and configure LATEX before proceeding. [53]
Emacs attempts to guess whether you're editing a TEX or LATEX file and enter the appropriate mode. You can force LaTeX mode if Emacs doesn't enter it automatically by typing M-x latex-mode Enter.
8.5.1 Matching Braces
LATEX commands often take the form \keyword{text}. LaTeX mode doesn't try to figure out if you're using the "right" keywords since the language is extensible and you may have defined your own keywords. It does, however, provide support for avoiding the most common error: mismatched curly braces and dollar signs.
In LATEX , curly braces ({}) and dollar signs ($$) should always appear in pairs; Emacs checks to make sure that each opening brace or dollar sign has a counterpart. When you type a closing brace or dollar sign, the cursor moves quickly to its counterpart (provided that it is on the screen; it shows the context in the minibuffer if it is not), then back again.
Emacs generates braces in matching pairs. The command C-c {inserts opening and closing braces and positions the cursor for typing between the braces.
Typing C-c }moves you past the right brace. It always finds the correct closing brace, given your current position. If there is no closing brace, you get an error message that says Scan error: Unbalanced parentheses. You also get this error message if you type C-c }while the cursor is in a section that is not surrounded by braces, which can be a little confusing.
To check for mismatched curly braces and dollar signs, type M-x tex-validate-buffer Enter. This command checks the entire buffer for unbalanced parentheses, curly braces, dollar signs, and the like. (If you have a large file, you might want to validate a region instead using M-x tex-validate-region Enter). If it finds any errors, Emacs displays an *Occur*buffer with Mismatches:at the top and a list of lines on which it found errors. You can then easily move to each line that contains an error with M-x goto-line.
Sometimes a mismatched parenthesis early in the buffer can start a chain reaction of "errors" through the rest of the file. If you suspect that one of the corrections you make may have fixed most of the remaining errors, simply run tex-validate-bufferagain.
When you're stepping through errors, C-c }provides a good way to check where the closing brace for a given opening brace is. Position the cursor right after the opening brace and press C-c }.
8.5.2 Quotation Marks and Paragraphing
LaTeX mode also has features for handling quotation marks and paragraph separation. Typing a quotation mark (") causes Emacs to simulate left and right quotation marks. Left quotation marks are represented as two backtick characters (``) while right quotation marks are represented as two apostrophes (' '). (Left and right quotation marks are not part of the standard ASCII character set.) If you need to type a literal quotation mark for any reason, simply use the quote-character command preceding the quotation mark, like this: C-q ".
8.5.3 Command Pairs
LaTeX mode provides support for inserting command pairs. To insert a command pair, type C-c C-o(for latex-insert-block). Emacs prompts for the block name, and then for associated options. For example, type C-c C-o Enter document Enter Enter(the second Enterindicates no options). Emacs inserts the command pair and positions the cursor between them:
\begin{document}
_
\end{document}
You can use this command to mark up a text file after you write it. If you mark a region, you can type C-c C-oto wrap a command pair around that region.
A related command is C-c C-e(for latex-close-block). In this case, you type an opening command, press C-c C-e, and Emacs inserts the corresponding closing command.
These commands work with any keyword, regardless of what it is. Emacs can't check to make sure that it's a valid LATEX keyword or even that it's been defined. For example, if you type \begin{eating} C-c C-e, Emacs inserts \end{eating}. It's up to you to make sure you use valid keywords.
8.5.4 Processing and Printing Text
In addition to marking up files for LATEX , you can process files, see your errors (if any), and invoke a viewer, all without leaving Emacs. To process a file, just type C-c C-f(for tex-file). [54]Emacs saves the file before processing it. Messages that would appear on screen are channeled to a buffer called *tex-shell*, which Emacs displays on your screen. If the buffer isn't on the screen, typing C-c C-l(for tex-recenter-output-buffer) automatically displays it.
To demonstrate, let's try processing dickens.tex , a very basic file indeed.
Type: C-c C-f
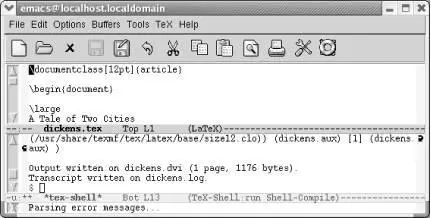
Processing a LATEX file displays a special *tex-shell*buffer.
This command generates a .dvi file, which is an intermediate, device-independent file. You can view the resulting file by typing C-c C-v. On Linux, the default viewer is xdvi . Pressing C-c C-vdisplays the output in an xdvi window.
Type: C-c C-v
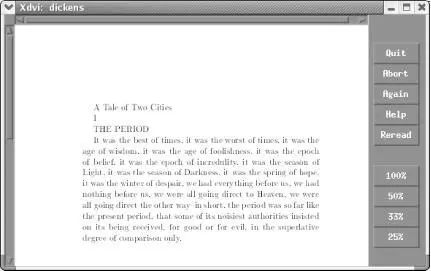
Output displayed by xdvi .
To print the .dvi file, give the command C-c C-p(for tex-print); this formats the .dvi file and sends it to your default printer. C-c C-q( tex-show-print-queue) displays the print queue so you know when to go to the printer to look for your processed output.
Two important variables tell Emacs how to print a TEX , file. You need to know about them if C-c C-por C-c C-qdoesn't work correctly; if these commands don't work, the configuration of TEX , on your system may be nonstandard, or the print and print queue commands are slightly different. The variable tex-dvi-print-commanddetermines the command that is used to print a .dvi file; its default is lpr -d. For print queues, the command used to show the print queue is controlled by the tex-show-queue-commandvariable. By default, tex-show-queue-commandis set to lpq.
Table 8-9summarizes TeX and LaTeX mode commands.
Table 8-9. TeX and LaTeX mode commands
| Keystrokes | Command name | Action |
|---|---|---|
| (none) | tex-mode | Enter TeX or LaTeX mode according to file's contents. |
| (none) | plain-tex-mode | Enter TeX mode. |
| (none) | latex-mode | Enter LaTeX mode. |
| C-j | tex-terminate-paragraph | Insert two hard returns (standard end of paragraph) and check syntax of paragraph. |
| C-c { | tex-insert-braces | Insert two braces and put cursor between them. |
| C-c } | up-list | If you are between braces, position the cursor following the closing brace. |
| (none)TeX → Validate Buffer | tex-validate-buffer | Check buffer for syntax errors. |
| (none)TeX → Validate Region | tex-validate-region | Check the region for syntax errors. |
| C-c C-f TeX → TeX File | tex-file | Saves the current file, then processes it. |
| C-c C-b TeX → TeX Buffer | tex-buffer | Process buffer. [55] |
| C-c C-l TeX → TeX Recenter | tex-recenter-output-buffer | Put the message shell on the screen, showing (at least) the last error message. |
| C-c C-k TeX → TeX Kill | tex-kill-job | Kill processing. |
| C-c C-p TeX → TeX Print | tex-print | Print output. |
| C-c C-q TeX → Show Print Queue | tex-show-print-queue | Show print queue. |
| C-c C-e | latex-close-block | Provide closing element of a command pair. |
| (none) | tex-close-latex-block | Provide closing element of a command pair. |
| C-c Tab` TeX → BibTeX File | tex-bibtex-file | Process the current file using BibTeX, a system for creating bibliographies automatically. |
| C-c C-v TeX → TeX View | tex-view | View . dvi output. |
| (none)TeX → TeX Print (alt printer) | tex-alt-print | Print .dvi file using an alternative printer defined by the variable tex-alt-dvi-print-command. |
| C-c C-o | latex-insert-block | Insert a block (prompts for block name and options). |
| C-c C-u | tex-goto-last-unclosed-latex-block | Look backward in the file to find the nearest unclosed block and move the cursor there. |
| M-Enter | latex-insert-item | Insert \item. |
| (none) | latex-split-block | Insert an end to the current block and the beginning of a new one. |
| " | tex-insert-quote | Insert TeX-style quotation marks. |
Chapter 9. Computer Language Support
Интервал:
Закладка:
Похожие книги на «Learning GNU Emacs, 3rd Edition»
Представляем Вашему вниманию похожие книги на «Learning GNU Emacs, 3rd Edition» списком для выбора. Мы отобрали схожую по названию и смыслу литературу в надежде предоставить читателям больше вариантов отыскать новые, интересные, ещё непрочитанные произведения.


Обсуждение, отзывы о книге «Learning GNU Emacs, 3rd Edition» и просто собственные мнения читателей. Оставьте ваши комментарии, напишите, что Вы думаете о произведении, его смысле или главных героях. Укажите что конкретно понравилось, а что нет, и почему Вы так считаете.