7.4.6 Using Outline Minor Mode
Outline mode is also available as a minor mode so that you can use it subordinately to your favorite major mode. To start outline mode as a minor mode, type M-x outline-minor-mode; Outlappears on the mode line. In some ways, this mode is less convenient; rather than the simple C-cprefix you use for most outline mode commands, in outline minor mode, you must preface all commands with C-c @instead, to avoid interfering with the usual C-ccommands of the major mode. So, if you want to move down to the next heading (the C-c C-ncommand in outline mode), you would type C-c @ C-ninstead.
Please note that mixing outline major mode and outline minor mode is not only redundant but can be dangerous. Turning on the minor mode while the major mode is on can confuse Emacs. Exit outline mode, then enter outline minor mode if you wish.
Table 7-4summarizes outline mode commands. In the next section, we discuss another specialized editing method: editing with rectangles.
Table 7-4. Outline mode commands
| Keystrokes |
Command name |
Action |
| ( none ) |
outline-mode |
Toggle outline mode. |
| C-c C-n Headings → Next |
outline-next-visible-heading |
Move to the next heading. |
| C-c C-p Headings → Previous |
outline-previous-visible-heading |
Move to the previous heading. |
| C-c C-f Headings → Next Same Level |
outline-forward-same-level |
Move to the next heading of the same level. |
| C-c C-b Headings → Previous Same Level |
outline-backward-same-level |
Move to the previous heading of same level. |
| C-c C-u Headings → Up |
outline-up-heading |
Move up one heading level. |
| C-c C-t Hide → Hide Body |
hide-body |
Hide all body lines. |
| C-c C-a Show → Show All |
show-all |
Show everything that's hidden. |
| C-c C-q Hide → Hide Sublevels |
hide-sublevels |
Display first level headers only. |
| C-c C-o Hide → Hide Other |
hide-other |
Hide all text and headings outside the current subtree. First level headers show. |
| C-c @ |
outline-mark-subtree |
Mark the current header and all sublevels. |
| C-c C-^ |
outline-promote |
Promote the current heading one level. |
| C-c C-v |
outline-demote |
Demote the current heading one level. |
| C-c C-d Hide → Hide Subtree |
hide-subtree |
Hide subheads and body associated with a given heading. |
| C-c C-c Hide → Hide Entry |
hide-entry |
Hide the body associated with a particular heading (not subheads and their bodies). |
| C-c C-l Hide → Hide Leaves |
hide-leaves |
Hide the body of a particular heading and the bodies of all its subheads. |
| C-c C-s Show → Show Subtree |
show-subtree |
Show the subheads and text associated with a given heading. |
| C-c C-e Show → Show Entry |
show-entry |
Show the body associated with a particular heading (not subheads and their bodies). |
| C-c C-k Show → Show Branches |
show-branches |
Show the body of a heading and bodies of all its subheads. |
| C-c Tab Show → Show Children |
show-children |
Show the next level of subheads associated with a particular heading (none of body text). |
When you mark regions to move or delete, they always cover the full width of the window. Editing by region is fine for most of the work that you do in Emacs. But what if you wanted to edit a table? Regions cover the full width of the window, so they can't handle columns. Emacs offers another way to define areas to delete, copy, and move around: using rectangles . Rectangles are just what they sound like: rectangular areas that you define and manipulate using special rectangle editing commands. Editing with rectangles is useful whenever you want to move or delete vertical columns of information; for instance, moving a column of a table or rearranging fields in a dataset.
For example, let's say you want to edit the following table, moving the "Hours" column to the right side. There's no way to do this using regions, but it's easy to do if you learn some rectangle editing commands.
Initial state:
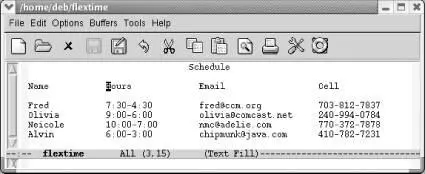
A flextime schedule.
You define a rectangle the same way you define a region; the commands you use after marking the area tell Emacs whether you want to work with a region or a rectangle. (This is a good time to let go of your mouse and use keyboard commands for marking the text. Highlighting remains horizontal when you're working with rectangles and will only confuse you as you begin to think rectangularly. Of course, there's nothing wrong with using the mouse to move the cursor quickly; just don't use it to highlight text.)
Before we start working with these columns, select the buffer with C-x hand untabify it by typing M-x untabify. Rectangle editing works best with files that do not contain tab characters.
To define a rectangle, move the cursor to the upper-left corner and set the mark by pressing C-Space, then move the cursor to the lower-right corner of the rectangle. Once you're at the lower-right corner of the rectangle, move one character farther. Why move one character farther? Remember that when you define a region, the character that the cursor is on isn't part of the region. (The character that the mark is on is part of the region.)
Let's define a rectangle that covers the second column of our table.
Move to the Hin Hoursand type C-Space
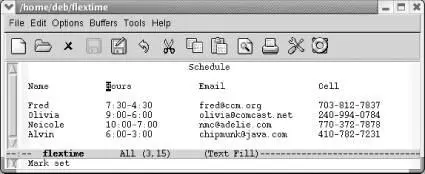
The mark is set at the upper-left corner of the rectangle to be moved.
Move the cursor to the space following the bottom-right corner of the rectangle, the cin chipmunk.
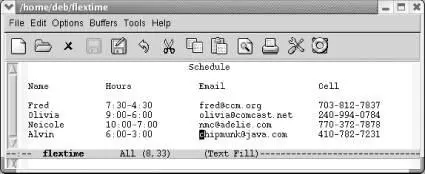
The cursor follows the bottom-right corner of the rectangle.
Now that the rectangle is marked, we want to delete it and then move it. The command to delete a rectangle so you can retrieve it elsewhere is C-x r k(for kill-rectangle).
Читать дальше
