The most basic thing you can do is a simple GET request on an endpoint that doesn’t require authentication. This could be a user or read-only information on an open source project. For example, if we want to know more about a user named “schacon”, we can run something like this:
$ curl https: //api.github.com/users/schacon
{
"login" : "schacon" ,
"id" : 70,
"avatar_url" : "https://avatars.githubusercontent.com/u/70" ,
# …
"name" : "Scott Chacon" ,
"company" : "GitHub" ,
"following" : 19,
"created_at" : "2008-01-27T17:19:28Z" ,
"updated_at" : "2014-06-10T02:37:23Z"
}
There are tons of endpoints like this to get information about organizations, projects, issues, commits — just about anything you can publicly see on GitHub. You can even use the API to render arbitrary Markdown or find a .gitignore template.
$ curl https: //api.github.com/gitignore/templates/Java
{
"name" : "Java" ,
"source" : "*.class
# Mobile Tools for Java (J2ME)
.mtj.tmp/
# Package Files #
*.jar
*.war
*.ear
# virtual machine crash logs, see http://www.java.com/en/download/help/error_hotspot.xml
hs_err_pid*
"
}
However, if you want to do an action on the website such as comment on an Issue or Pull Request or if you want to view or interact with private content, you’ll need to authenticate.
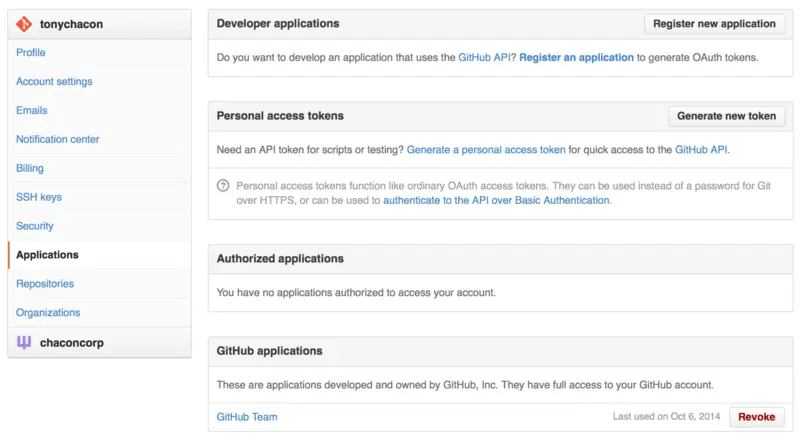
There are several ways to authenticate. You can use basic authentication with just your username and password, but generally it’s a better idea to use a personal access token. You can generate this from the “Applications” tab of your settings page.

Рисунок 53. Generate your access token from the “Applications” tab of your settings page.
It will ask you which scopes you want for this token and a description. Make sure to use a good description so you feel comfortable removing the token when your script or application is no longer used.
GitHub will only show you the token once, so be sure to copy it. You can now use this to authenticate in your script instead of using a username and password. This is nice because you can limit the scope of what you want to do and the token is revokable.
This also has the added advantage of increasing your rate limit. Without authenticating, you will be limited to 60 requests per hour. If you authenticate you can make up to 5,000 requests per hour.
So let’s use it to make a comment on one of our issues. Let’s say we want to leave a comment on a specific issue, Issue #6. To do so we have to do an HTTP POST request to repos///issues//comments with the token we just generated as an Authorization header.
$ curl -H "Content-Type: application/json" \
-H "Authorization: token TOKEN" \
--data '{"body":"A new comment, :+1:"}' \
https: //api.github.com/repos/schacon/blink/issues/6/comments
{
"id" : 58322100,
"html_url" : "https://github.com/schacon/blink/issues/6#issuecomment-58322100" ,
...
"user" : {
"login" : "tonychacon" ,
"id" : 7874698,
"avatar_url" : "https://avatars.githubusercontent.com/u/7874698?v=2" ,
"type" : "User" ,
},
"created_at" : "2014-10-08T07:48:19Z" ,
"updated_at" : "2014-10-08T07:48:19Z" ,
"body" : "A new comment, :+1:"
}
Now if you go to that issue, you can see the comment that we just successfully posted as in A comment posted from the GitHub API..

Рисунок 54. A comment posted from the GitHub API.
You can use the API to do just about anything you can do on the website — creating and setting milestones, assigning people to Issues and Pull Requests, creating and changing labels, accessing commit data, creating new commits and branches, opening, closing or merging Pull Requests, creating and editing teams, commenting on lines of code in a Pull Request, searching the site and on and on.
Changing the Status of a Pull Request
One final example we’ll look at since it’s really useful if you’re working with Pull Requests. Each commit can have one or more statuses associated with it and there is an API to add and query that status.
Most of the Continuous Integration and testing services make use of this API to react to pushes by testing the code that was pushed, and then report back if that commit has passed all the tests. You could also use this to check if the commit message is properly formatted, if the submitter followed all your contribution guidelines, if the commit was validly signed — any number of things.
Let’s say you set up a webhook on your repository that hits a small web service that checks for a Signed-off-by string in the commit message.
require 'httparty'
require 'sinatra'
require 'json'
post '/payload' do
push = JSON.parse(request.body.read) # parse the JSON
repo_name = push[ 'repository' ][ 'full_name' ]
# look through each commit message
push[ "commits" ].each do|commit|
# look for a Signed-off-by string
if /Signed-off-by/ .match commit[ 'message' ]
state = 'success'
description = 'Successfully signed off!'
else
state = 'failure'
description = 'No signoff found.'
end
# post status to GitHub
sha = commit[ "id" ]
status_url = "https://api.github.com/repos/ #{ repo_name }/statuses/ #{ sha }"
status = {
"state" => state,
"description" => description,
"target_url" => "http://example.com/how-to-signoff" ,
"context" => "validate/signoff"
}
HTTParty.post(status_url,
:body => status.to_json,
:headers => {
'Content-Type' => 'application/json' ,
'User-Agent' => 'tonychacon/signoff' ,
'Authorization' => "token #{ ENV[ 'TOKEN' ] }" }
)
end
end
Hopefully this is fairly simple to follow. In this web hook handler we look through each commit that was just pushed, we look for the string Signed-off-by in the commit message and finally we POST via HTTP to the /repos///statuses/ API endpoint with the status.
In this case you can send a state ( success , failure , error ), a description of what happened, a target URL the user can go to for more information and a “context” in case there are multiple statuses for a single commit. For example, a testing service may provide a status and a validation service like this may also provide a status — the “context” field is how they’re differentiated.
Читать дальше


