Andrew Hudson - Fedora™ Unleashed, 2008 edition
Здесь есть возможность читать онлайн «Andrew Hudson - Fedora™ Unleashed, 2008 edition» весь текст электронной книги совершенно бесплатно (целиком полную версию без сокращений). В некоторых случаях можно слушать аудио, скачать через торрент в формате fb2 и присутствует краткое содержание. Город: Indianapolis, Год выпуска: 2008, ISBN: 2008, Издательство: Sams Publishing, Жанр: ОС и Сети, на английском языке. Описание произведения, (предисловие) а так же отзывы посетителей доступны на портале библиотеки ЛибКат.

- Название:Fedora™ Unleashed, 2008 edition
- Автор:
- Издательство:Sams Publishing
- Жанр:
- Год:2008
- Город:Indianapolis
- ISBN:978-0-672-32977-7
- Рейтинг книги:5 / 5. Голосов: 1
-
Избранное:Добавить в избранное
- Отзывы:
-
Ваша оценка:
Fedora™ Unleashed, 2008 edition: краткое содержание, описание и аннотация
Предлагаем к чтению аннотацию, описание, краткое содержание или предисловие (зависит от того, что написал сам автор книги «Fedora™ Unleashed, 2008 edition»). Если вы не нашли необходимую информацию о книге — напишите в комментариях, мы постараемся отыскать её.
Finding information you need is not always easy. This short index provides a list of common tasks discussed inside this book. Browse the table of contents or index for detailed listings and consult the specified chapter for in-depth discussions about each subject.
left How Do I…?
See…
How Do I…?
See…
left Back up my system?
Chapter 13
Partition a hard drive?
Appendix B, Chapters 1, 35
left Build a new Linux kernel?
Chapter 36
Play MP3s and other music?
Chapter 7
left Burn a CD?
Chapter 7
Print a file?
Chapter 8
left Change a password?
Chapter 4
Read a text file?
Chapter 4
left Change the date and time?
Chapter 32
Read or send email?
Chapter 21
left Compress a file?
Chapter 13
Read or post to newsgroups?
Chapter 5
left Configure a modem?
Chapter 2
Reboot Fedora?
Chapter 1
left Configure a printer?
Chapter 8
Rescue my system?
Chapter 13
left Configure a scanner?
Chapter 7
Set up a DNS server?
Chapter 23
left Configure a sound card?
Chapter 7
Set up a firewall?
Chapter 14
left Configure my desktop settings?
Chapter 3
Set up a web server?
Chapter 15
left Connect to the Internet?
Chapter 5
Set up an FTP server?
Chapter 20
left Control a network interface?
Chapter 14
Set up Samba with SWAT?
Chapter 19
left Copy files or directories?
Chapters 13, 32
Set up wireless networking?
Chapter 14
left Create a boot disk to boot Fedora?
Chapter 1
Shut down Fedora?
Chapter 1
left Create a database?
Chapter 16
Use a spreadsheet?
Chapter 6
left Create a user?
Chapter 4
Use Instant Messaging?
Chapter 5
left Delete a file or directory?
Chapter 32
Watch television on my computer?
Chapter 7
left Get images from a digital camera?
Chapter 7
Edit a text file?
Chapter 4
left Install Fedora?
Chapter 1
Make Fedora more secure?
Chapter 14
left Log in to Fedora?
Chapter 1
Mount a CD-ROM or hard drive?
Chapter 35
Fedora™ Unleashed, 2008 edition — читать онлайн бесплатно полную книгу (весь текст) целиком
Ниже представлен текст книги, разбитый по страницам. Система сохранения места последней прочитанной страницы, позволяет с удобством читать онлайн бесплатно книгу «Fedora™ Unleashed, 2008 edition», без необходимости каждый раз заново искать на чём Вы остановились. Поставьте закладку, и сможете в любой момент перейти на страницу, на которой закончили чтение.
Интервал:
Закладка:
Next, create and edit a new file called people.ldif. This is where you will define entries for your address book, also using LDIF. Here are the people we used in our example:
dn: cn=Paul Hudson,ou=People,dc=hudzilla,dc=org
objectClass: inetOrgPerson
cn: Paul Hudson
cn: Hudzilla
mail: paul@hudzilla.org
jpegPhoto:< file:///home/paul/paulhudson.jpg
sn: Hudson
dn: cn=Andrew Hudson,ou=People,dc=hudzilla,dc=org
objectClass: inetOrgPerson
cn: Andrew Hudson
cn: IzAndy
mail: andrew@hudzilla.org
sn: Hudson
dn: cn=Nick Veitch,ou=People,dc=hudzilla,dc=org
objectClass: inetOrgPerson
cn: Nick Veitch
cn: CrackAttackKing
mail: nick@hudzilla.org
sn: Veitch
There are three entries there, again separated by empty lines. Each person has a DN that is made up of his common name (CN), organizational unit (OU), and domain components (DCs). He also has an objectClassdefinition, inetOrgPerson, which gives him standard attributes such as an email address, a photograph, and a telephone number. Entities of type inetOrgPersonmust have a CN and an SN (surname), so you will see them in this code.
Note also that each person has two common names: his actual name and a nickname. Not all LDAP clients support more than one CN, but there is no harm in having several as long as the main one comes first and is listed in the DN.
Having multiple key/value pairs, like multiple CNs, is one of the defining features of LDAP. In today's interconnected world, few people can be defined in a single set of attributes because they have home phone numbers, work phone numbers, cell phone numbers, plus several email addresses, and potentially even a selection of offices where they hot desk. Using multiple CNs and other attributes allows you to properly record these complex scenarios.
The jpegPhotoattribute for the first entity has very particular syntax. Immediately after the colon you use an opening angle bracket ( <), followed by a space and then the location of the person's picture. Because the picture is local, it is prefixed with file://. It is in /home/paul/paulhudson.jpg, so the whole URL is file:///home/paul/paulhudson.jpg.
After you have edited the file to include the people in your organization, save it and close the editor. As root, issue these two commands:
ldapadd -x -W -D "cn=root,dc=hudzilla,dc=org" -f base.ldif
ldapadd -x -W -D "cn=root,dc=hudzilla,dc=org" -f people.ldif
The ldapadd command is used to convert LDIF into live directory content and, most importantly, can be executed while your LDAP server is running. The -xparameter means to use only basic authentication, which means you need to supply the root username and password. -Wmeans to prompt you for the password. -Dlets you specify a DN for your username, and immediately after the -D, we specify the root DN as set earlier in slapd.conf. Finally, -fmeans to use the LDIF from the following file.
When you run them, you are prompted for the root password you set earlier. On entering it, you should see confirmation messages as your entries are added, like this:
adding new entry "cn=Paul Hudson,ou=People,dc=hudzilla,dc=org"
If you see an error such as ldap_bind: Can't contact LDAP server (-1), you need to start the LDAP server by typing service ldap start . The most likely sources of other errors are typing errors. LDIF is a precise format, even down to its use of whitespace.
To test that the directory has been populated and that your configuration settings are correct, run this command:
ldapsearch -x 'objectclass=*'
The ldapsearchcommand does what you might expect: It queries the LDAP directory from the command line. Again, -x means to use simple authentication, although in this situation you do not need to provide any credentials because you are only reading from the directory. The objectclass=*search specifies that you're searching for any entry of any objectclass, so the search will return all the entries in your directory.
You can amend the search to be more specific, for example:
ldapsearch -x 'cn=Ni*'
This returns all people with a common name that begins with Ni. If you get results for your searches, you are ready to configure your clients.
OpenLDAP needs specific permissions for its files. The /var/lib/ldapdirectory should be owned by user ldapand group ldap, with permissions 600. If you experience problems, try running chmod 600 /var/lib/ldap.
Configuring Clients
Although Fedora comes with a selection of email clients, there is not enough room here to cover them all. So we will discuss the two most frequently used clients: Evolution, the default, and Thunderbird. Both are powerful messaging solutions and so both work well with LDAP. Of the two, Thunderbird seems to be the easier to configure. We have had various problems with Evolution in situations where Thunderbird has worked the first time.
Evolution
To configure Evolution for LDAP, click the arrow next to the New button and select Address Book. A new screen appears, the first option of which prompts you for the type of address book to create. Select On LDAP Servers.
For Name, just enter Address book , and for Server, enter the IP address of your LDAP server (or 127.0.0.1 if you are working on the server), as shown in Figure 24.1. Leave the port as 389, which is the default for slapd. Switch to the Details tab, and set Search Base to be the DN for your address book — for example, ou=People,dc=hudzilla,dc=org. Set Search Scope to be Sub so that Evolution will perform a comprehensive search. To finish, click Add Address Book.
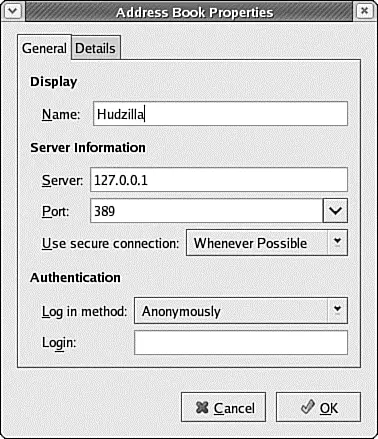
FIGURE 24.1 Configuring Evolution to use LDAP for addresses is easy for anonymous connections.
Although Evolution is now configured to use your directory, it will not use it for email address autocompletion just yet. To enable that, go to the Tools menu and click Settings. From the options that appear on the left, click Autocompletion and select your LDAP server from the list. Click Close and then create a new email message. If everything has worked, typing part of someone's name should pop up a box with LDAP matches.
Thunderbird
Thunderbird is a little easier to configure than Evolution and tends to work better, particularly with entries that have multiple CNs. To enable autocompletion, go to the Tools menu, click Options, and then select Composition from the tab on the left.
Check the Directory Server box and click the Edit Directories button to its right. From the dialog box that appears, click Add to add a new directory. You can give it any name you want because this is merely for display purposes. As shown in Figure 24.2, set the Hostname field to be the IP address of your LDAP server (or 127.0.0.1 if you are working on the server). Set the Base DN to be the DN for your address book (for instance, ou=People,dc=hudzilla,dc=org ), and leave the port number as 389. Click OK three times to get back to the main interface.
Интервал:
Закладка:
Похожие книги на «Fedora™ Unleashed, 2008 edition»
Представляем Вашему вниманию похожие книги на «Fedora™ Unleashed, 2008 edition» списком для выбора. Мы отобрали схожую по названию и смыслу литературу в надежде предоставить читателям больше вариантов отыскать новые, интересные, ещё непрочитанные произведения.


![Andrew Radford - Linguistics An Introduction [Second Edition]](/books/397851/andrew-radford-linguistics-an-introduction-second-thumb.webp)


Обсуждение, отзывы о книге «Fedora™ Unleashed, 2008 edition» и просто собственные мнения читателей. Оставьте ваши комментарии, напишите, что Вы думаете о произведении, его смысле или главных героях. Укажите что конкретно понравилось, а что нет, и почему Вы так считаете.