Andrew Hudson - Fedora™ Unleashed, 2008 edition
Здесь есть возможность читать онлайн «Andrew Hudson - Fedora™ Unleashed, 2008 edition» весь текст электронной книги совершенно бесплатно (целиком полную версию без сокращений). В некоторых случаях можно слушать аудио, скачать через торрент в формате fb2 и присутствует краткое содержание. Город: Indianapolis, Год выпуска: 2008, ISBN: 2008, Издательство: Sams Publishing, Жанр: ОС и Сети, на английском языке. Описание произведения, (предисловие) а так же отзывы посетителей доступны на портале библиотеки ЛибКат.

- Название:Fedora™ Unleashed, 2008 edition
- Автор:
- Издательство:Sams Publishing
- Жанр:
- Год:2008
- Город:Indianapolis
- ISBN:978-0-672-32977-7
- Рейтинг книги:5 / 5. Голосов: 1
-
Избранное:Добавить в избранное
- Отзывы:
-
Ваша оценка:
Fedora™ Unleashed, 2008 edition: краткое содержание, описание и аннотация
Предлагаем к чтению аннотацию, описание, краткое содержание или предисловие (зависит от того, что написал сам автор книги «Fedora™ Unleashed, 2008 edition»). Если вы не нашли необходимую информацию о книге — напишите в комментариях, мы постараемся отыскать её.
Finding information you need is not always easy. This short index provides a list of common tasks discussed inside this book. Browse the table of contents or index for detailed listings and consult the specified chapter for in-depth discussions about each subject.
left How Do I…?
See…
How Do I…?
See…
left Back up my system?
Chapter 13
Partition a hard drive?
Appendix B, Chapters 1, 35
left Build a new Linux kernel?
Chapter 36
Play MP3s and other music?
Chapter 7
left Burn a CD?
Chapter 7
Print a file?
Chapter 8
left Change a password?
Chapter 4
Read a text file?
Chapter 4
left Change the date and time?
Chapter 32
Read or send email?
Chapter 21
left Compress a file?
Chapter 13
Read or post to newsgroups?
Chapter 5
left Configure a modem?
Chapter 2
Reboot Fedora?
Chapter 1
left Configure a printer?
Chapter 8
Rescue my system?
Chapter 13
left Configure a scanner?
Chapter 7
Set up a DNS server?
Chapter 23
left Configure a sound card?
Chapter 7
Set up a firewall?
Chapter 14
left Configure my desktop settings?
Chapter 3
Set up a web server?
Chapter 15
left Connect to the Internet?
Chapter 5
Set up an FTP server?
Chapter 20
left Control a network interface?
Chapter 14
Set up Samba with SWAT?
Chapter 19
left Copy files or directories?
Chapters 13, 32
Set up wireless networking?
Chapter 14
left Create a boot disk to boot Fedora?
Chapter 1
Shut down Fedora?
Chapter 1
left Create a database?
Chapter 16
Use a spreadsheet?
Chapter 6
left Create a user?
Chapter 4
Use Instant Messaging?
Chapter 5
left Delete a file or directory?
Chapter 32
Watch television on my computer?
Chapter 7
left Get images from a digital camera?
Chapter 7
Edit a text file?
Chapter 4
left Install Fedora?
Chapter 1
Make Fedora more secure?
Chapter 14
left Log in to Fedora?
Chapter 1
Mount a CD-ROM or hard drive?
Chapter 35
Fedora™ Unleashed, 2008 edition — читать онлайн бесплатно полную книгу (весь текст) целиком
Ниже представлен текст книги, разбитый по страницам. Система сохранения места последней прочитанной страницы, позволяет с удобством читать онлайн бесплатно книгу «Fedora™ Unleashed, 2008 edition», без необходимости каждый раз заново искать на чём Вы остановились. Поставьте закладку, и сможете в любой момент перейти на страницу, на которой закончили чтение.
Интервал:
Закладка:
You will use the following commands to manage electronic mail in Fedora:
► balsa — A GNOME mail user agent for X
► biff — A console-based mail notification utility
► evolution — A comprehensive and capable Ximian GNOME mail PIM for X
► fetchmail — A console-based and daemon-mode mail retrieval command for Linux
► fetchmailconf — A graphical Fetchmail configuration client for X
► kmail — A graphical mail user client for KDE and X
► korn — A biff applet for KDE and X
► mail — A console-based mail user agent
► mutt — A console-based mail user agent
► sendmail — A comprehensive mail transport agent for UNIX and Linux
► xbiff — A mail notification X client
Reference
The following references are recommended reading for email configuration. Of course, not all references apply to you. Select the ones that apply to the email server that you are using.
Web Resources
► http://www.sendmail.org/— This is the Sendmail home page. Here you can find configuration information and FAQs regarding the Sendmail MTA.
► http://www.postfix.org/— This is the Postfix home page. If you are using the Postfix MTA, documentation and sample configurations can be found at this site.
► http://www.qmail.org/— This is the home page for the Qmail MTA. It contains documentation and links to other resources on Qmail.
► http://www.linuxgazette.com/issue35/jao.html— IMAP on Linux: A Practical Guide. The Internet Mail Access Protocol allows a user to access his email stored on a remote server rather than a local disk.
► http://www.imap.org/about/whatisIMAP.html— A page describing what IMAP is.
► http://www.rfc-editor.org/— A repository of RFCs that define the technical "rules" of modern computer usage.
► http://www.procmail.org/— The Procmail home page.
► http://www.ibiblio.org/pub/Linux/docs/HOWTO/other-formats/html_single/Qmail-VMailMgr-Courier-imap-HOWTO.html— If you want some help configuring a mail system based on the lesser-used applications, this HOWTO can help.
Books
► Sendmail , from O'Reilly Publishing. This is the de facto standard guide for everything Sendmail. It is loaded with more than 1,000 pages, which gives you an idea of how complicated Sendmail really is.
► Postfix , from Sams Publishing. An excellent book that covers the Postfix MTA.
► Running Qmail , from Sams Publishing. This is similar to the Postfix book from Sams Publishing except that it covers the Qmail MTA.
CHAPTER 22
Setting Up a Proxy Server
There are two things in this world that you can never have enough of: time and bandwidth. Fedora comes with a proxy server — Squid — that enables you to cache web traffic on your server so that websites load faster and users consume less bandwidth.
What Is a Proxy Server?
A proxy server lies between client machines — the desktops in your company—and the Internet. As clients request websites, they do not connect directly to the web and send the HTTP request. Instead, they connect to the local proxy server. The proxy then forwards their requests on to the web, retrieves the result, and hands it back to the client. At its simplest, a proxy server really is just an extra layer between client and server, so why bother?
The three main reasons for deploying a proxy server are
► Content control— You want to stop people whiling away their work hours reading the news or downloading MP3s.
► Speed— You want to cache common sites to make the most of your bandwidth.
► Security— You want to monitor what people are doing.
Squid is capable of achieving all of these goals and more.
Installing Squid
Squid installation is handled through the Add/Remove Applications dialog under the System Settings menu. The Squid package is confusingly located under the Web Server group; this has the downside of installing Apache alongside Squid whether you like it or not. That said, you can (and should) deselect other autoinstall packages that you do not need from the Web Server category.
After Squid is installed, switch to the console and use suto get to the root account. You should run the command chkconfig --level 345 squid onto run Squid at runlevels 3, 4, and 5, like this:
[root@susannah ~]# chkconfig --list squid
squid 0:off 1:off 2:off 3:off 4:off 5:off 6:off
[root@susannah ~]# chkconfig --level 345 squid on
[root@susannah ~]# chkconfig --list squid
squid 0:off 1:off 2:off 3:on 4:on 5:on 6:off
That runs Squid the next time the system switches to runlevel 3, 4, or 5, but it will not run it just yet.
Configuring Clients
Before you configure your new Squid server, you should set up the local web browser to use Squid for its web access. This allows you to test your rules as you are working with the configuration file.
To configure Firefox, select Preferences from the Edit menu. From the dialog that appears, click the Connection Settings button (near the bottom on the General tab) and select the option Manual Proxy Configuration. Check the box beneath it, Use the Same Proxy for All Protocols; then enter 127.0.0.1 as the IP address and 3128 as the port number. See Figure 22.1 for how this should look. If you are configuring a remote client, specify the IP address of the Squid server instead of 127.0.0.1.
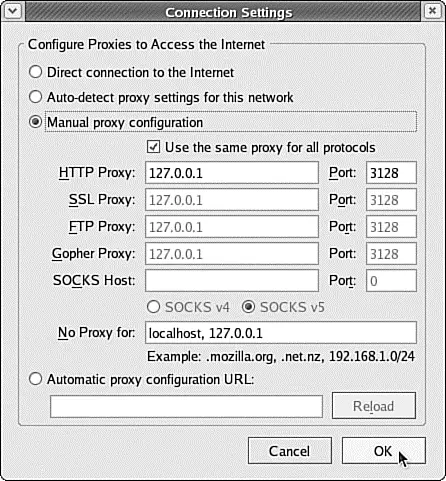
FIGURE 22.1 Setting up Firefox to use 127.0.0.1 routes all its web requests through Squid.
For Konqueror, go to the Settings menu and select Configure Konqueror. From the left tab, scroll down to Proxy, select Manually Specify the Proxy Settings, and then click Setup. Enter 127.0.0.1 as the proxy IP address and 3128 as the port. As with Firefox, if you are configuring a remote client, specify the IP address of the Squid server instead of 127.0.0.1.
Internet Explorer's proxy settings are in Tools/Internet Options. From the Connections tab, click the LAN Settings button and enable the Use a Proxy Server for Your LAN option. Enter the address as the IP of your Squid machine, and then specify 3128as the port.
Access Control Lists
The main Squid configuration file is /etc/squid/squid.conf, and the default Fedora configuration file is full of comments to help guide you. The default configuration file allows full access to the local machine but denies the rest of your network. This is a secure place to start; we recommend you try all the rules on yourself ( localhost) before rolling them out to other machines.
Before you start, open two terminal windows as root. In the first, change to the directory /var/log/squidand run this command:
Интервал:
Закладка:
Похожие книги на «Fedora™ Unleashed, 2008 edition»
Представляем Вашему вниманию похожие книги на «Fedora™ Unleashed, 2008 edition» списком для выбора. Мы отобрали схожую по названию и смыслу литературу в надежде предоставить читателям больше вариантов отыскать новые, интересные, ещё непрочитанные произведения.


![Andrew Radford - Linguistics An Introduction [Second Edition]](/books/397851/andrew-radford-linguistics-an-introduction-second-thumb.webp)


Обсуждение, отзывы о книге «Fedora™ Unleashed, 2008 edition» и просто собственные мнения читателей. Оставьте ваши комментарии, напишите, что Вы думаете о произведении, его смысле или главных героях. Укажите что конкретно понравилось, а что нет, и почему Вы так считаете.