William Stanek - Windows Server 2012 R2 Storage, Security, & Networking Pocket Consultant
Здесь есть возможность читать онлайн «William Stanek - Windows Server 2012 R2 Storage, Security, & Networking Pocket Consultant» весь текст электронной книги совершенно бесплатно (целиком полную версию без сокращений). В некоторых случаях можно слушать аудио, скачать через торрент в формате fb2 и присутствует краткое содержание. Жанр: ОС и Сети, на английском языке. Описание произведения, (предисловие) а так же отзывы посетителей доступны на портале библиотеки ЛибКат.
- Название:Windows Server 2012 R2 Storage, Security, & Networking Pocket Consultant
- Автор:
- Жанр:
- Год:неизвестен
- ISBN:нет данных
- Рейтинг книги:3 / 5. Голосов: 1
-
Избранное:Добавить в избранное
- Отзывы:
-
Ваша оценка:
Windows Server 2012 R2 Storage, Security, & Networking Pocket Consultant: краткое содержание, описание и аннотация
Предлагаем к чтению аннотацию, описание, краткое содержание или предисловие (зависит от того, что написал сам автор книги «Windows Server 2012 R2 Storage, Security, & Networking Pocket Consultant»). Если вы не нашли необходимую информацию о книге — напишите в комментариях, мы постараемся отыскать её.
Windows Server 2012 R2 Storage, Security, & Networking Pocket Consultant — читать онлайн бесплатно полную книгу (весь текст) целиком
Ниже представлен текст книги, разбитый по страницам. Система сохранения места последней прочитанной страницы, позволяет с удобством читать онлайн бесплатно книгу «Windows Server 2012 R2 Storage, Security, & Networking Pocket Consultant», без необходимости каждый раз заново искать на чём Вы остановились. Поставьте закладку, и сможете в любой момент перейти на страницу, на которой закончили чтение.
Интервал:
Закладка:
Disk Management has three views: Disk List, Graphical View, and Volume List.
With remote systems, you’re limited in the tasks you can perform with Disk Management. Remote management tasks you can perform include viewing drive details, changing drive letters and paths, and converting disk types. With removable media drives, you can also eject media remotely. To perform more advanced manipulation of remote drives, you can use the DiskPart command-line utility.
NOTE You should be aware that if you create a partition but don’t format it, the partition is labeled as Free Space. In addition, if you haven’t assigned a portion of the disk to a partition, this section of the disk is labeled Unallocated.
In Figure 1–1, the Volume List view is in the upper-right corner, and the Graphical View is in the lower-right corner. This is the default configuration. You can change the view for the top or bottom pane as follows:
■To change the top view, select View, choose Top, and then select the view you want to use.
■To change the bottom view, select View, choose Bottom, and then select the view you want to use.
■To hide the bottom view, select View, choose Bottom, and then select Hidden.

FIGURE 1–1In Disk Management, the upper view provides a detailed summary of all the drives on the computer, and the lower view provides an overview of the same drives by default.
Windows Server 2012 R2 supports four types of disk configurations:
■ BasicThe standard fixed disk type. Basic disks are divided into partitions and are the original disk type for early Windows operating systems.
■ DynamicAn enhanced fixed disk type that you can update without having to restart the operating system (in most cases). Dynamic disks are divided into volumes.
■ RemovableThe standard disk type associated with removable storage devices.
■ VirtualThe virtual hard disk (VHD) disk type associated with virtualization. Computers can use VHDs just like they use regular fixed disks and can even be configured to boot from a VHD.
These disk configurations can be used with legacy storage approaches as well as standards-based storage. From the Disk Management window, you can get more detailed information on a drive section by pressing and holding or right-clicking it, and then selecting Properties. When you do this, you get a dialog box. Figure 1–2 shows the dialog boxes for two fixed disks. The one on the left uses NTFS, and the one on the right uses ReFS. Both disks have additional tabs based on the server configuration.
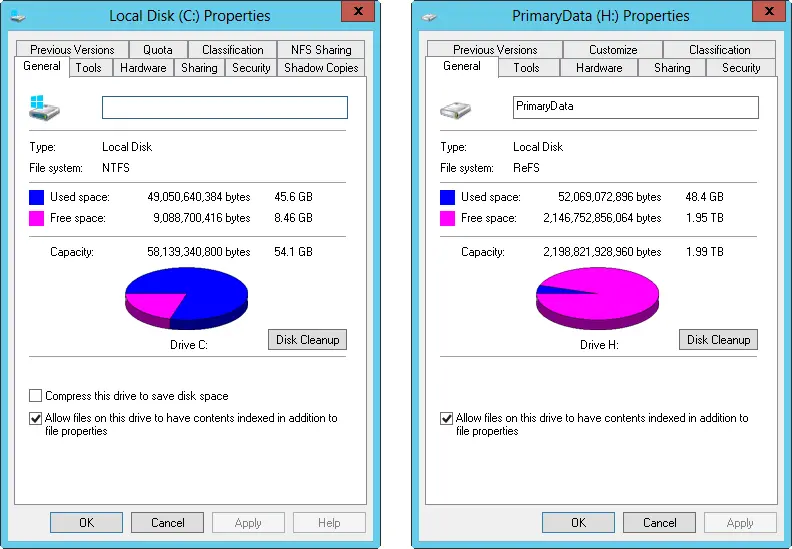
FIGURE 1–2The General tab of the Properties dialog box provides detailed information about a drive.
If you’ve configured remote management through Server Manager and MMCs, as discussed in Chapter 2, you can use Disk Management to configure and work with disks on remote computers. Keep in mind, however, that your options are slightly different from when you are working with the disks on a local computer.
Tasks you can perform include the following:
■Viewing limited disk properties, but not volume properties. When you are viewing disk properties, you’ll see only the General and Volumes tabs. You won’t be able to see volume properties.
■Changing drive letters and mount paths.
■Formatting, shrinking, and extending volumes. With mirrored, spanned, and striped volumes, you are able to add and configure related options.
■Deleting volumes (except for system and boot volumes).
■Creating, attaching, and detaching VHDs. When you create and attach VHDs, you need to enter the full file path and won’t be able to browse for the.vhd file.
Some tasks you perform with disks and volumes depend on the Plug and Play and Remote Registry services.
Using removable storage devices
Removable storage devices can be formatted with ReFS, NTFS, FAT, FAT32, or exFAT. You connect external storage devices to a computer rather than installing them inside the computer. This makes external storage devices easier and faster to install than most fixed disk drives. Most external storage devices have either a USB or a FireWire interface. When working with USB and FireWire, the transfer speed and overall performance of the device from a user’s perspective depends primarily on the version supported. Currently, several versions of USB and FireWire are used.
USB 2.0 is the current industry standard until the world transitions to USB 3.0. USB 2.0 devices can be rated as either full speed (up to 12 Mbps) or high speed (up to 480 Mbps). Although high-speed USB 2.0 supports data transfers at a maximum rate of 480 Mbps, sustained data-transfer rates are usually 10–30 Mbps. The actual sustainable transfer rate depends on many factors, including the type of device, the data you are transferring, and the speed of a computer. Each USB controller on a computer has a fixed amount of bandwidth, which all devices attached to the controller must share. The data transfer rates are significantly slower if a computer’s USB port is an earlier version than the device you are using. For example, if you connect a USB 3.0 device to a USB 2.0 port or vice versa, the device operates at the significantly reduced USB 2.0 transfer speed.
USB 1.0, 1.1, and 2.0 ports all look alike; however, most USB 3.0 ports I’ve seen have a special color to differentiate them. Still, the best way to determine which type of USB ports a computer has is to refer to the documentation that comes with the computer. Newer monitors have USB 2.0 ports to which you can connect devices as well. When you have USB devices connected to a monitor, the monitor acts like a USB hub device. As with any USB hub device, all devices attached to the hub share the same bandwidth, and the total available bandwidth is determined by the speed of the USB input to which the hub is connected on a computer.
FireWire (IEEE 1394) is a high-performance connection standard that uses a peerto-peer architecture in which peripherals negotiate bus conflicts to determine which device can best control a data transfer. Like USB, several versions of FireWire are currently used. FireWire 400 (IEEE 1394a) has maximum sustained transfer rates of up to 400 Mbps. IEEE 1394b allows 400 Mbps (S400), 800 Mbps (S800), and 1600 Mbps (S1600). As with USB devices, if you connect an IEEE 1394b device to an IEEE 1394a port or vice versa, the device operates at the significantly reduced FireWire 400 transfer speed.
As with USB ports, the sustained transfer rate for IEEE 1394a and IEEE 1394b ports will be considerably less than the maximum rate possible. IEEE 1394a and IEEE 1394b ports and cables have different shapes, making it easier to tell the difference between them-if you know what you’re looking for. FireWire 400 cables without bus power have four pins and four connectors. FireWire 400 cables with bus power have six pins and six connectors. FireWire 800 and FireWire 1600 cables always have bus power and have nine pins and nine connectors.
Another option is external SATA (eSATA), which is available on newer computers and is an ultra-high-performance connection for data transfer to and from external mass storage devices. eSATA operates at speeds up to 6 Gbps. If your computer doesn’t come with eSATA ports, you can add support for eSATA devices by installing an eSATA controller card.
Читать дальшеИнтервал:
Закладка:
Похожие книги на «Windows Server 2012 R2 Storage, Security, & Networking Pocket Consultant»
Представляем Вашему вниманию похожие книги на «Windows Server 2012 R2 Storage, Security, & Networking Pocket Consultant» списком для выбора. Мы отобрали схожую по названию и смыслу литературу в надежде предоставить читателям больше вариантов отыскать новые, интересные, ещё непрочитанные произведения.


Обсуждение, отзывы о книге «Windows Server 2012 R2 Storage, Security, & Networking Pocket Consultant» и просто собственные мнения читателей. Оставьте ваши комментарии, напишите, что Вы думаете о произведении, его смысле или главных героях. Укажите что конкретно понравилось, а что нет, и почему Вы так считаете.