William Stanek - Windows Server 2012 R2 Storage, Security, & Networking Pocket Consultant
Здесь есть возможность читать онлайн «William Stanek - Windows Server 2012 R2 Storage, Security, & Networking Pocket Consultant» весь текст электронной книги совершенно бесплатно (целиком полную версию без сокращений). В некоторых случаях можно слушать аудио, скачать через торрент в формате fb2 и присутствует краткое содержание. Жанр: ОС и Сети, на английском языке. Описание произведения, (предисловие) а так же отзывы посетителей доступны на портале библиотеки ЛибКат.
- Название:Windows Server 2012 R2 Storage, Security, & Networking Pocket Consultant
- Автор:
- Жанр:
- Год:неизвестен
- ISBN:нет данных
- Рейтинг книги:3 / 5. Голосов: 1
-
Избранное:Добавить в избранное
- Отзывы:
-
Ваша оценка:
Windows Server 2012 R2 Storage, Security, & Networking Pocket Consultant: краткое содержание, описание и аннотация
Предлагаем к чтению аннотацию, описание, краткое содержание или предисловие (зависит от того, что написал сам автор книги «Windows Server 2012 R2 Storage, Security, & Networking Pocket Consultant»). Если вы не нашли необходимую информацию о книге — напишите в комментариях, мы постараемся отыскать её.
Windows Server 2012 R2 Storage, Security, & Networking Pocket Consultant — читать онлайн бесплатно полную книгу (весь текст) целиком
Ниже представлен текст книги, разбитый по страницам. Система сохранения места последней прочитанной страницы, позволяет с удобством читать онлайн бесплатно книгу «Windows Server 2012 R2 Storage, Security, & Networking Pocket Consultant», без необходимости каждый раз заново искать на чём Вы остановились. Поставьте закладку, и сможете в любой момент перейти на страницу, на которой закончили чтение.
Интервал:
Закладка:
2.On the Select The Server And Path page, shown in Figure 3-13, select the server with which you want to work. Keep in mind that only servers that have the Work Folders role installed are available for selection.
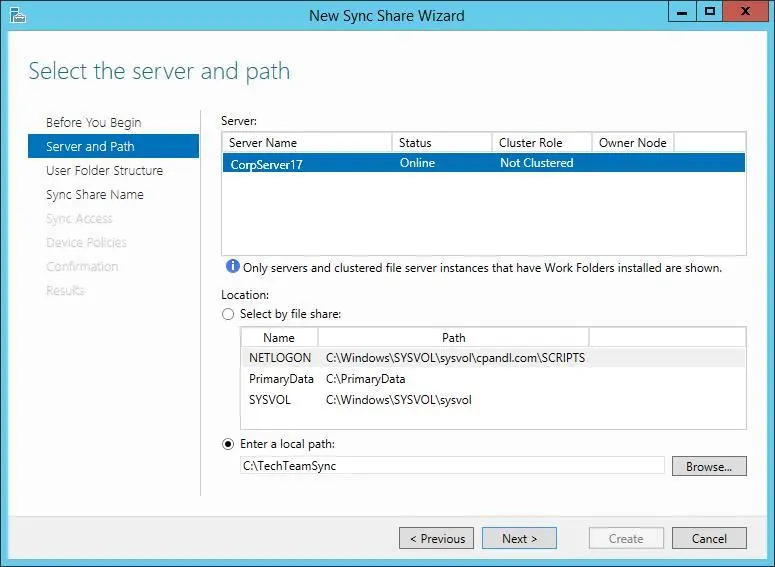
FIGURE 3-13Specify the server and folder to use.
3.When configuring sync shares, you have several options. You can:
■Add syncing to an existing file share by choosing the Select By File Share option, and then selecting the file share that should also be synced.
■Add syncing to an existing local folder by choosing Enter A Local Path, selecting Browse, and then using the Select Folder dialog box to locate and chose the folder to sync.
■Add syncing to a new local folder by choosing Enter A Local Path, and then entering the path to use.
4.When you are ready to continue, tap or click Next. If you specified a new folder location, you are prompted to confirm whether you want to create this folder. Select OK to create the folder and continue.
5.On the Specify The Structure For User Folders page, choose a folder naming format for the subfolders where user data is stored. To use only the user alias portion of the user’s logon name for naming user folders, choose User Alias. To use the full logon name for naming user folders, choose User alias@domain.
6.By default, all folders and files stored under the user folder are synced automatically. If you’d prefer that only a specific folder is synced, select the Sync Only The Following Folder check box, and then enter the name of the folder, such as Documents. Tap or click Next to continue
7.On the Enter The Sync Share Name page, enter a share name and description before tapping or clicking Next to continue.
8.On the Grant Sync Access To Groups page, shown in Figure 3-14, use the options provided to specify the users and groups that should be able to access the sync share. To add a user or group, tap or click Add, and then use the Select User Or Group dialog box to specify the user or group that should have access to the sync share.
SECURITY ALERT Any users and groups you specify will be granted permissions on the base folder that allows the users and groups to create folders and access files in their folders. Specifically, Creator/Owner is granted Full Control on subfolders and files only. The users and groups are granted List Folder/Read Data, Create Folders/Append Data, Traverse Folder/execute File, Read/Write attributes on the base folder. Local System is granted Full Control of the base folder, subfolders, and files. Administrator is granted Read permission on the base folder.
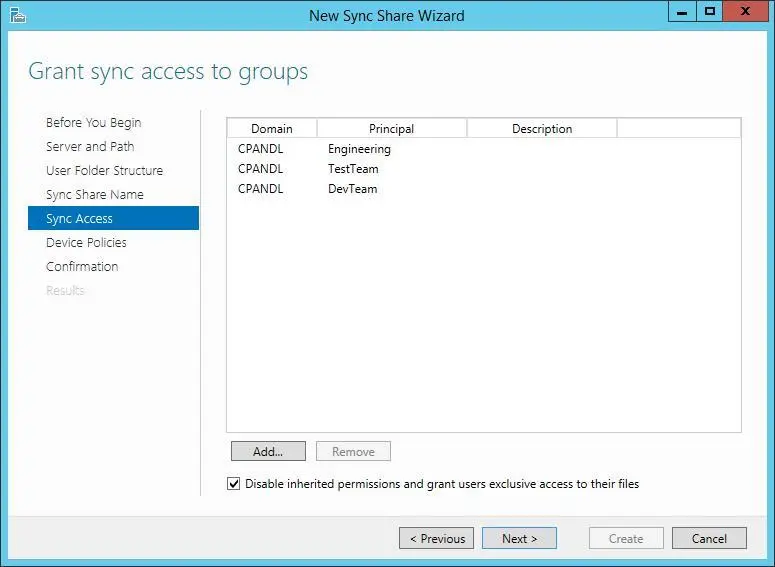
FIGURE 3-14Specify the users and groups that should have access to the sync share.
9.By default, inherited permissions are disabled and users have exclusive access to their user folders. Because of this, only the user who stores a file has access to this file on the share. If the base folder for the share has permissions that you want to be applied to user folders, such as those that would grant administrators access to user folders, clear the Disable Inherited Permissions check box. When you are ready to continue, tap or click Next.
10.On the Specify Device Policies page, you have two options. You can select Encrypt Work Folders to encrypt files in Work Folders on client devices. You can select Automatically Lock Screen And Require A Password to ensure that the screens on client devices lock automatically and require a password for access.
11.Tap or click Next to continue, and then confirm your selections. Select Create to create the sync share. If the wizard is unable to create the sync share, you’ll get an error and will need to note the error and take appropriate corrective action. A common error you might get occurs when the server hosts both Work Folders (which use the hostable web core) and the full Web (IIS) role. Before you can crate sync shares, you’ll need to modify the ports used so they do not conflict or install Work Folders on a server that doesn’t have the full Web (IIS) role.
12.If you did not select an existing file share during set up and want to enable the sync share for SMB access, open File Explorer. In File Explorer, press and hold or right-click the folder, select Share With, and then select Specific People. Finally, configure file sharing as discussed earlier in this chapter.
Accessing Work Folders on clients
Users with a domain user account can access Work Folders from a client device over the Internet or over the corporate network. You can configure Work Folder Access for a user by completing the following steps:
1.In Control Panel, tap or click System And Security, and then select Work Folders. On the Manage Work Folders page, tap or click Set Up Work Folders.
2.On the Enter Your Work Email Address page, enter the user email address, such as amyh@cpandl.com, and then tap or click Next. If the client device is joined to the domain, you will not be prompted for the user’s credentials. Otherwise, you are prompted for the user’s credentials. After the user enters her credentials, you can select Remember My Credentials to store the user’s credentials for future use, and then tap or click OK to continue.
3.On the Introducing Work Folders page, note where the work files for the user will be stored. By default, work files are stored in a user profile subfolder called Work Folders. For example, the work files for Amyh would be stored under %SystemDrive%\Users\Amyh\WorkFolders. To store work files in another location, tap or click Change and then use the options provided to specify a new save location for work files. When you are ready to continue, tap or click Next.
4.On the Security Policies page, review the security policies that will be applied, and then have the user select the I Accept These Policies On My PC check box. You will not be able to continue if you do not select this check box.
5.Select Set Up Work Folders to create Work Folders on the client device.
After you configure Work Folders for initial use on a client device, the user can access Work Folders in File Explorer. When a user opens File Explorer, the This PC node should be opened by default. If so, the user just needs to double-tap or double-click Work Folders to view work files. If a user has an open Explorer window and This PC is not the selected node, she just needs to tap or click the leftmost option button in the address list, and then tap or click This PC.
As the user works with files, the changes the user makes trigger sync actions with the server. If the user doesn’t change any files locally for an extended period of time, the client connects to the server every 10 minutes to determine whether there are changes to sync.

CHAPTER 4: Data security and auditing
■Object management, ownership, and inheritance
■File and folder permissions
■Auditing system resources
■Using, configuring, and managing NTFS disk quotas
Читать дальшеИнтервал:
Закладка:
Похожие книги на «Windows Server 2012 R2 Storage, Security, & Networking Pocket Consultant»
Представляем Вашему вниманию похожие книги на «Windows Server 2012 R2 Storage, Security, & Networking Pocket Consultant» списком для выбора. Мы отобрали схожую по названию и смыслу литературу в надежде предоставить читателям больше вариантов отыскать новые, интересные, ещё непрочитанные произведения.


Обсуждение, отзывы о книге «Windows Server 2012 R2 Storage, Security, & Networking Pocket Consultant» и просто собственные мнения читателей. Оставьте ваши комментарии, напишите, что Вы думаете о произведении, его смысле или главных героях. Укажите что конкретно понравилось, а что нет, и почему Вы так считаете.