Darren Levine - Krav Maga for Beginners
Здесь есть возможность читать онлайн «Darren Levine - Krav Maga for Beginners» весь текст электронной книги совершенно бесплатно (целиком полную версию без сокращений). В некоторых случаях можно слушать аудио, скачать через торрент в формате fb2 и присутствует краткое содержание. Город: Berkeley, CA, Год выпуска: 2008, ISBN: 2008, Издательство: Ulysses Press, Жанр: Спорт, military_arts, на английском языке. Описание произведения, (предисловие) а так же отзывы посетителей доступны на портале библиотеки ЛибКат.
- Название:Krav Maga for Beginners
- Автор:
- Издательство:Ulysses Press
- Жанр:
- Год:2008
- Город:Berkeley, CA
- ISBN:978-1-569-75537-2
- Рейтинг книги:4 / 5. Голосов: 1
-
Избранное:Добавить в избранное
- Отзывы:
-
Ваша оценка:
Krav Maga for Beginners: краткое содержание, описание и аннотация
Предлагаем к чтению аннотацию, описание, краткое содержание или предисловие (зависит от того, что написал сам автор книги «Krav Maga for Beginners»). Если вы не нашли необходимую информацию о книге — напишите в комментариях, мы постараемся отыскать её.
Krav Maga for Beginners
Krav Maga or Beginners
With over 360 step-by-step photos,
makes it easy to learn the world’s most effective self-defense and fighting system:
• Escape Danger • Counterattack
• Neutralize & Defeat
Krav Maga for Beginners — читать онлайн бесплатно полную книгу (весь текст) целиком
Ниже представлен текст книги, разбитый по страницам. Система сохранения места последней прочитанной страницы, позволяет с удобством читать онлайн бесплатно книгу «Krav Maga for Beginners», без необходимости каждый раз заново искать на чём Вы остановились. Поставьте закладку, и сможете в любой момент перейти на страницу, на которой закончили чтение.
Интервал:
Закладка:
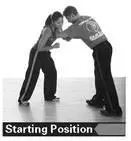
Hand Defense against Knee Strike
ATTACK→ The attacker throws a right knee to the groin, midsection, or face.
IMMEDIATE DANGER→ Being struck. The primary danger is being hit.
SECONDARY DANGERS→ Additional counterattacks, takedowns. Because knees happen in close situations, the attacker is very close to you. If the first knee does damage, you may be open to a number of additional strikes and other attacks.
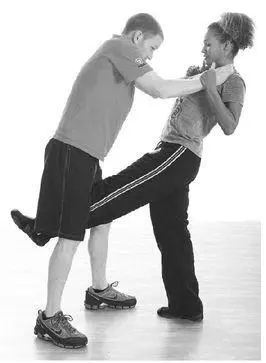
SOLUTION→ Forearm Block (like 360°)
1As the knee rises, make a 360° defense against the middle of the thigh with the arm closest to the attacking limb (generally the left arm). Preferably, you should defend relatively early—the more momentum the knee builds up, the more impact you’ll feel when defending. Be aggressive—attack the leg as it rises, rather than waiting for it.
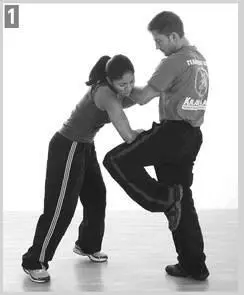
INITIAL COUNTERATTACK→ Punch to the groin (page 75). As you make the defense, strike to the groin with an uppercut punch or open-hand strike.
NEUTRALIZING THE ATTACKER→ After the initial counterstrike, the defender should disengage from any hold the attacker may have, and continue to strike to the body and face. Students must focus on rendering the attacker unwilling or unable to continue the assault.
• make a 360° defense—be sure to follow all the basic 360° principles, including using the blade of your arm and attacking the attack
Won’t this defense hurt my arm?
Only if you think defensively and wait for the knee to reach your arm. Be aggressive and defend the attack before it develops full power.
What if I cannot disengage from his hold?
Continue with counterattacks and prepare to defend again. You’re in an undesirable position, but he is open to attacks if you punch to his groin and midsection.
Defenses against Holds, Grabs, and Chokes
This section deals with chokes, headlocks, and bearhugs from a variety of positions.
Choke from the Front (Two-Handed Pluck)
ATTACK→ This attack happens to the defender’s live side, and the attacker places both hands on the throat. The defender should train from a neutral position. Emphasis must be placed on the defender lifting the attacker’s hands prior to sliding the attacker’s hands outward.
Safety in training note: Do not “punch” the hands into the defender’s throat when training.
IMMEDIATE DANGER→ Thumbs on throat. The primary danger in this attack is the potential of the thumbs crushing the windpipe. Without the thumbs, the attack is much less dangerous.
SECONDARY DANGERS→ Balance, headbutt. In the attack and the subsequent defense, disruption of balance and headbutts (incidental or intentional) are possible. If the defense is performed properly, these peripheral dangers should be mitigated or removed altogether.
SOLUTION→ Two-Handed Pluck
The natural reaction to this attack is to bring the hands to where the danger or pain is. The plucking motion turns this instinct into a defense, which relies on explosiveness (speed), as opposed to strength.
1Create hooks with your hands by bringing your fingers and thumb together tightly and curling them slightly. Bring your hands up and over the attacker’s hands, reaching deep inside at the point where the wrists and thumbs meet, plucking the attacker’s hands up and out. This movement should be explosive from the beginning of the motion. Tuck your chin to guard against an incidental headbutt.
2As the pluck continues parallel to your shoulders, pin the attacker’s hands to your body. While this is not essential to the technique, it limits the attacker’s weapons.

INITIAL COUNTERATTACK Front Kick to Groin (page 92). The front kick to the groin should be delivered as close to simultaneously to the pluck as possible. Not only will this shift the dynamics of the fight faster, but it will also mitigate the chances of an accidental headbutt. Note: Depending on the proximity of the attack, your knee may make contact first, but you should still throw the kick, since it may be difficult to assess the range in the moment.
NEUTRALIZING THE ATTACKERTypical follow-ups to the groin kick are knees, more front kicks, and/or hammerfists to the back of the head, though the situation will always dictate. Regardless of the combatives used, students must focus on rendering the attacker unwilling or unable to continue the assault.
• explosive pluck, deep and at the wrist and thumb
• trap attacking hands to body
• simultaneous front kick to groin
• aggressive, follow-up combatives
• disengage when deemed safe
Why not just kick to the groin?
While it’s important to counterattack quickly, it’s necessary to eliminate the immediate danger first. In this particular case, it’s possible that the kick would cause the attacker to tense and increase the pressure on the choke if the pluck were not employed.
Do I have to pin the attacker’s hands?
While it’s not a must to pin the hands, it will serve to prevent or delay secondary attacks.
Why is the pluck better than other defenses I have seen for this attack?
The pluck is a derivation of a natural movement, so it’s more likely to work under pressure. It will also work regardless of whether the arms are bent or straight, and the same motion will be utilized versus other attacks.
Training Tips:Think of the plucking action and direction like Superman ripping off his shirt. Plucking up and out is a strong action and, if performed explosively, the attacker cannot adjust in the moment.
Give this a try: Have a friend extend her arm out straight. Ask her to resist as you gradually add downward pressure and weight on the arm. Your friend will be able to offer amazing resistance to this gradual increase. Now, ask her to do the same, but this time, and without telling her, explosively slap the arm down with your hand. She will not be able to resist this action. This is the same way the pluck works.
Choke from the Side
ATTACK→ This attack happens to the defender’s side, and the attacker places the hands on the throat and neck. The defender should train from a neutral position. The attacker should simulate a realistic attack, building in intensity as familiarity with the defense increases. One hand is positioned in front of the throat, while the other is placed on the back of the neck.
Читать дальшеИнтервал:
Закладка:
Похожие книги на «Krav Maga for Beginners»
Представляем Вашему вниманию похожие книги на «Krav Maga for Beginners» списком для выбора. Мы отобрали схожую по названию и смыслу литературу в надежде предоставить читателям больше вариантов отыскать новые, интересные, ещё непрочитанные произведения.


Обсуждение, отзывы о книге «Krav Maga for Beginners» и просто собственные мнения читателей. Оставьте ваши комментарии, напишите, что Вы думаете о произведении, его смысле или главных героях. Укажите что конкретно понравилось, а что нет, и почему Вы так считаете.