Darren Levine - Krav Maga for Beginners
Здесь есть возможность читать онлайн «Darren Levine - Krav Maga for Beginners» весь текст электронной книги совершенно бесплатно (целиком полную версию без сокращений). В некоторых случаях можно слушать аудио, скачать через торрент в формате fb2 и присутствует краткое содержание. Город: Berkeley, CA, Год выпуска: 2008, ISBN: 2008, Издательство: Ulysses Press, Жанр: Спорт, military_arts, на английском языке. Описание произведения, (предисловие) а так же отзывы посетителей доступны на портале библиотеки ЛибКат.
- Название:Krav Maga for Beginners
- Автор:
- Издательство:Ulysses Press
- Жанр:
- Год:2008
- Город:Berkeley, CA
- ISBN:978-1-569-75537-2
- Рейтинг книги:4 / 5. Голосов: 1
-
Избранное:Добавить в избранное
- Отзывы:
-
Ваша оценка:
Krav Maga for Beginners: краткое содержание, описание и аннотация
Предлагаем к чтению аннотацию, описание, краткое содержание или предисловие (зависит от того, что написал сам автор книги «Krav Maga for Beginners»). Если вы не нашли необходимую информацию о книге — напишите в комментариях, мы постараемся отыскать её.
Krav Maga for Beginners
Krav Maga or Beginners
With over 360 step-by-step photos,
makes it easy to learn the world’s most effective self-defense and fighting system:
• Escape Danger • Counterattack
• Neutralize & Defeat
Krav Maga for Beginners — читать онлайн бесплатно полную книгу (весь текст) целиком
Ниже представлен текст книги, разбитый по страницам. Система сохранения места последней прочитанной страницы, позволяет с удобством читать онлайн бесплатно книгу «Krav Maga for Beginners», без необходимости каждый раз заново искать на чём Вы остановились. Поставьте закладку, и сможете в любой момент перейти на страницу, на которой закончили чтение.
Интервал:
Закладка:
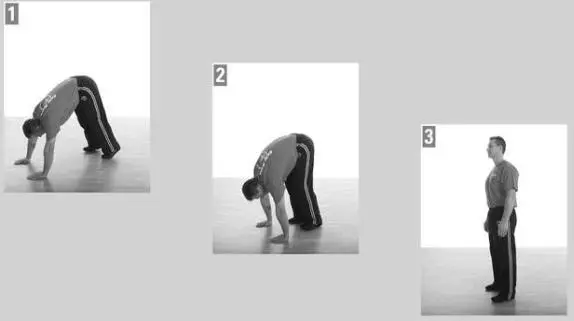
1Jump your feet back.
2Slowly allow your waist to sink to the floor and look up, keeping your shoulders back and down.
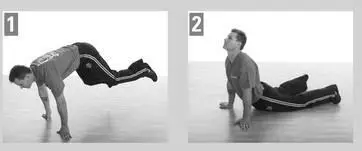
If you practice yoga, you’ll recognize this as Downward-facing Dog.

Starting Position:The bottom of the takedown defense.
1Shift your hips up and back, turn your fingers forward, and spread your fingers wide. Press into the floor as you drive your shoulders away from your ears. Push your hips up and back while pressing your hands into the floor. Pull your chest toward your thighs and glide your hips back (as in downward-facing dog position). Take a beat here to feel the stretch. Maintain a long spine from your tailbone to the top of your head.
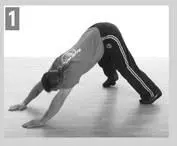
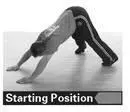
Starting Position:The extended Bull Post.
1Baby-step your hands back toward your feet while feeling the stretch in the backs of your legs and calves.
2-3Once you’ve reached your stretch limit, slightly bend your knees and slowly rise up one bit at a time to a standing position.
Conditioning for Krav Maga
The muscular and cardiovascular conditioning program Krav-FIT is designed to develop a beginning student’s overall fitness level as well as provide “hidden repetition” on basic movement patterns that are necessary for training for the fight. A normal workout will involve the following: warm-up (10 to 15 minutes), alignment postures (5 minutes), circuit training (such as Krav-FIT workout; 15 to 25 minutes), and cool-down with alignment postures and a focus on controlling your breathing.
Before starting your daily training in Krav Maga, it’s important to give the body a reference point for muscle length and alignment. The alignment postures, when done correctly, do just that and have the added benefit of correcting common spinal misalignments. We recommend that you do the alignment postures in front of a mirror for visual feedback. This will help you recognize misalignments or collapsing of the spine.
The muscular conditioning program aims to develop strength and muscular endurance that’s vital to your progress in Krav Maga training. It’s important to use proper form to avoid injury, so be sure to read the instructions carefully. To work out at home, it’s recommended that you purchase exercise tubing, an exercise mat, and a Jungle Gym (the latter is available at www.monkeybargym.com). A stop watch may also come in handy.
This program can be done as a supplement to your Krav Maga skills training or on opposite days depending on time and energy level. Warriors have been doing this type of muscular (bodyweight) conditioning for centuries—it’s time to wake up your warrior and get Krav-FIT.
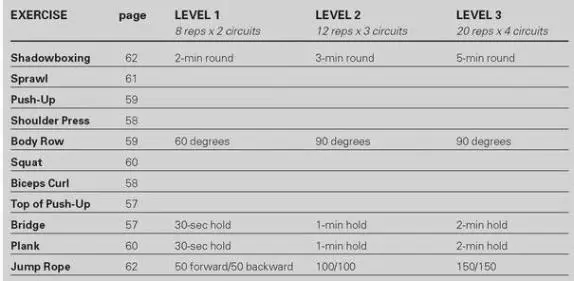
Here is the basic Krav-FIT (Function Interval Training) workout, which should only be done once you’ve warmed up with the Krav Maga Warm-Up (see pages 37-53). Start with Level 1. Your goal is to always perform the prescribed number of repetitions with correct form, completing the entire circuit before resting. If you’re just starting out, it’s ok to rest as needed. Otherwise, try to keep moving. Once you’ve done Level 1 for a few weeks and need more of a challenge, progress to Level 2.
Follow these simple guidelines: 1) Krav-FIT Rule #1: Clean what you catch. In other words, finish what you start. If, for example, you start at Level 3 with 20 reps per exercise, you keep that number of reps for the complete circuit. 2) Circuit-Repeat as Fast as Possible (AFAP) .
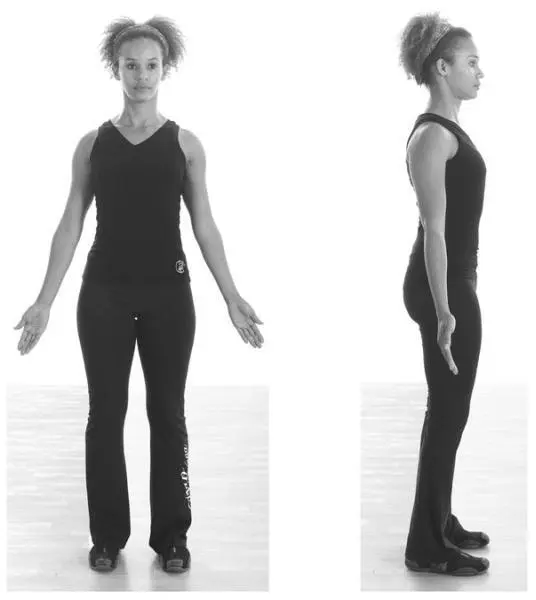
Standing Alignment
The Position:Stand tall with your feet shoulder-width apart. Point your feet straight ahead and place your weight evenly on both feet, front to back and side to side. Soften your knees and work your shins slightly forward. Keep your hands open wide and reach down toward your knees with your palms facing forward.
Open your chest and lengthen your entire spine. Think open and extend.
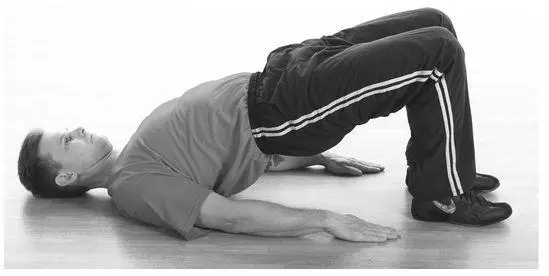
Bridge
The Position:Lie on your back with your knees bent and your feet close to your butt. Place your arms down by your sides. Press your feet and the backs of your arms evenly into the floor, causing your butt to lift. Open your chest, push your shins slightly forward, and hold the bridge.
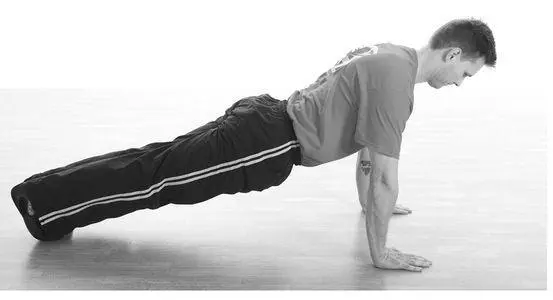
Top of Push-Up
The Position:Get in a push-up position, placing your hands directly under your shoulders, extending your legs behind you, and balancing on the balls of your feet. Place even pressure in the palms of each hand and extend your fingers. Your elbows should be extended but not locked, and the insides of your elbows should face each other. Extend your spine from the tailbone to the top of your head; do not allow your upper or lower back to sag. Your spine should be in alignment from the top of your head to your heels.
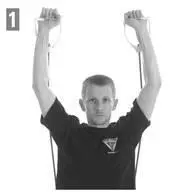
Shoulder Press

Starting Position:Assume Standing Alignment posture (page 56). Step on the band with one foot, making sure it sits in your arch. Clean the band to your shoulders.
1Keeping your midsection tight, Keeping your midsection tight, your chest lifted, and your shoulders down, extend your arms overhead. Keep your knees soft and your shins forward with your weight even on both feet. Take care not to bend backward, which puts stress on the low back.
Return to starting position.
Biceps Curl
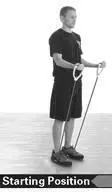
Starting Position:Assume Standing Alignment posture (page 56). Step on the band with both feet, making sure it sits in your arches. Keeping your elbows in, bring the band to waist height; your forearms should be parallel to the floor.
Читать дальшеИнтервал:
Закладка:
Похожие книги на «Krav Maga for Beginners»
Представляем Вашему вниманию похожие книги на «Krav Maga for Beginners» списком для выбора. Мы отобрали схожую по названию и смыслу литературу в надежде предоставить читателям больше вариантов отыскать новые, интересные, ещё непрочитанные произведения.


Обсуждение, отзывы о книге «Krav Maga for Beginners» и просто собственные мнения читателей. Оставьте ваши комментарии, напишите, что Вы думаете о произведении, его смысле или главных героях. Укажите что конкретно понравилось, а что нет, и почему Вы так считаете.