7. Let the seeds germinate in darkness or low light, waiting until they sprout before placing them under full light.
Water seedlings daily if necessary to keep the soil damp. Only wet the top inch or so of soil but do not let the soil medium dry out. Use a spray bottle type to mist the seedlings when they sprout to prevent water from knocking over the tender plants. If the seedlings do fall over, don’t lift them up or stake them upright. They will stand again on their own after a few days of lying down.
After a month or so, when the soil-borne nutrition is all used up by the growing plants, begin adding fertilizer at about half strength. I feed my vegetating plants about every two weeks. For more information on fertilizing, see chapter 3.
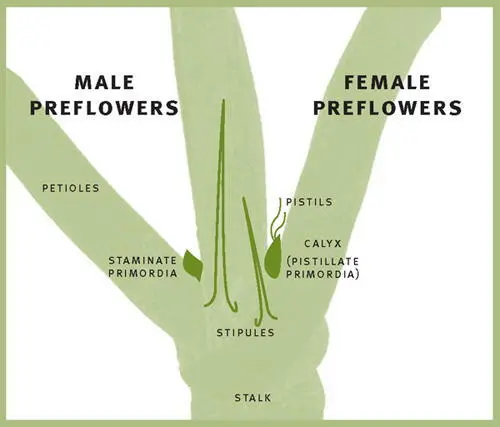
After one to two months of vegetative growth, when cannabis plants are about 1’ tall, they can be placed in the budding room under 12 hours of light per day. Within two weeks the male flower pods first appear at the trunk of the male plants, usually where a branch is growing. A female plant will show similar shaped flower pods on the main stem but these flower pods quickly develop white pistils (hairs) that do not appear on males. The 1 mm to 2 mm round flower pods of male plants will sometimes resemble a female flower for a brief time, showing two protruding spear-shaped leaves that look like flower pistils, but by the time they are one month old, none of the male seed pods show clusters of white pistils like female flowers do. If left unattended the male plants will form clusters of tiny white or yellow flowers that eventually release a pollen that fertilizes the white female flower pistils to create seeds and propagate the species. When that happens the female plant spends all of its energy producing seeds and produces very little smokable bud. To avoid the complications of sexing your plants, you can sometimes buy feminized seeds that are the result of fertilizing a female plant with a hermaphrodite male. The resultant seeds from a feminized plant are purely female but are not reliable for breeding because of their tendency to produce hermaphrodites. For more on breeding, see chapter 4.

Female flowers develop clusters of white pistils (hairs) that protrude from their seed pods
The simplest way to start your garden is with cannabis seeds, but once your garden is under way, plant clones are essential to keep your marijuana garden rotating from crop to crop with the least amount of cost and effort. Here is a step-by-step method for cloning. It is simple and consistent. You’ll need:
• sterilized soil
• one-gallon plastic or clay plant containers (about 8” wide and 8” deep)
• bottle of Rootone or equivalent root growth stimulant
• sterilized razor blade
To start cloning,
1. Prepare containers by filling them with soil.
2. Select a cutting. You want a healthy piece, not some scraggly piece. Slice it off at a 45 degree angle with a razor blade.
3. Remove the leaves and small side branches from the base of the cutting using the razor blade, leaving a nice cluster of leaves at the top of the cut.
4. Dip the cut end in rooting solution and shake off the excess powder or gel.
5. Make a hole in the prepared soil; make the hole wider than the plant’s stem so the rooting hormone won’t be scraped off.
6. Place the cutting into the hole and gently pack the medium around it.
7. Using plain water, soak the cuttings in the soil.
8. Place cuttings under low light until roots develop.
There’s really no need to prepare extra clones for insurance, as I find that well over 98 percent of my healthy cuttings survive the cloning process.
Basic Care During Vegetative Growth
Vegetative growth is the time prior to flowering when a plant grows its leaves and branches. This phase lasts approximately two months and requires 18 to 24 hours of light per day. A healthy vegetating plant will be dark green. The stems will be thick, and the plant will stand upright in a typical Christmas tree shape. The branches will be rubbery and strong, and the leaves will not tear easily.
Cuttings do not require plant food/fertilizer until their roots develop about three to four weeks after being planted, and you should use a weak mix for the first feeding. I never exceed a reading of 8 on my salts meter when mixing fertilizer for my young cuttings. If the young plants react well to the fertilizer, keep feeding them approximately every two weeks. You’ll have to determine what the best schedule is for your own plants, which might be different from mine based on your growing climate, the porosity of the soil mix, and the vigor of the cannabis strain you choose. Choose a fertilizer high in nitrogen, also known as vegetative formula, for this phase of leafy growth.
A vegetating plant does not mind if you turn the lights off for a few hours. As long as there are at least 18 hours of light per session, the plant will experience vigorous growth. If lights are accidentally left off for a few hours or even days, there is no lasting harm to a vegetating cannabis plant. If heat buildup becomes a problem in the grow room during vegetative plant growth, turn the lights off for six hours per day and begin an 18-hour-per-day growth regimen that will allow the room to cool down during the off-light cycle. Don’t worry about triggering your vegetating plants into budding when turning the light cycle down to 18-hour days. It takes at least two weeks of 12 hours of light per day to trigger a vegetative plant into blooming.
Water vegetative plants twice a week or more often if needed with pure water from your water container. Let tap water stand in the container for a day before using it to water the plants. This will allow the chlorine in the water to evaporate. Chlorinated tap water won’t really hurt your plants, but it is better to let the chlorine escape and to let the water reach room temperature before using it on the plants. Very cold water can shock the plant and stunt growth.
Trimming during the vegetative state is good for making bushy plants, but never trim a plant once it is budding and in flower. When your plants have reached the end of their vegetative growth period, take a cutting from each plant before transplanting it and moving it to the budding room. This keeps your garden stocked with new plants as needed.
Transplanting Seedlings and Clones
When the cuttings or seedlings have completed the vegetative stage and are about two months old and two feet tall, they are ready to be transplanted and moved to the budding room. You’ll need:
• five-gallon planting containers with ¼” drainage holes in the bottom.
• lava rock or commercially sterilized gravel
• Pro-Mix or another commercial growing medium, preferably soilless
• water or a mild quarter-strength bloom fertilizer formula
After you have the materials,
1. Prepare the receptor plant pot so that it is half full of soilless mix.
2. Position your donor plant pot directly over the receptor plant pot.
3. Place a finger on either side of the seedling or clone’s main stem and turn the donor pot upside down. The seedling or clone should easily slip out into your hand. If the donor plant does not easily slip out of a plastic pot, squeeze all around the pot to break the seal of the soil against the sides of the container and then try again. For a clay pot turn it upside down and tap the sides and bottom with a rubber mallet until the donor plant slides out into your palm or receptor pot.
Читать дальше


