Artist Farit - 3D drawing. Tutorial 3D drawing
Здесь есть возможность читать онлайн «Artist Farit - 3D drawing. Tutorial 3D drawing» — ознакомительный отрывок электронной книги совершенно бесплатно, а после прочтения отрывка купить полную версию. В некоторых случаях можно слушать аудио, скачать через торрент в формате fb2 и присутствует краткое содержание. ISBN: , Жанр: Хобби и ремесла, Руководства, Детская образовательная литература, на английском языке. Описание произведения, (предисловие) а так же отзывы посетителей доступны на портале библиотеки ЛибКат.
- Название:3D drawing. Tutorial 3D drawing
- Автор:
- Жанр:
- Год:неизвестен
- ISBN:9785449846464
- Рейтинг книги:5 / 5. Голосов: 1
-
Избранное:Добавить в избранное
- Отзывы:
-
Ваша оценка:
3D drawing. Tutorial 3D drawing: краткое содержание, описание и аннотация
Предлагаем к чтению аннотацию, описание, краткое содержание или предисловие (зависит от того, что написал сам автор книги «3D drawing. Tutorial 3D drawing»). Если вы не нашли необходимую информацию о книге — напишите в комментариях, мы постараемся отыскать её.
3D drawing. Tutorial 3D drawing — читать онлайн ознакомительный отрывок
Ниже представлен текст книги, разбитый по страницам. Система сохранения места последней прочитанной страницы, позволяет с удобством читать онлайн бесплатно книгу «3D drawing. Tutorial 3D drawing», без необходимости каждый раз заново искать на чём Вы остановились. Поставьте закладку, и сможете в любой момент перейти на страницу, на которой закончили чтение.
Интервал:
Закладка:
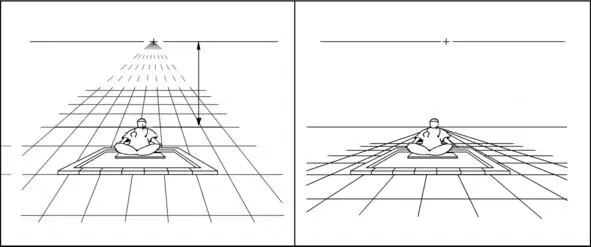
In the left picture.
Original drawing with non-coincident horizons of the site and drawing. In the right picture.
The original drawing of the pool is left, while a new platform is drawn, the horizon of which coincides with the horizon of the pool. The photograph on which this drawing was drawn looked something like this. A pool with its horizon coinciding with the horizon of the site looks more correct. In my humble opinion.
The discrepancy between the real horizon and the horizon in the figure can sometimes be understood. Example: An artist paints a hole (pit, mainsail) in asphalt. In hole, the artist draws his own, separate horizon of the picture, different from the real horizon of the site. This kind of dips (grottoes) with its own horizon, a very common and popular form of 3D drawing.

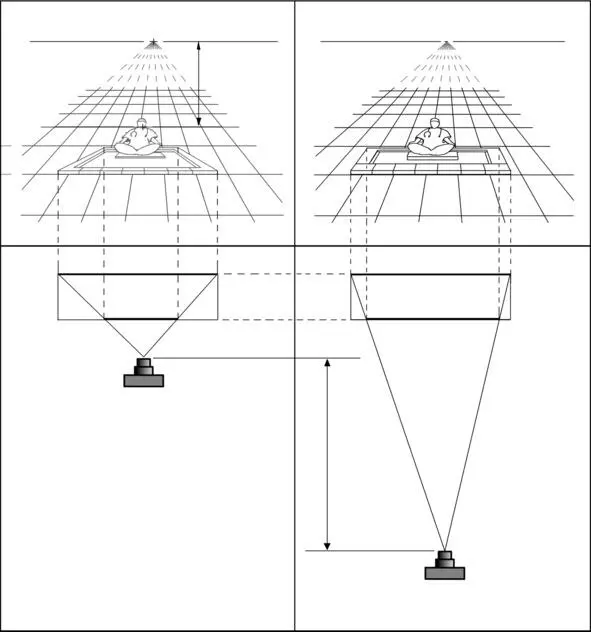
In the left picture is the original.
In the right picture.
A possible version of the picture with a dip (pit) in the plates. In a dip, behind a person’s back, one can see his own horizon of this drawing. The pool is located in a dip, very peculiar. The pool side closest to us lies at the site level, and the far (rear) side of the pool lie well below the site level.
If there is no second artificial horizon in the drawing, the perspective of the drawing should be oriented to the real horizon. Then the picture will not look strange in terms of the laws of perspective.
But this is not the only mistake in the perspective of this picture.
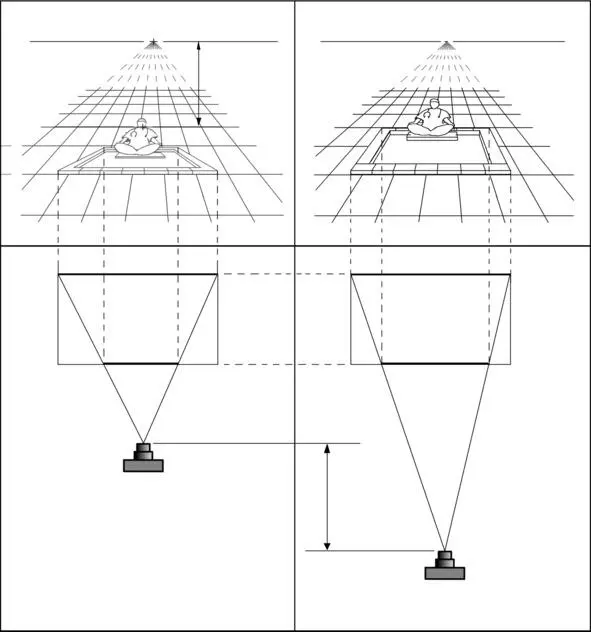
In the left picture.
The distance of taking a preliminary photograph of the pool. The distance from which the pool was photographed is small. You can understand this by comparing the sizes of the near (front) and far (rear) sides of the pool in the photo. The larger on photograph the difference in the length of the front and rear sides of the pool, the smaller the distance from which the pool was photographed.
In the right picture.
The distance the picture was taken. The distance from which they look at the picture more. You can understand this by comparing the sizes of the near (front) and far (rear) sides of the pool in the photo. The smaller the difference in the length of the front and rear sides of the pool, the more the pool was photographed from a greater distance.
If you draw a pool (in the right picture) less in the depth of the picture, as deep as in the original picture, the difference in the distances to the camera will increase even more.
Never point out errors
if you don’t know how to fix them.
Bernard ShowFollowing the advice of Bernard Shaw.
I point out errors, knowing how to fix them, or how to prevent such mistakes.
How to correctly build the perspective of such drawings, step by step, and will be available in one of the next books of this course. Or in one of the lessons on my Patreon page.
https://www.patreon.com/ArtistFarit
In the chapter or exercise “Parallelepipeds’.
These were drawings with obvious errors in the perspective, which, I hope, can be seen by all, or most viewers, most beginners and experienced artists.
Further there will be less noticeable errors in building the perspective of the picture. I deliberately did not draw the details of these drawings, so that it was harder to recognize. In order not to offend the artists who made these mistakes. These are very talented artists, I have not yet learned how to draw like them.
But I saved the distortion of perspective in the form in which the original drawings had them.
Next example
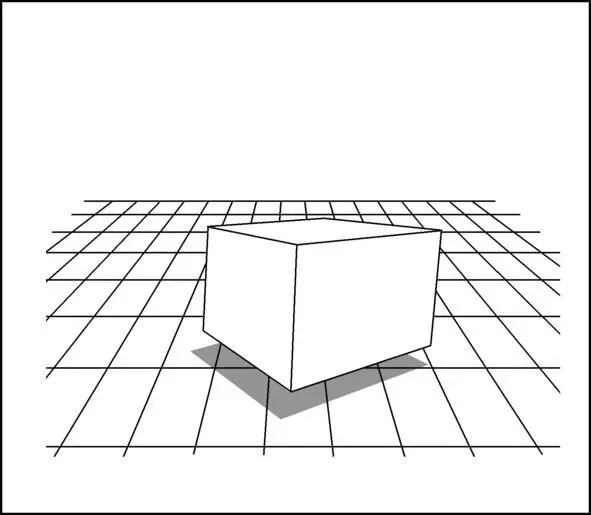
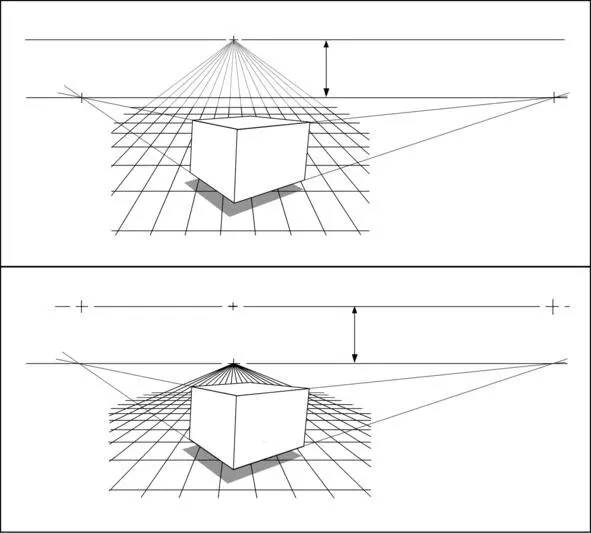
Many may say that this cube is drawn correctly. In my humble opinion, this cube is drawn from a photograph. The horizon of the photograph on which this cube was drawn is much lower than the horizon of the platform on which this drawing is drawn. Therefore, I get the impression that the cube is very distorted. In my humble opinion, a preliminary photograph of this cube was taken from a lower point, and from a closer distance than the viewer looks at this picture. Therefore, the top face of the cube, I see not parallel to the floor surface. In my opinion, the top face of the cube is strongly inclined from the viewer.
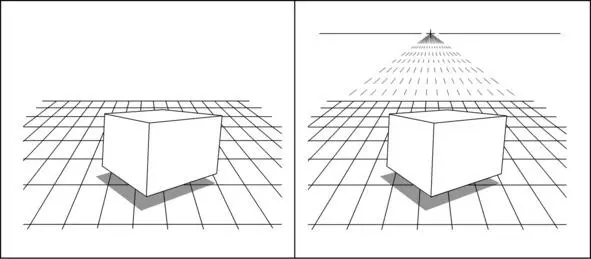
To prove my point, a rectangular tile on the floor in this room helps me. We continue the seams of the rectangular tiles, and find the horizon of this site.
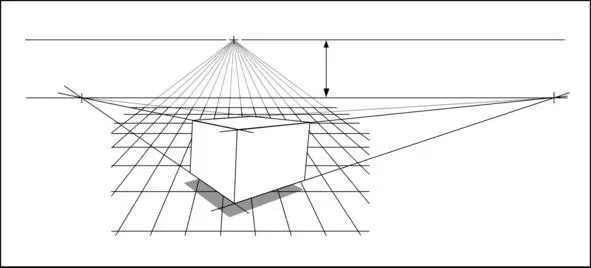
Now we find the horizon of the original photograph of the cube from which this drawing was made. The horizon of the cube (parallelepiped) can be found by continuing the horizontal sides of the cube if these sides are on the surface of the site or parallel to the surface of the site. Continue the horizontal sides of the cube until they intersect with each other. The continuation of the horizontal sides of the cube intersects at the horizon line of the photograph with which the cube was drawn. As you can see the horizon of the site and the horizon of the photo of the cube do much not coincide.
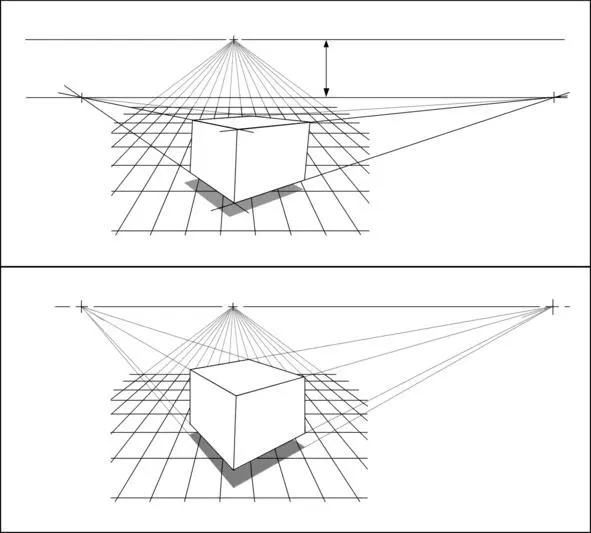
The top picture is the original.
In the bottom picture.
The cube is drawn so that its horizon coincides with the horizon of the site. In this case, the top face of the cube looks parallel to the floor surface of the room. Something like this should look like a cube drawn according to the laws of perspective (geometry), and not according to a photograph. Try to quickly look from the top picture to the bottom picture. Distortion of perspective becomes apparent. In any case, I can see.
The top picture is the original.
In the bottom picture.
The original cube is left, but a new area is drawn with the horizon matching the horizon of the cube. This is what the photograph used to draw this cube looked like.
There remains one POSSIBLE “mistake” – the mismatch between the distance from which the cube was photographed and the distance from which the viewer looks at the picture. That is why I have the impression that the near corner of the base of the cube is not straight, but sharp. Such a “mistake” can be obtained because the cube was photographed from a closer distance than the viewer looks at the drawing of the cube.
This possible “mistake” could be easily verified if the seams of the rectangular tile were parallel to one of the sides of the base of the cube. But in this figure, the seams of the tile are not parallel to the sides of the base of the cube, and it is not possible to check this possible error. Also, this possible “mistake” could be checked if the plates on the floor were square, but the plates on the floor of this room were not square, but rectangular.
Читать дальшеИнтервал:
Закладка:
Похожие книги на «3D drawing. Tutorial 3D drawing»
Представляем Вашему вниманию похожие книги на «3D drawing. Tutorial 3D drawing» списком для выбора. Мы отобрали схожую по названию и смыслу литературу в надежде предоставить читателям больше вариантов отыскать новые, интересные, ещё непрочитанные произведения.


Обсуждение, отзывы о книге «3D drawing. Tutorial 3D drawing» и просто собственные мнения читателей. Оставьте ваши комментарии, напишите, что Вы думаете о произведении, его смысле или главных героях. Укажите что конкретно понравилось, а что нет, и почему Вы так считаете.